¶ Nginx Proxy Manager: Reverse Proxy
Nginx-Proxy-Manager is an open-source reverse proxy used to redirect website traffic to the appropriate place. Using Nginx-Proxy-Manager allows you to use one public IP address to host many different web services. You can find more information about Nginx-Proxy-Manager from the links below:
- NginxProxyManager.com
- NginxProxyManager / nginx-proxy-manager on Github
- jc21/nginx-proxy-manager on Docker Hub
¶ Introduction
Nginx-Proxy-Manager makes it very easy to run multiple websites off of one public IP address. You could easily run 50 websites on one computer using Nginx-Proxy-Manager. This eliminates the need to expose a port for each of your web services, and if you do need to do some port forwarding or domain redirects that is all possible inside of the admin UI (you may need to edit your compose to expose ports you want to add). Nginx-Proxy-Manager is the best reverse proxy we have found for our workflow and doesn't require a ton of editing code or configurations of v-hosts in order to get a website up and running.
There are many things that go into getting a website running and we will not be covering it all here. You must figure out how to get your domain to point to your Nginx-Proxy-Manger server (here's a hint, your A record is your public IP address. Your firewall or router needs to redirect traffic on ports 80 & 443 to the host running Nginx-Proxy-Manager.) We have an advanced course available at TrueFreedomTech.com that goes into far more depth and will show you all aspects of getting your first domain name pointed to your servers, we will also show you more advanced configurations such as separating data from compute, deploying with git, and more.
For this guide, we will be covering how to run Nginx-Proxy-Manager using Docker, Docker-compose, and Portainer. This is strictly how to set up the proxy, for more information regarding how to use Nginx-Proxy-Manager please refer to the main website Here.
¶ Overview
We are going to assume you already have a working server with Docker, and Portainer running. We will go over creating the Nginx-public network in Portainer, the compose for the stack, and configuring Nginx-Proxy-Manager.
¶ Nginx-Public Network
We need to create an overlay network in docker that we will attach all our containers to. This is essential in order to use our method for hosting.
Open up Portainer and log in. If you are not familiar with Portainer here are the official docs:
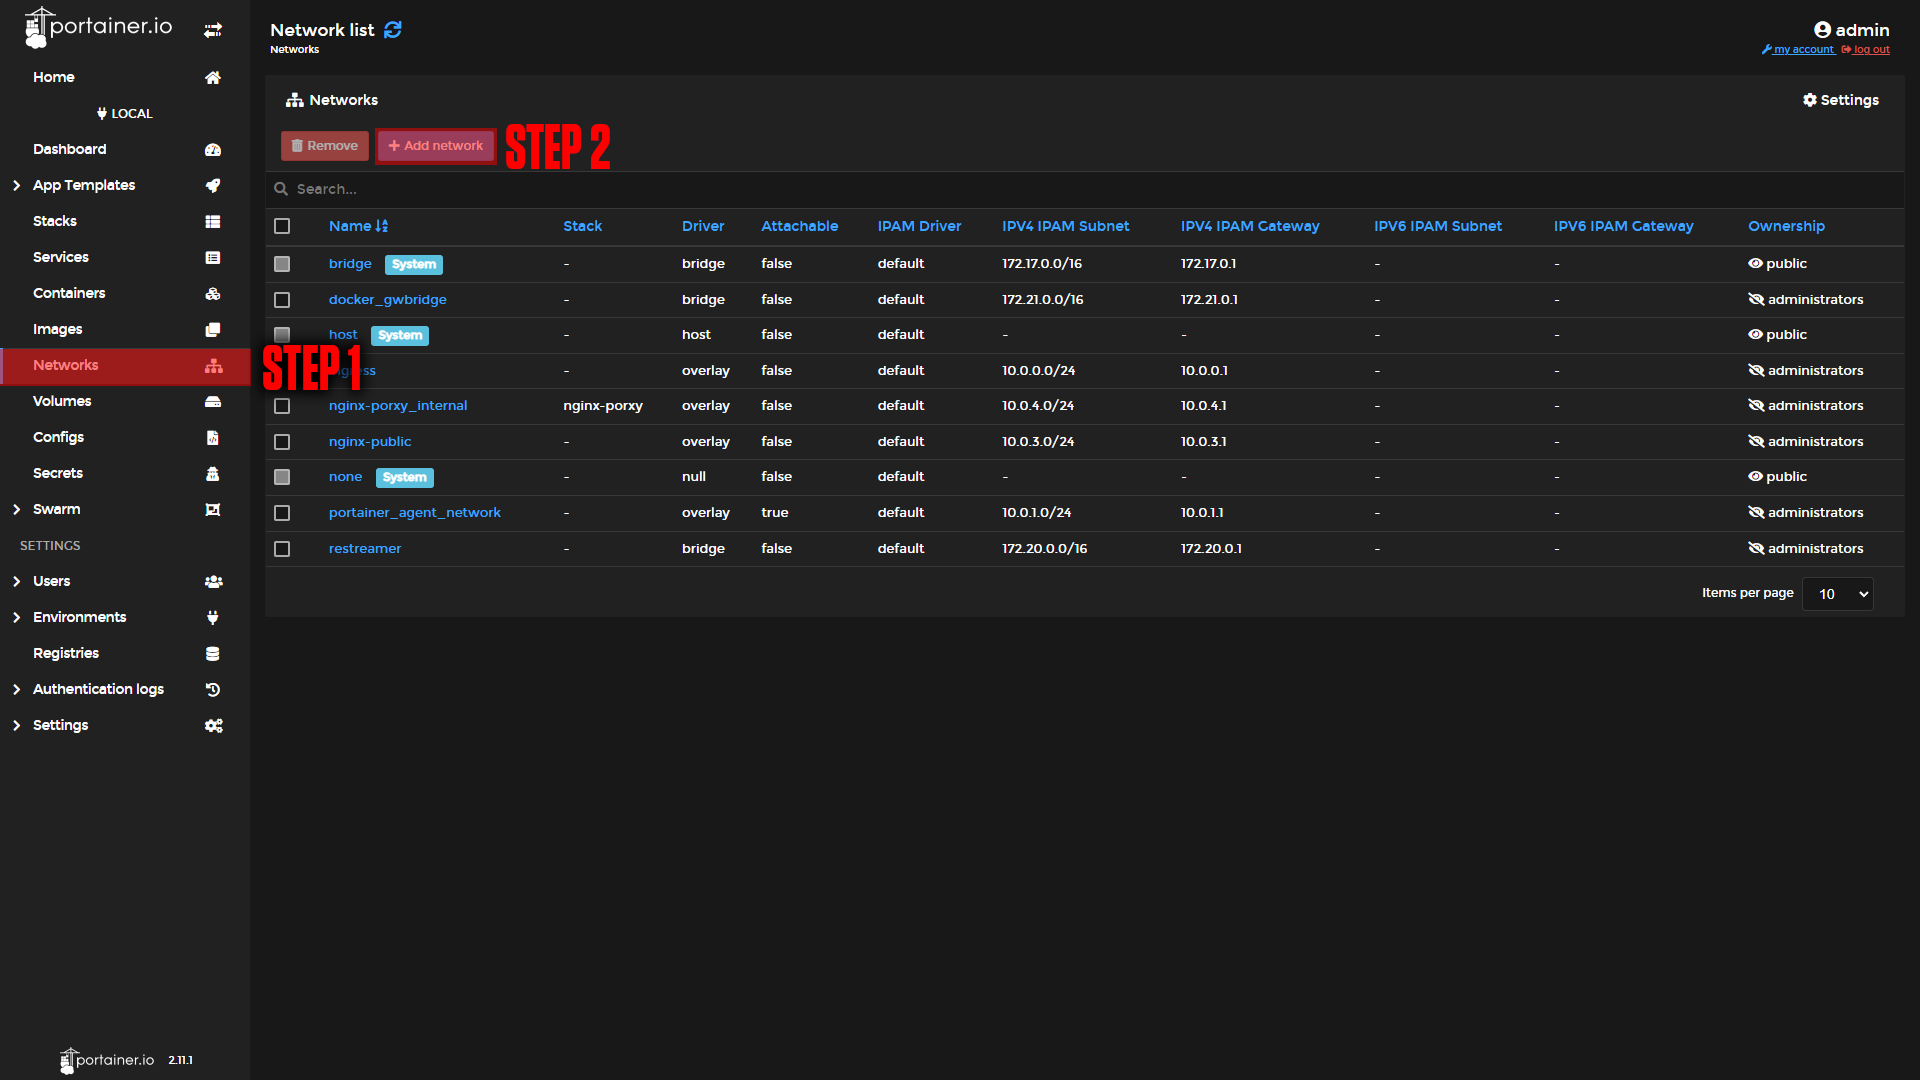
Step 1: Click the Networks Tab.
Step 2: Click Add Network.
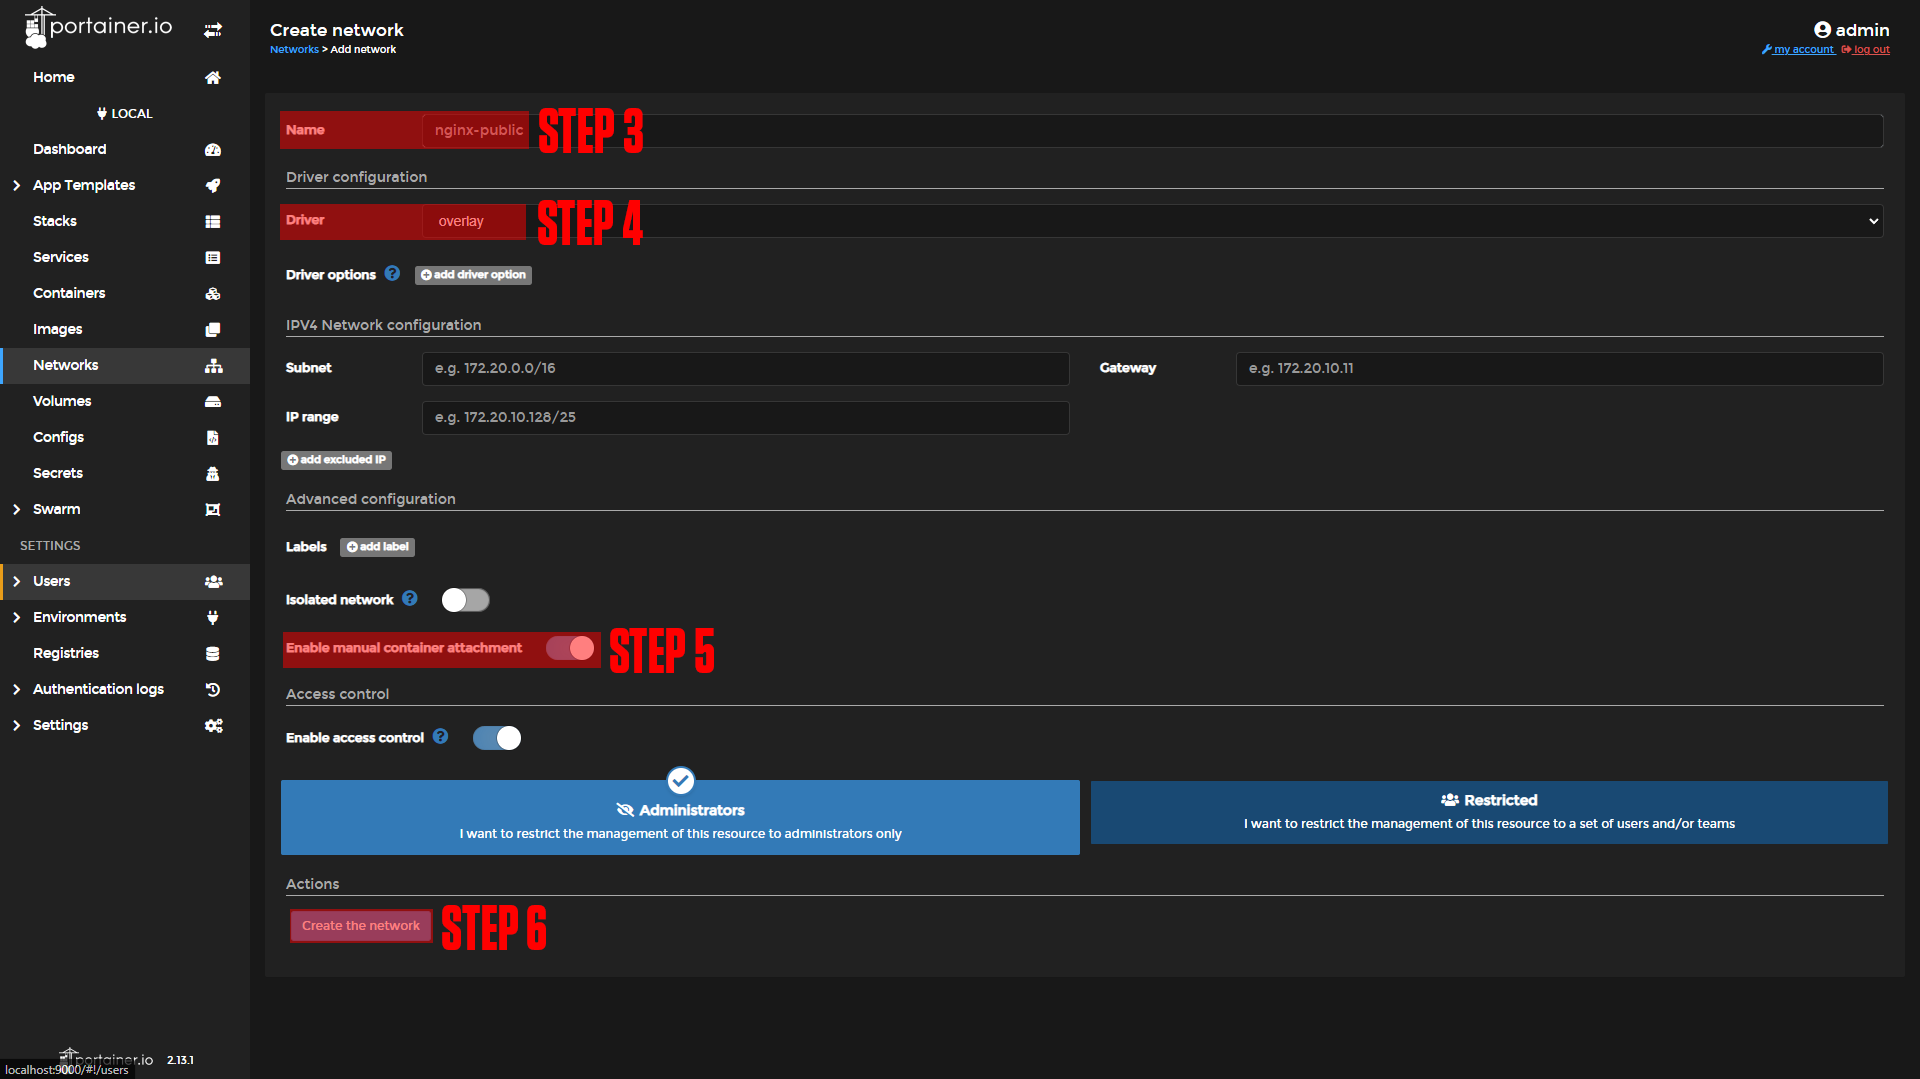
Step 3: name your network (nginx-public is the default that all of our stacks use).
Step 4: Choose the "Overlay" Option.
Step 5: Enable Manual Container Attachment.
Step 6: Click Create the Network.
(You may need to run docker swarm init if you are not able to create an overlay network.
|
|
¶ Docker-Compose
The next step is our Docker-Compose. We will be deploying this with Portainer.
If you are not familiar with Portainer or Docker-Compose here are the official docs:
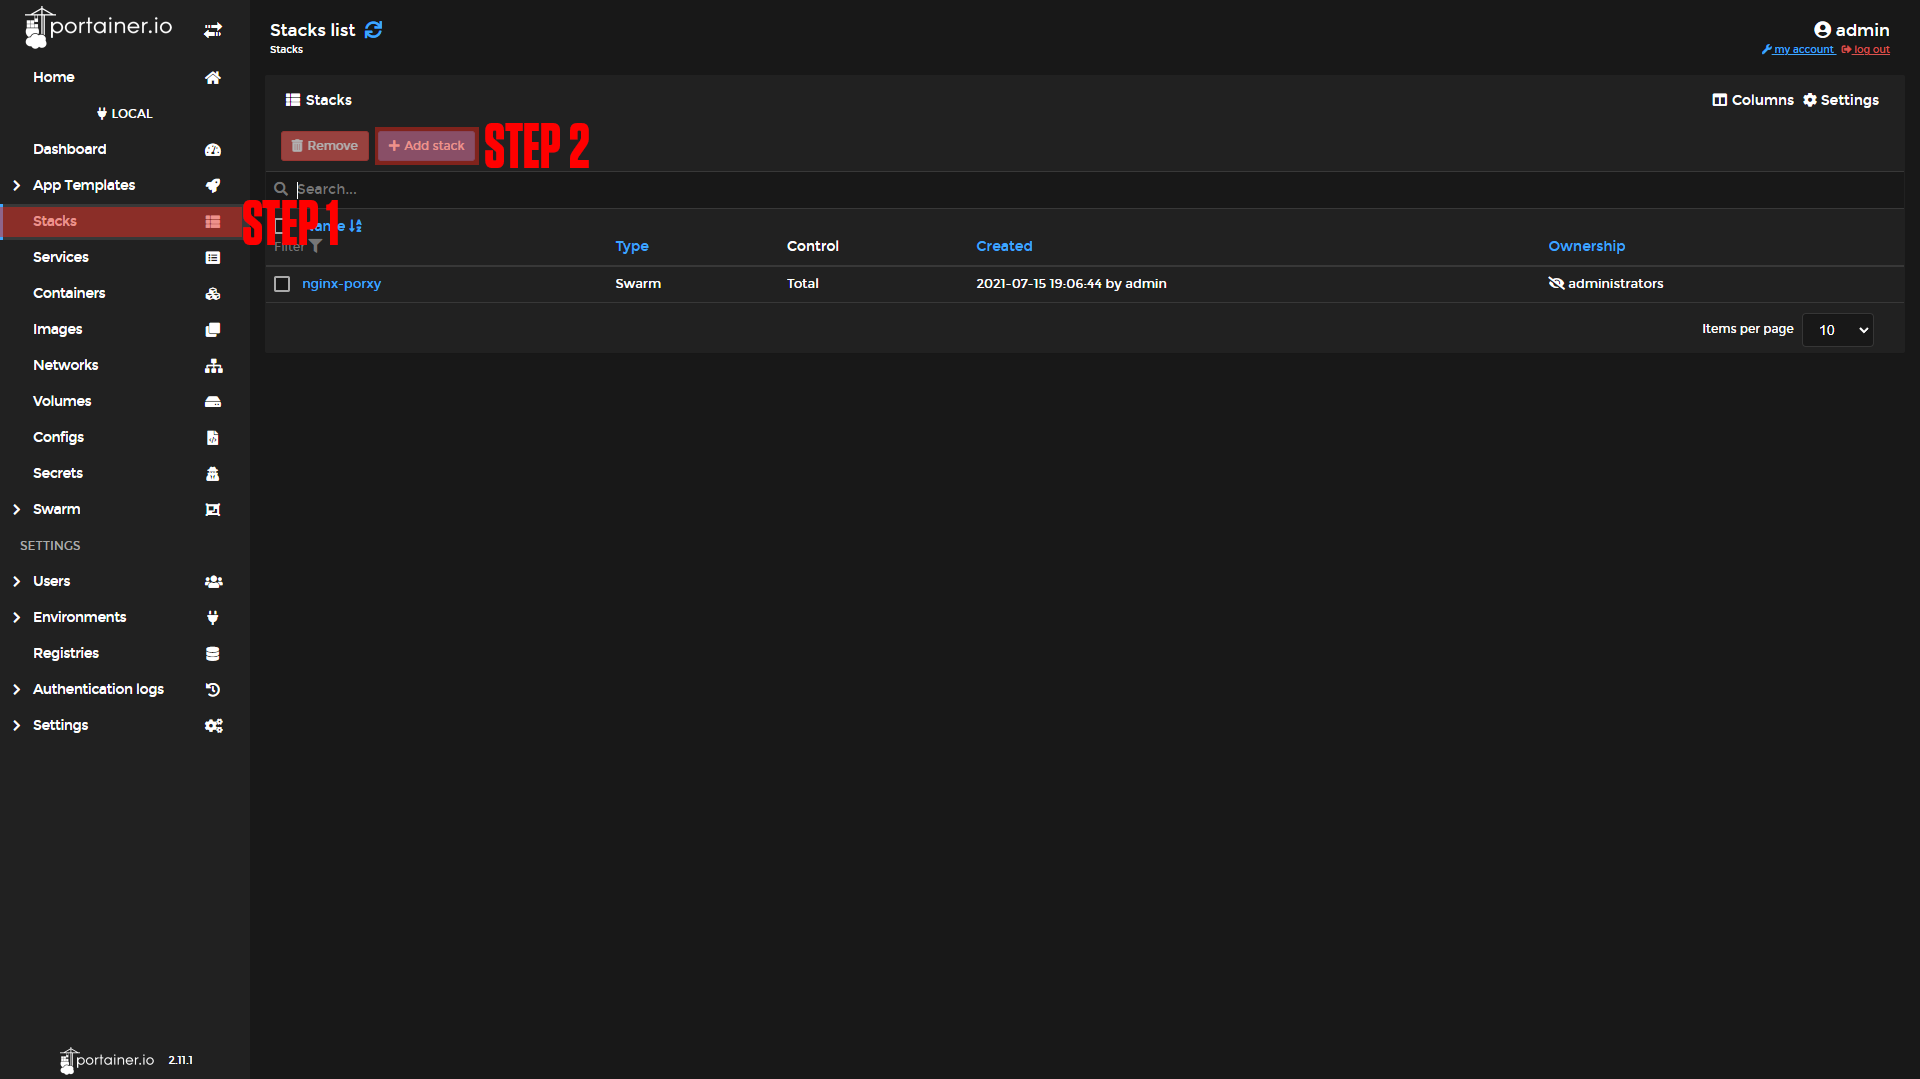
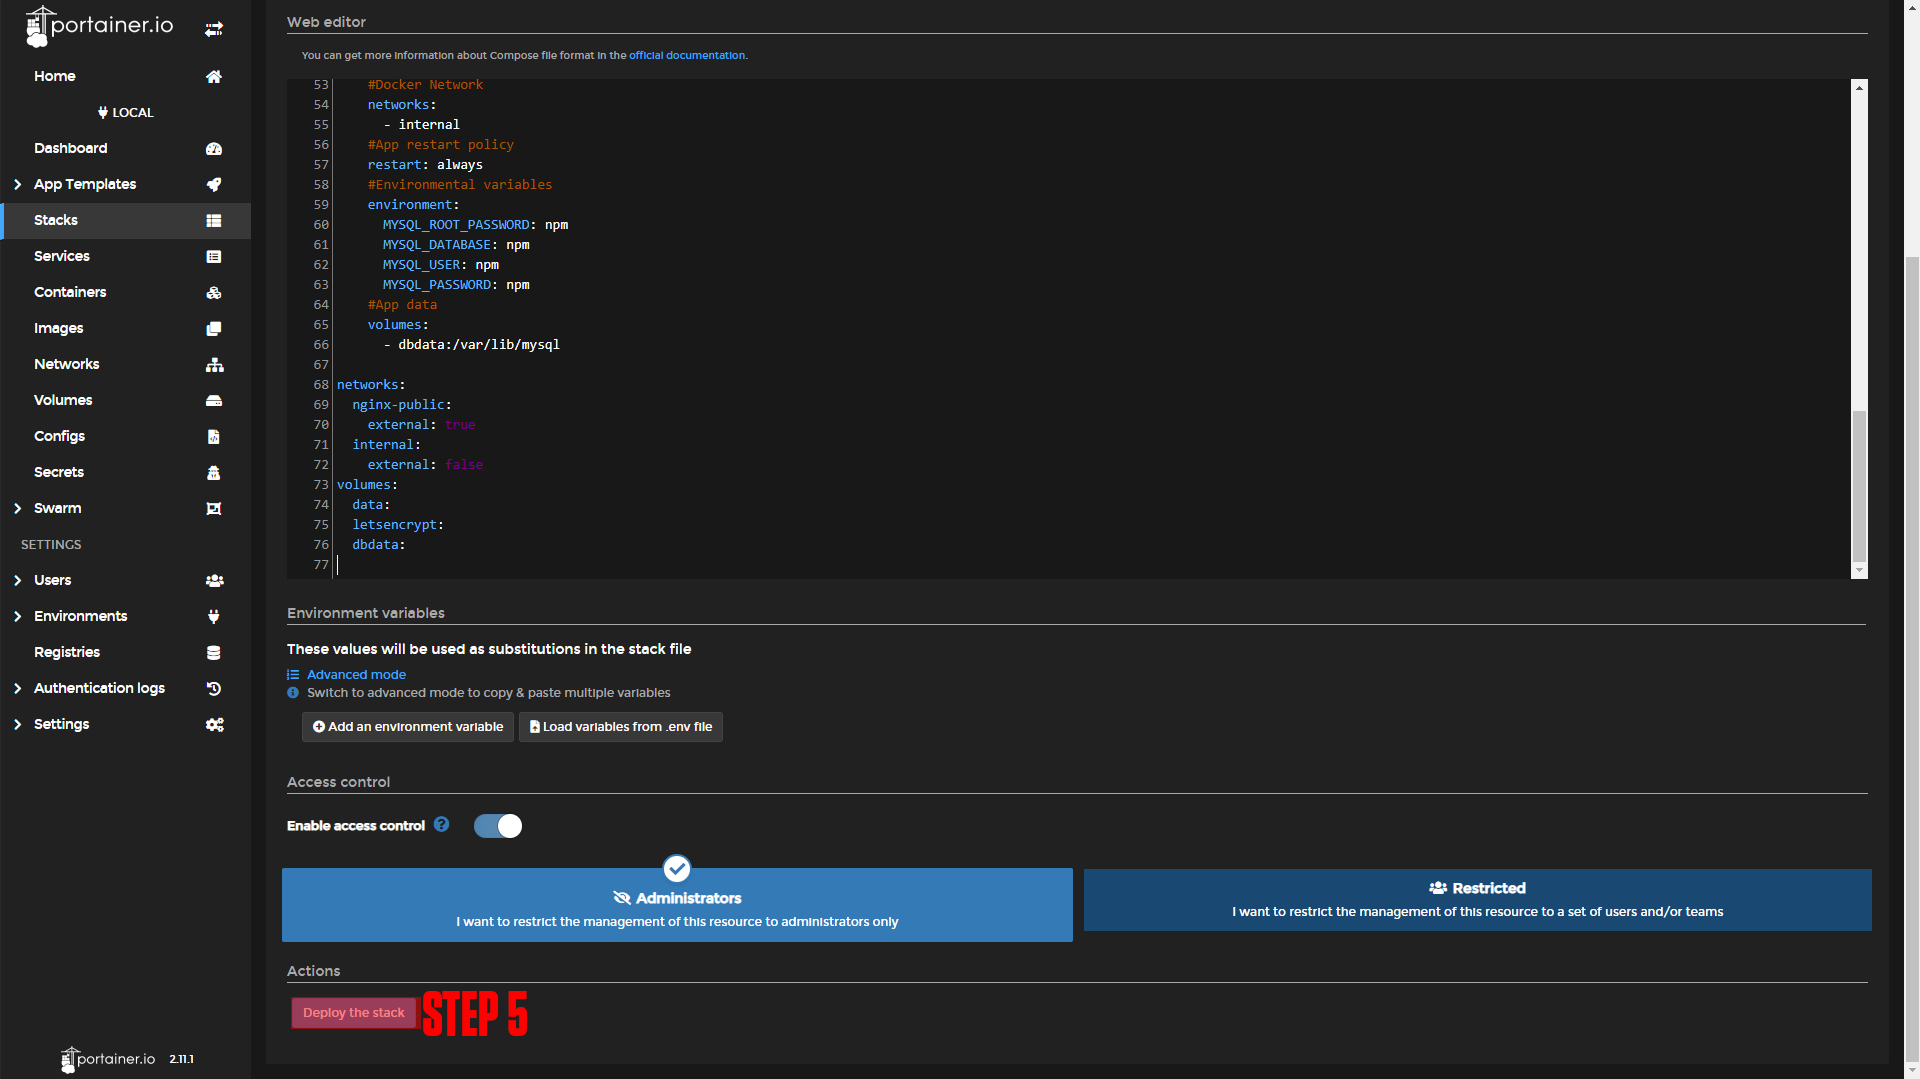
Step 1: Go to Stacks.
Step 2: Click Add Stack.
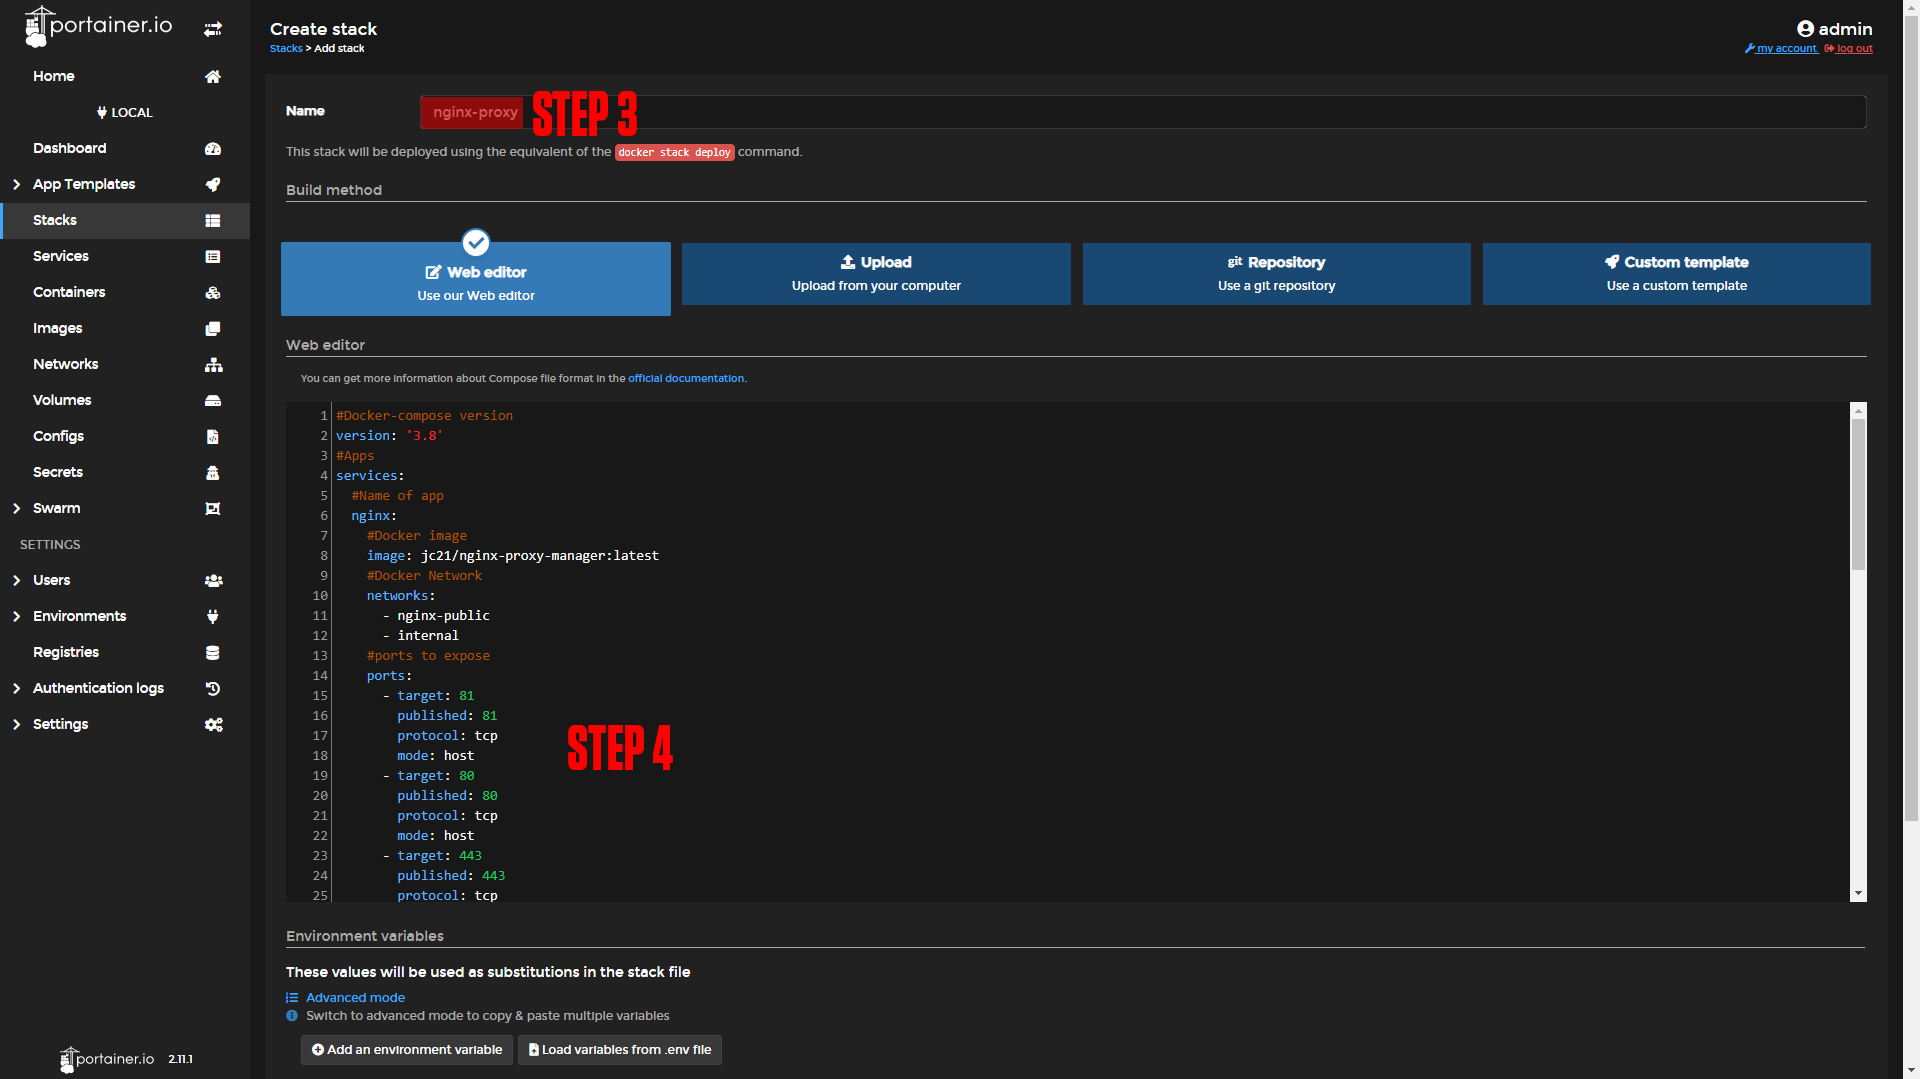
Step 3: Name your stack (Ex. nginx-proxy).
Step 4: Paste in the contents below:
Step 5: Deploy the stack.
|
|
|
#Docker-compose version
version: '3.8'
#Apps
services:
  #Name of app
  nginx:
    #Docker image
    image: jc21/nginx-proxy-manager:latest
    #Docker Network
    networks:
      - nginx-public
      - internal
    #ports to expose
    ports:
      - target: 81
        published: 81
        protocol: tcp
        mode: host
      - target: 80
        published: 80
        protocol: tcp
        mode: host
      - target: 443
        published: 443
        protocol: tcp
        mode: host
    #App restart policy
    restart: always
    #Environmental variables
    environment:
      # These are the settings to access your db
      DB_MYSQL_HOST: db
      DB_MYSQL_PORT: 3306
      DB_MYSQL_USER: dbuser
      DB_MYSQL_PASSWORD: dbpass
      DB_MYSQL_NAME: dbname
      # If you would rather use Sqlite uncomment this
      # and remove all DB_MYSQL_* lines above
      # DB_SQLITE_FILE: "/data/database.sqlite"
      # Uncomment this if IPv6 is not enabled on your host
      #DISABLE_IPV6: 'true'
    #App data
    volumes:
      - data:/data
      - letsencrypt:/etc/letsencrypt
    depends_on:
      - db

  #Name of app
  db:
    #Docker image
    image: jc21/mariadb-aria:latest
    #Docker Network
    networks:
      - internal
    #App restart policy
    restart: always
    #Environmental variables
    environment:
      MYSQL_ROOT_PASSWORD: dbpass
      MYSQL_DATABASE: dbname
      MYSQL_USER: dbuser
      MYSQL_PASSWORD: dbpass
    #App data
    volumes:
      - dbdata:/var/lib/mysql

networks:
  nginx-public:
    external: true
  internal:
    external: false
volumes:
  data:
  letsencrypt:
dbdata:¶ Nginx-Proxy-Manager
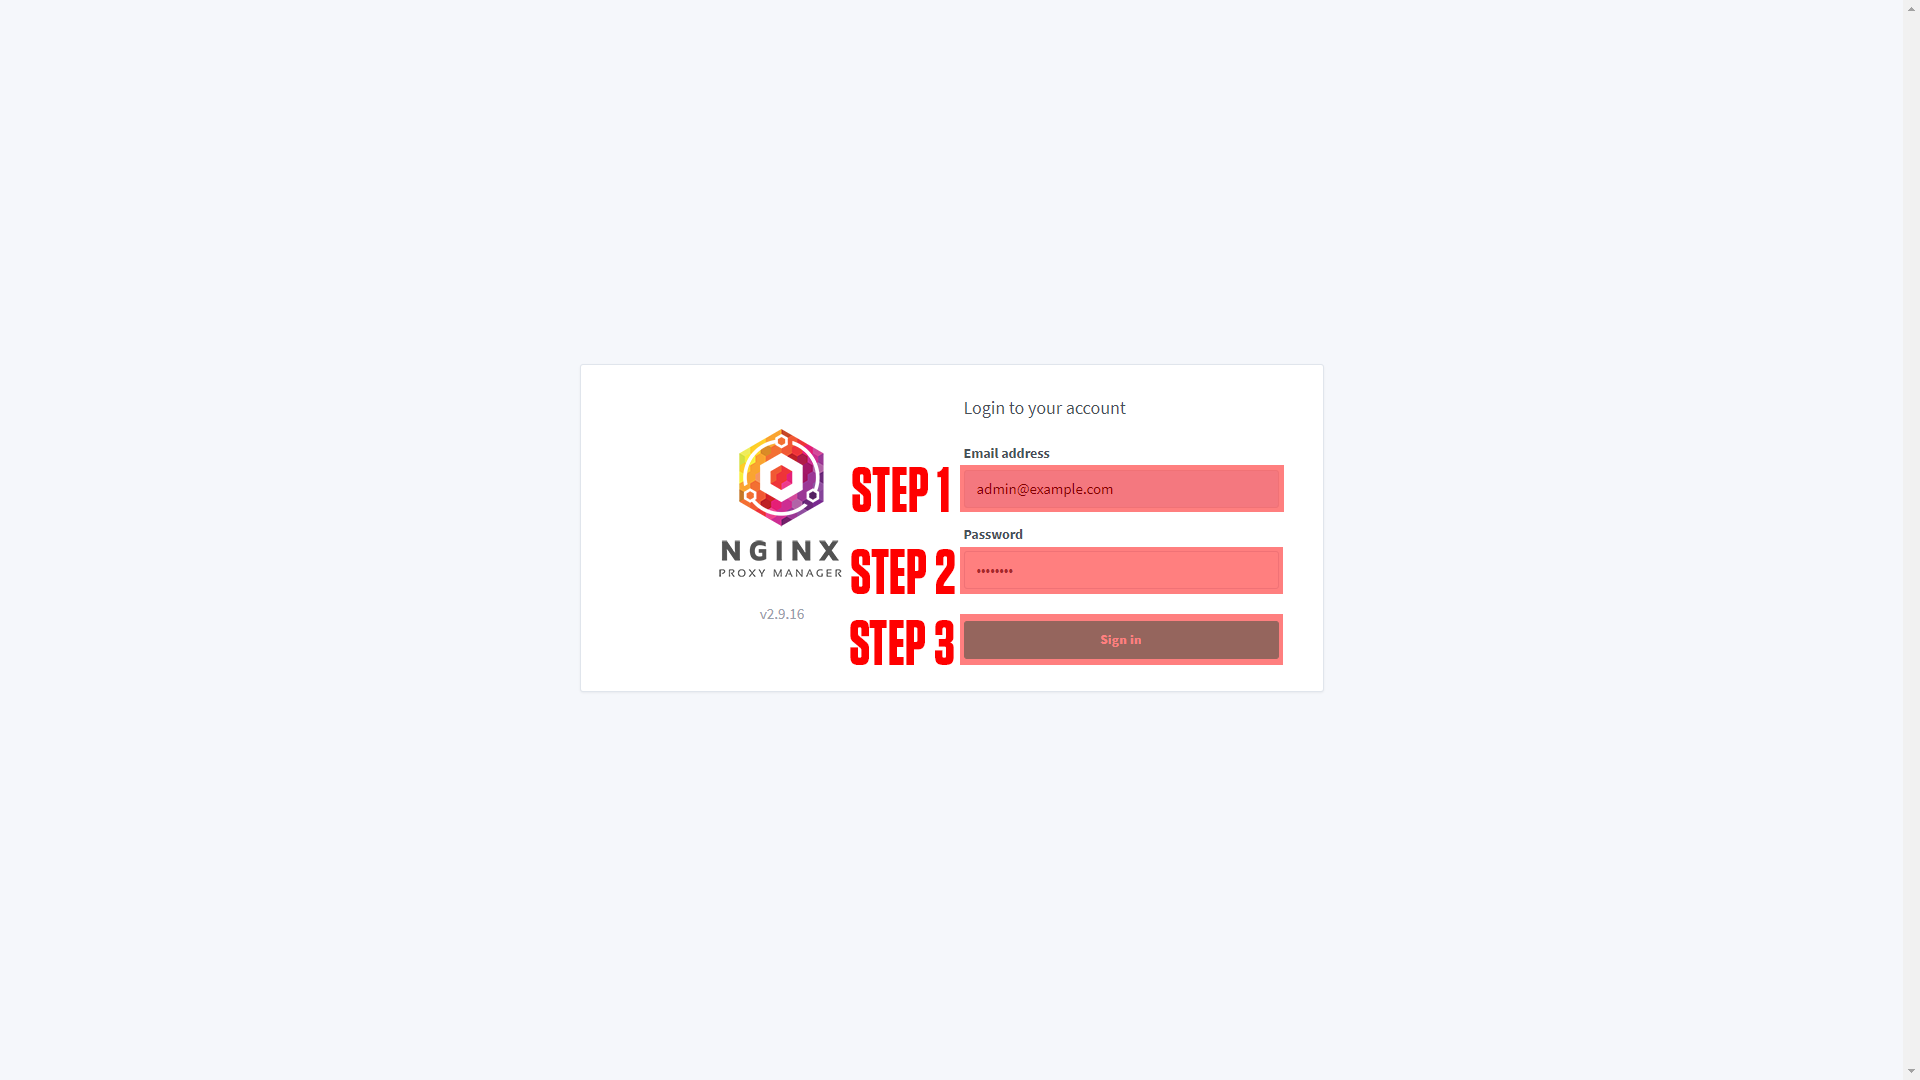
to access the admin panel for Nginx-Proxy-Manager go to <your-pc-ip-address>:81 (Ex. 192.168.1.1:81). You should arrive at a screen like this!
|
|
|
(If you do not arrive at a screen like this then something is wrong! Our premium members can open a support ticket Here!)
Step 1: Enter the Default Email (admin@example.com).
Step 2: Enter the Default Password (changeme).
Step 3: Sign In.
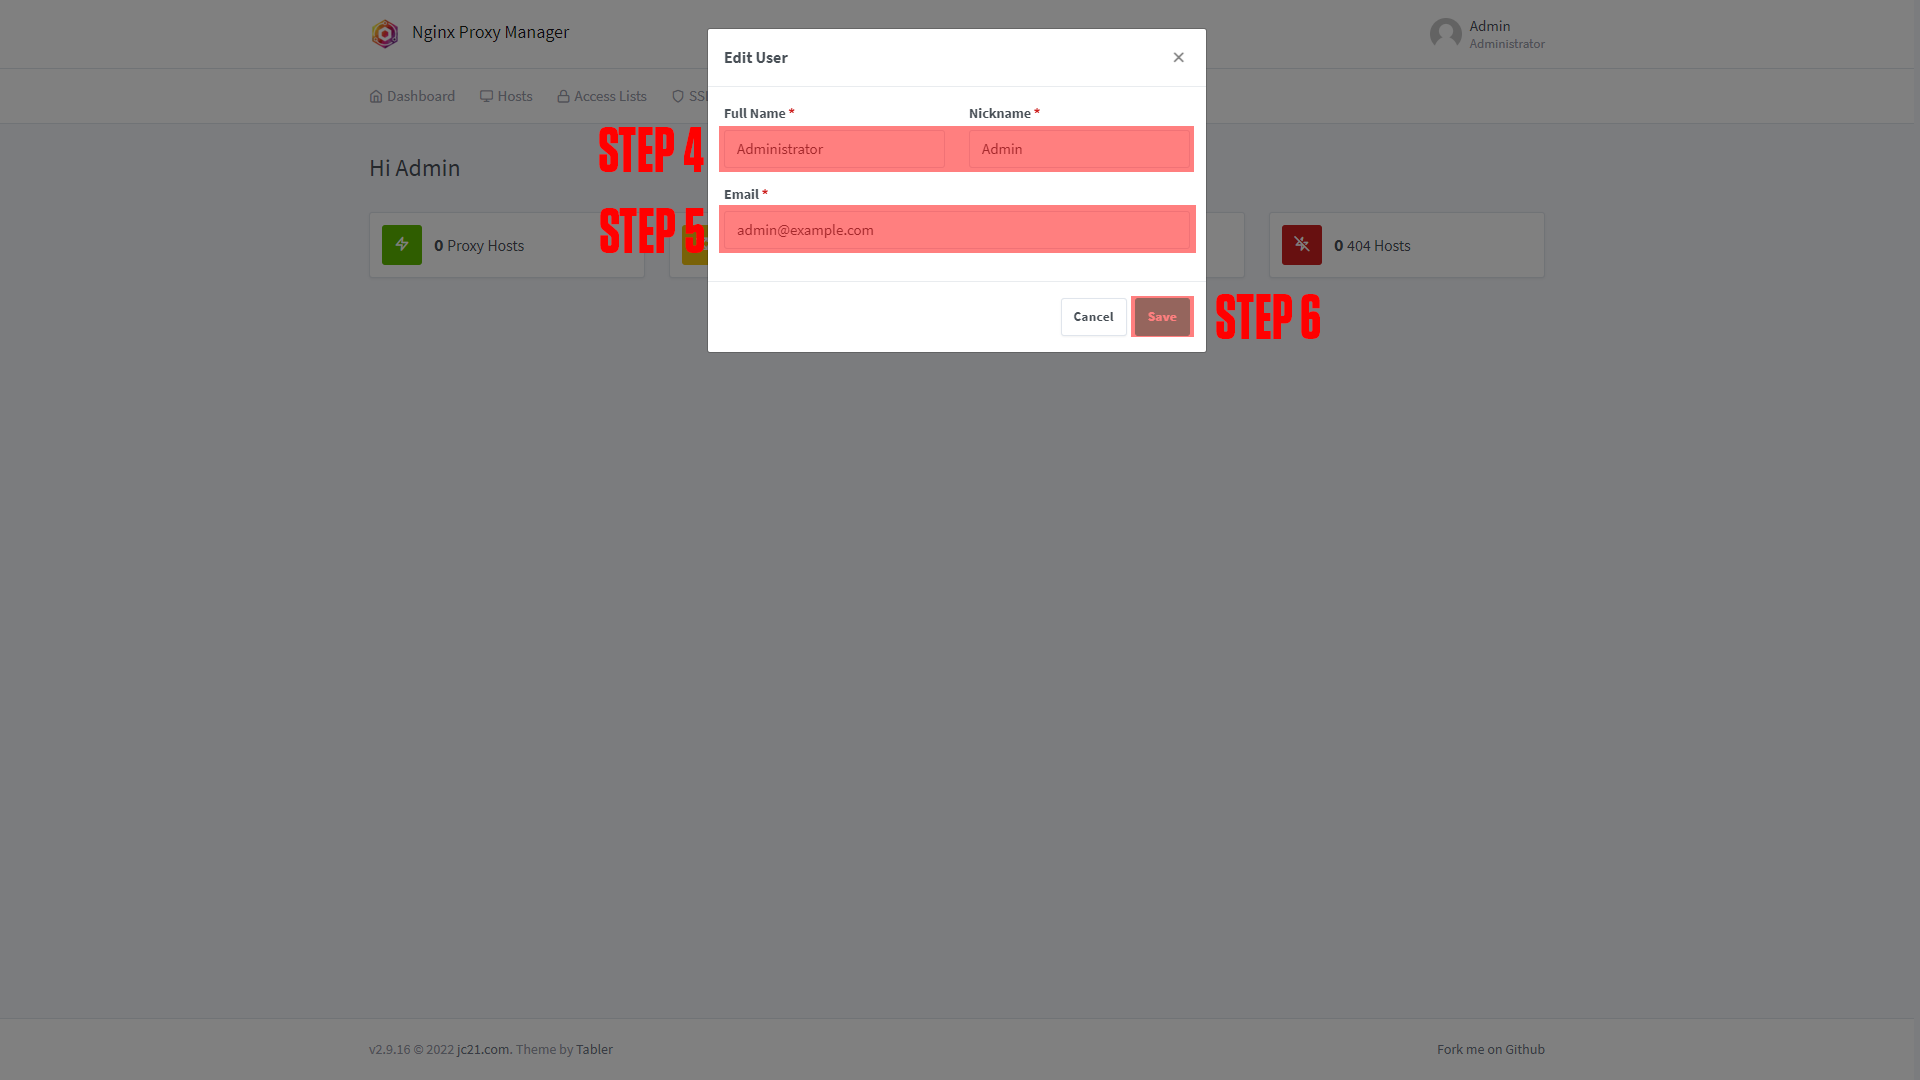
Step 4: Enter Your Full Name and Nickname.
Step 5: Enter Your Email (It is important that this email exists and is accessible).
Step 6: Click Save.
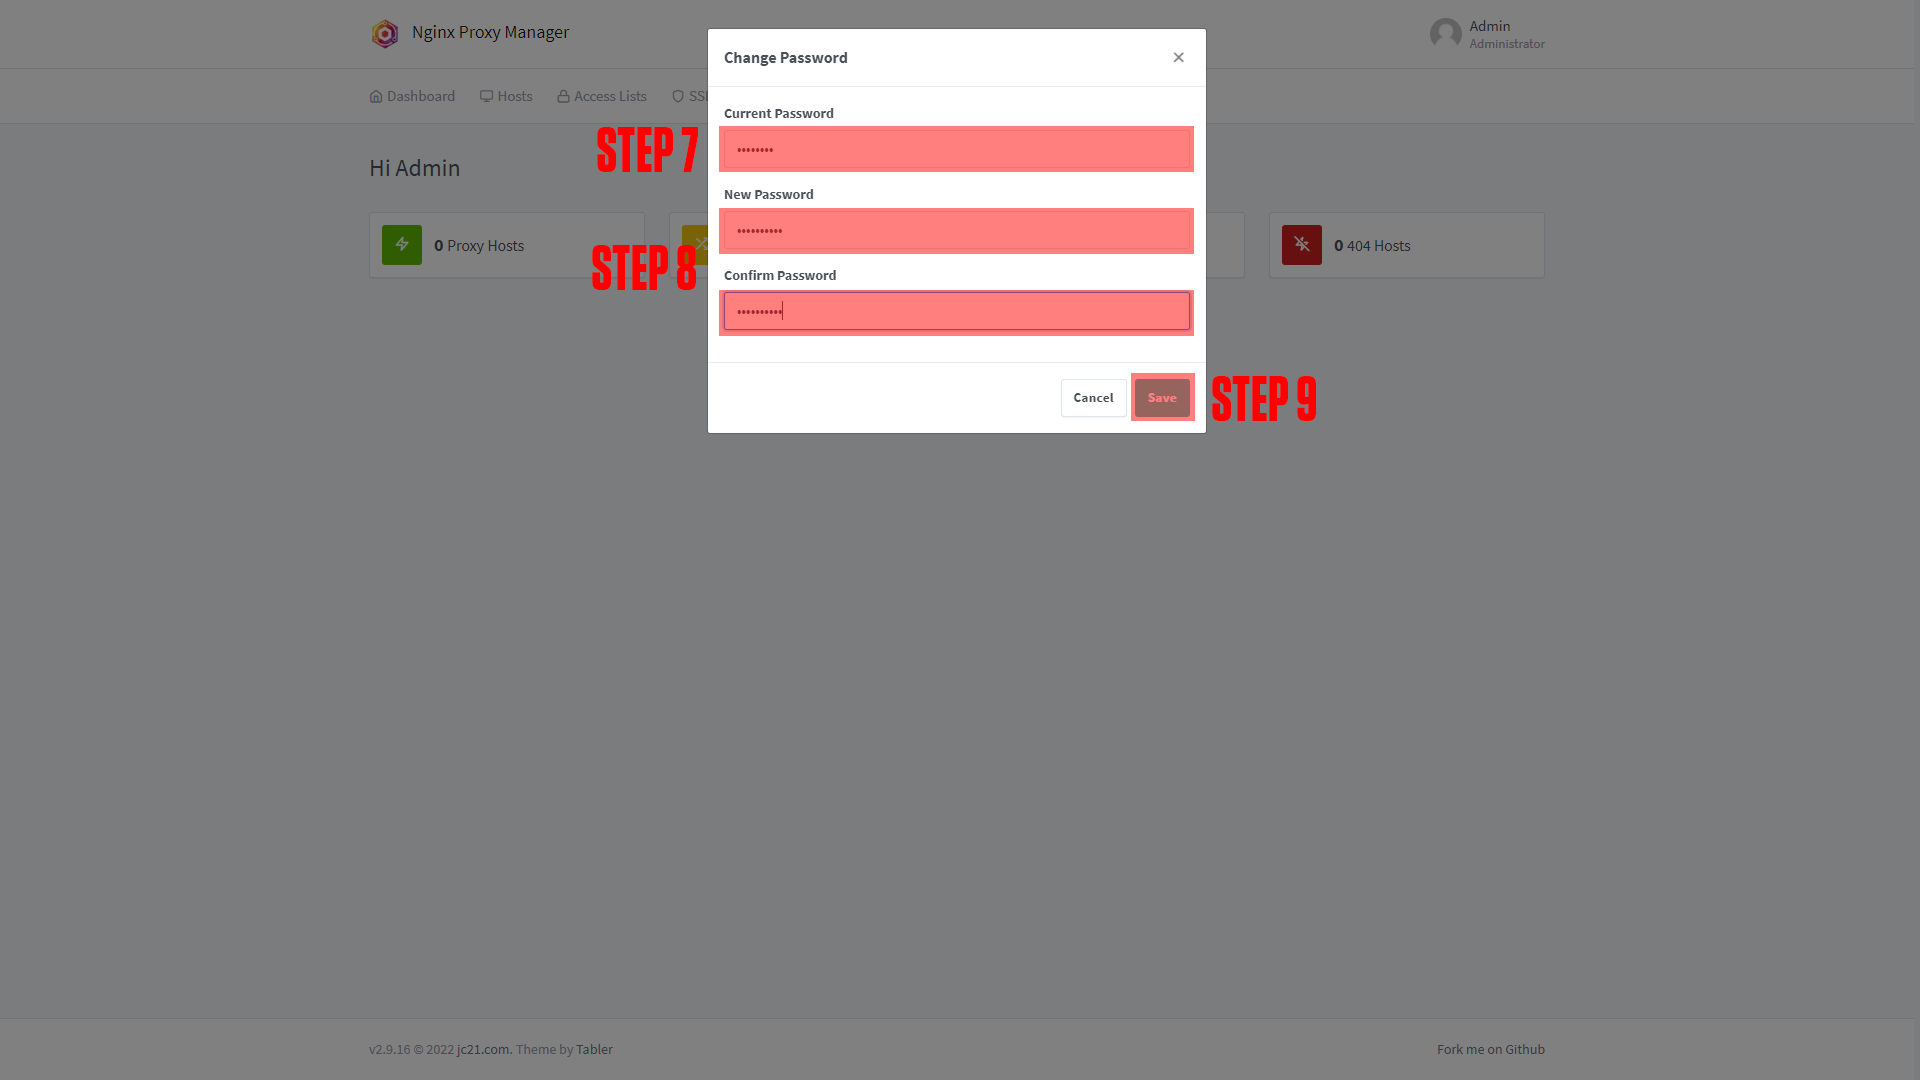
Step 7: Enter the Current Password (changeme).
Step 8: Enter Your New Password.
Step 9: Click Save.
¶ Conclusion
This is the basic setup for Nginx-Proxy-Manager, as mentioned at the beginning we have a more in-depth course available at TrueFreedomTech.com.
Troubleshooting
¶ Troubleshooting
¶ Docker Services stuck on “New” in Portainer.
Your Nginx-Reverse-Proxy network may be reaching its limit. You have 2 options here:
1. Create a new network and add it to your Nginx-Reverse-Proxy Stack. (See Nginx-Public Network)
2. Deploy a new Nginx-Reverse-Proxy Stack with a different network.
Option 1: this will require editing your Docker-Compose.yml network section and adding the new network under “nginx-public” ( assuming you did not change our template compose) You will also need to declare this new network at the bottom of the Docker-Compose.yml (Follow the same formating as nginx-public for declaring the network)
Ex.
networks:
  nginx-public:
    external: true
  new-network:
external: trueOption 2: Deploy a new stack with a new stack name, ports, and network name.