¶ GitLab: DevOps, Code Repository.
GitLab is an open-source DevOps software that allows for developing, securing, and operating software. We use GitLab to store our source code and to deploy apps.
You can find more information about GitLab using the links below:
- About.GitLab.com
- Gitlab/Gitlab-CE on Docker Hub
- GitLab.org/GitLab on GitLab (Confused yet?)
- GitLab Docs
¶ Introduction
If you have used anything open source then you have heard of and visited a code repository, probably Github. Github is great, GitLab is better! Instead of hosting your source code on Github, host a GitLab instance where you can keep your data secure and private, or public, allow users, allow anyone to sign up, develop and update live from source code. We use docker to run all applications so we don't really focus on live deployment within GitLab. We do use GitLab to build Dockerfiles and host our docker-compose's. If you arent using something like GitLab you are probably using one computer either via ssh or some sort of server management software to complete your dev operations. Nothing wrong with that necessarily, but it can get messy. Doing anything from a system like this involves extra steps in deployment, sharing, and more. GitLab can eliminate that and allow a team to develop live.
We will be running GitLab using Docker, Docker-Compose, Portainer, and Nginx Proxy Manager. We have an advanced course on how to do this at TrueFreedomTech.com covering multiple configurations and separating data from compute.
¶ Overview
We are going to assume you already have a working server with Docker, Portainer, and Nginx Proxy Manager running. We will go over the configuration file, docker-compose, and configuring Nginx-Proxy-Manager. We are not using our own images for this stack so please consult the Docker hub and GitLab links for more information regarding the Docker image and source code.
This is strictly how to get the app running. Once again, we cover how to do this at TrueFreedomTech.com in much more detail! This will get beginners running, and experts should be able to adapt this to their own configuration with relative ease.
Ready?
¶ Docker Config
Open up Portainer and log in. If you are not familiar with Portainer here are the official docs:
We will be adding 1 custom configuration to our stack. The source code is linked below and can be found below the steps.
Add these files in Portainer:
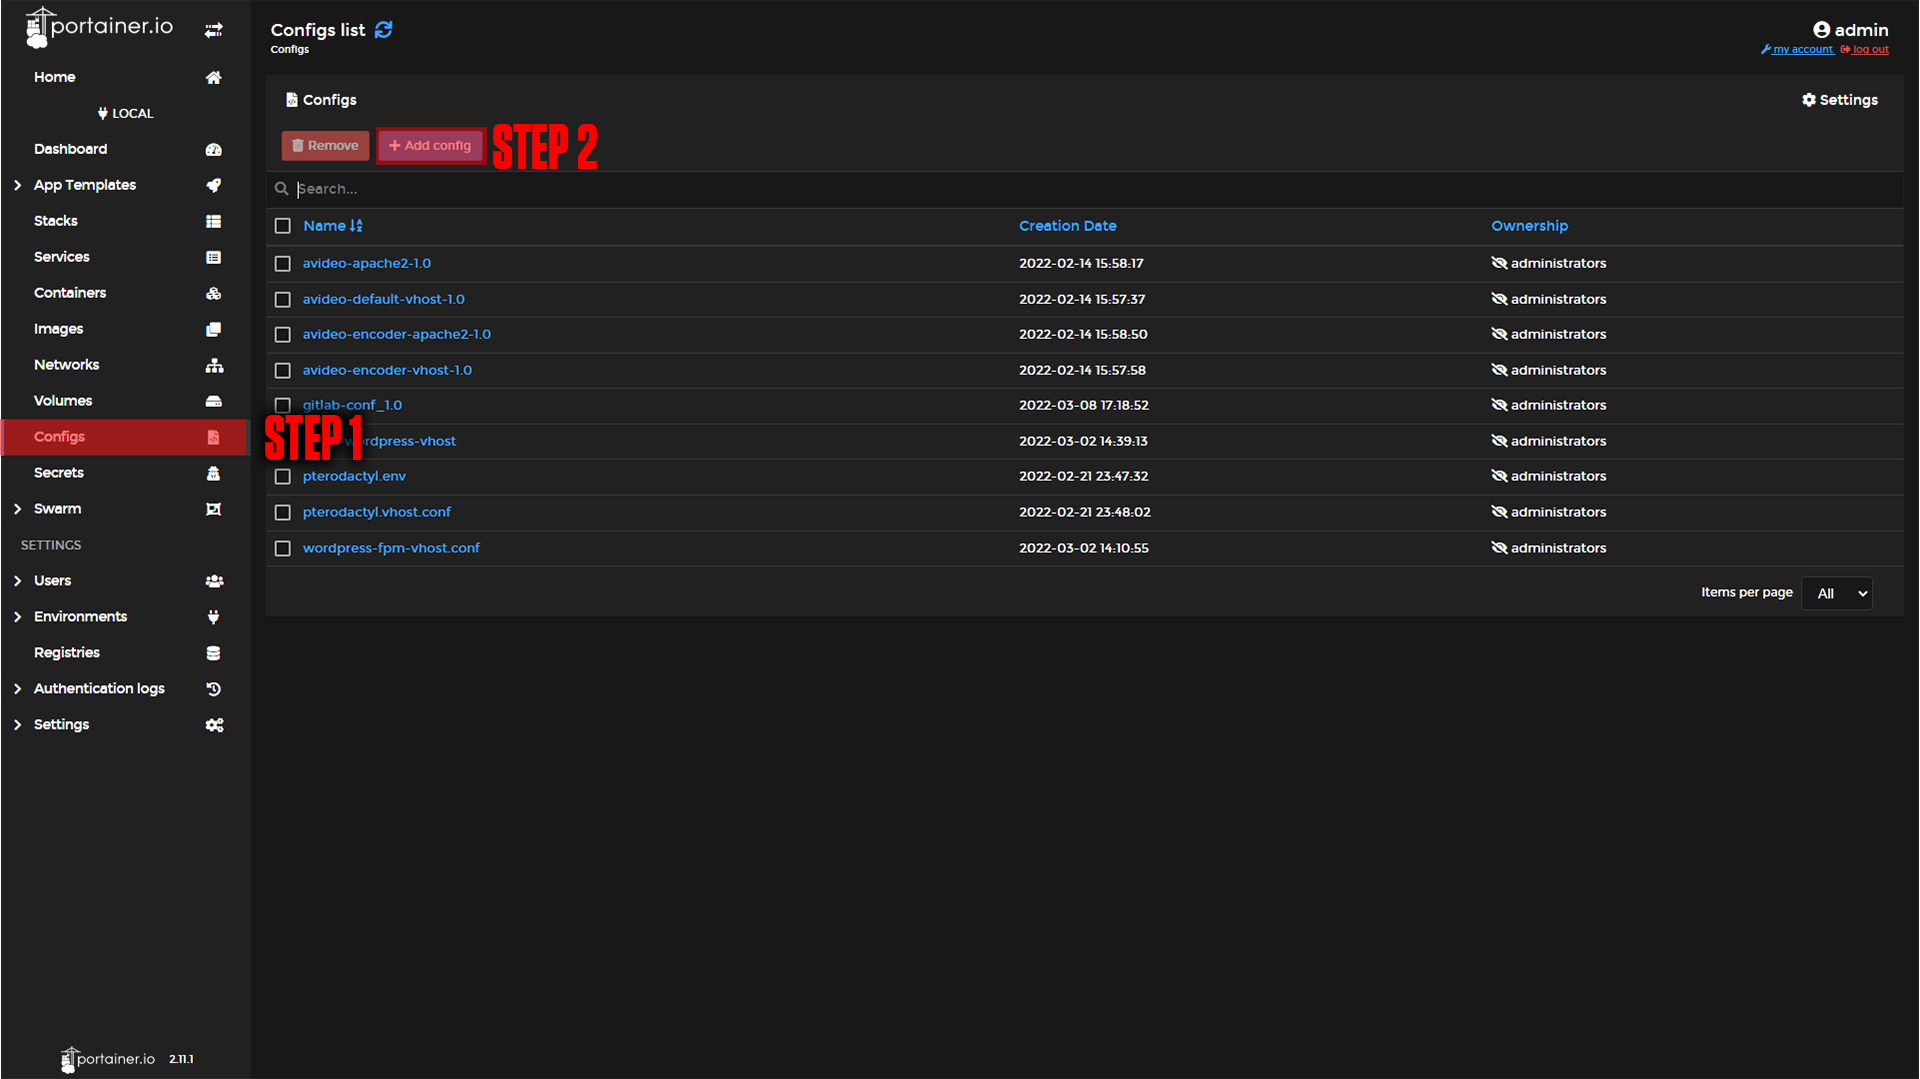
Step 1: Go to Configs.
Step 2: Click Add Config.
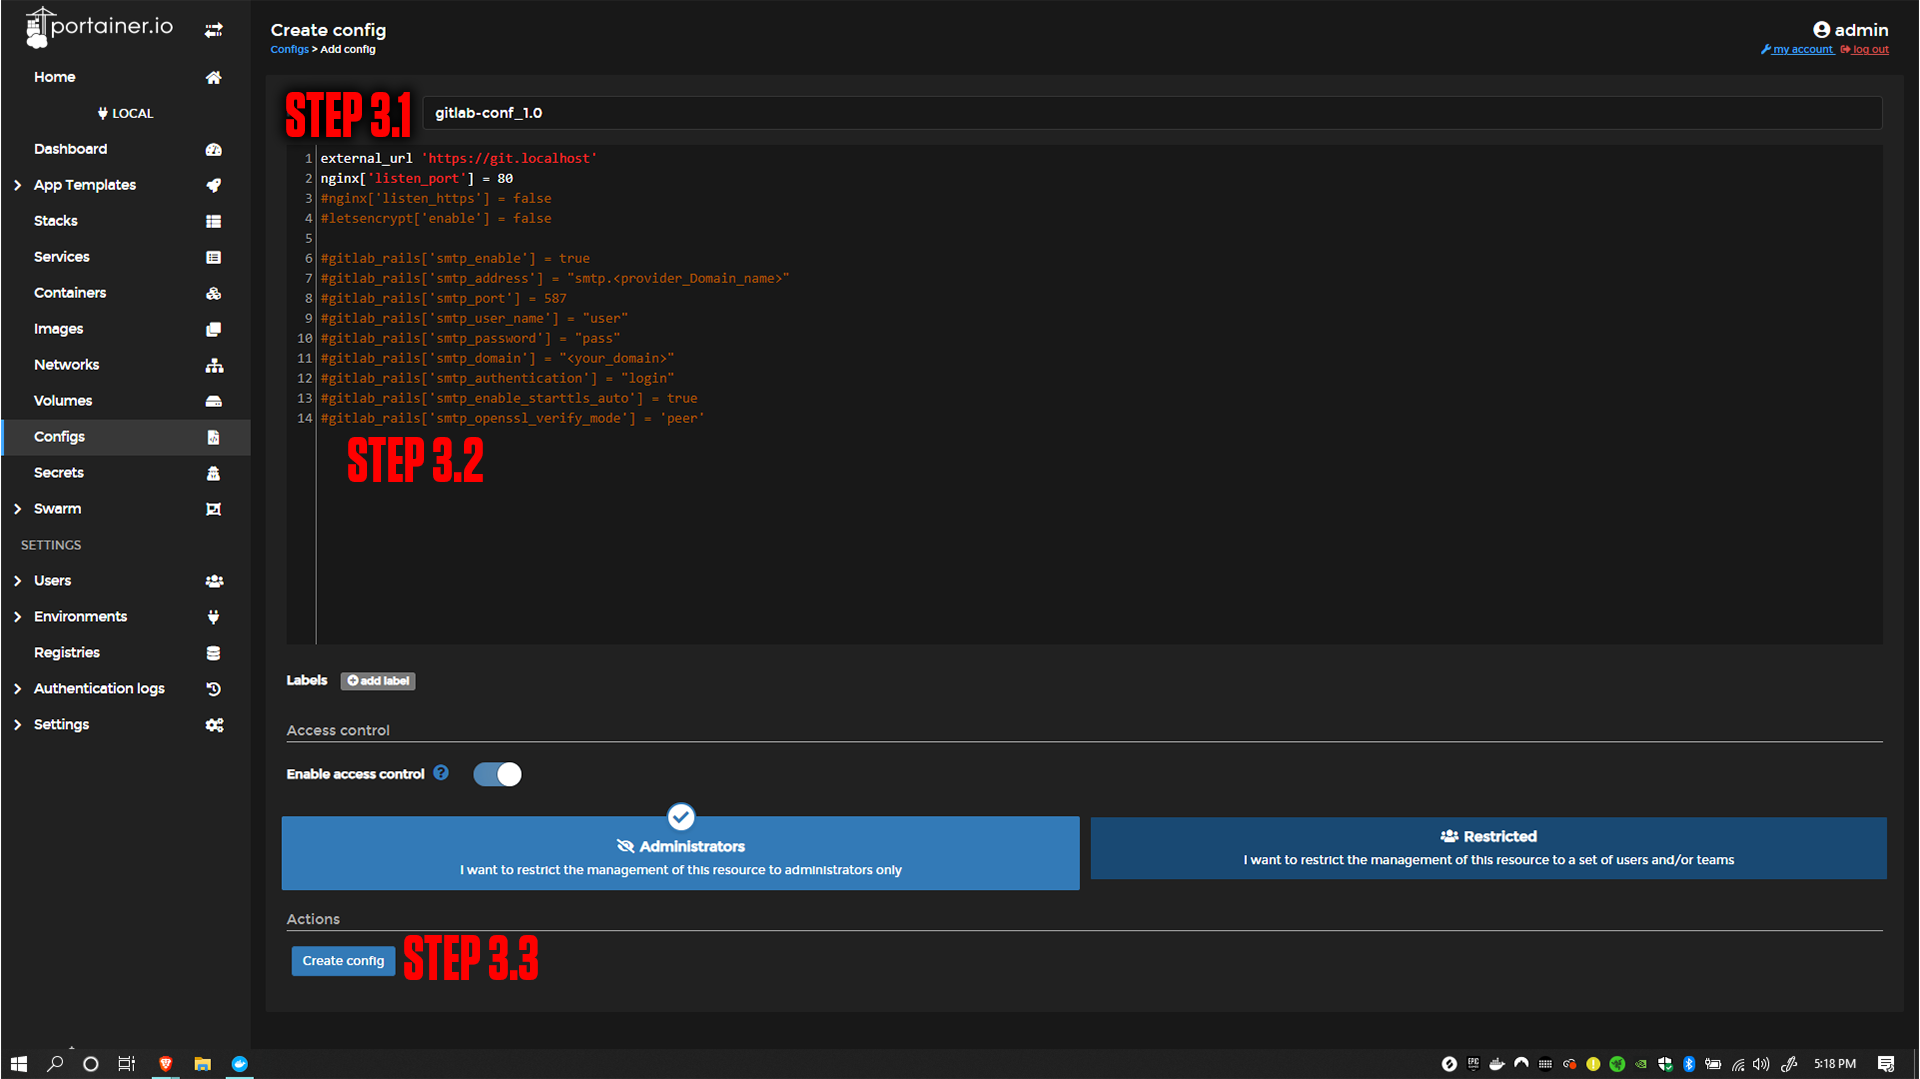
Step 3: Paste the name of the file and code as-is.
|
|
external_url 'https://git.<your_domain>'
nginx['listen_port'] = 80
#nginx['listen_https'] = false
#letsencrypt['enable'] = false

gitlab_rails['smtp_enable'] = true
gitlab_rails['smtp_address'] = "smtp.<provider_Domain_name>"
gitlab_rails['smtp_port'] = 587
gitlab_rails['smtp_user_name'] = "user"
gitlab_rails['smtp_password'] = "pass"
gitlab_rails['smtp_domain'] = "<your_domain>"
gitlab_rails['smtp_authentication'] = "login"
gitlab_rails['smtp_enable_starttls_auto'] = true
gitlab_rails['smtp_openssl_verify_mode'] = 'peer'Now moving on to the compose.
¶ Docker-Compose
The next step is our Docker-Compose. We will be deploying this with Portainer.
If you are not familiar with Portainer or Docker-Compose here are the official docs:
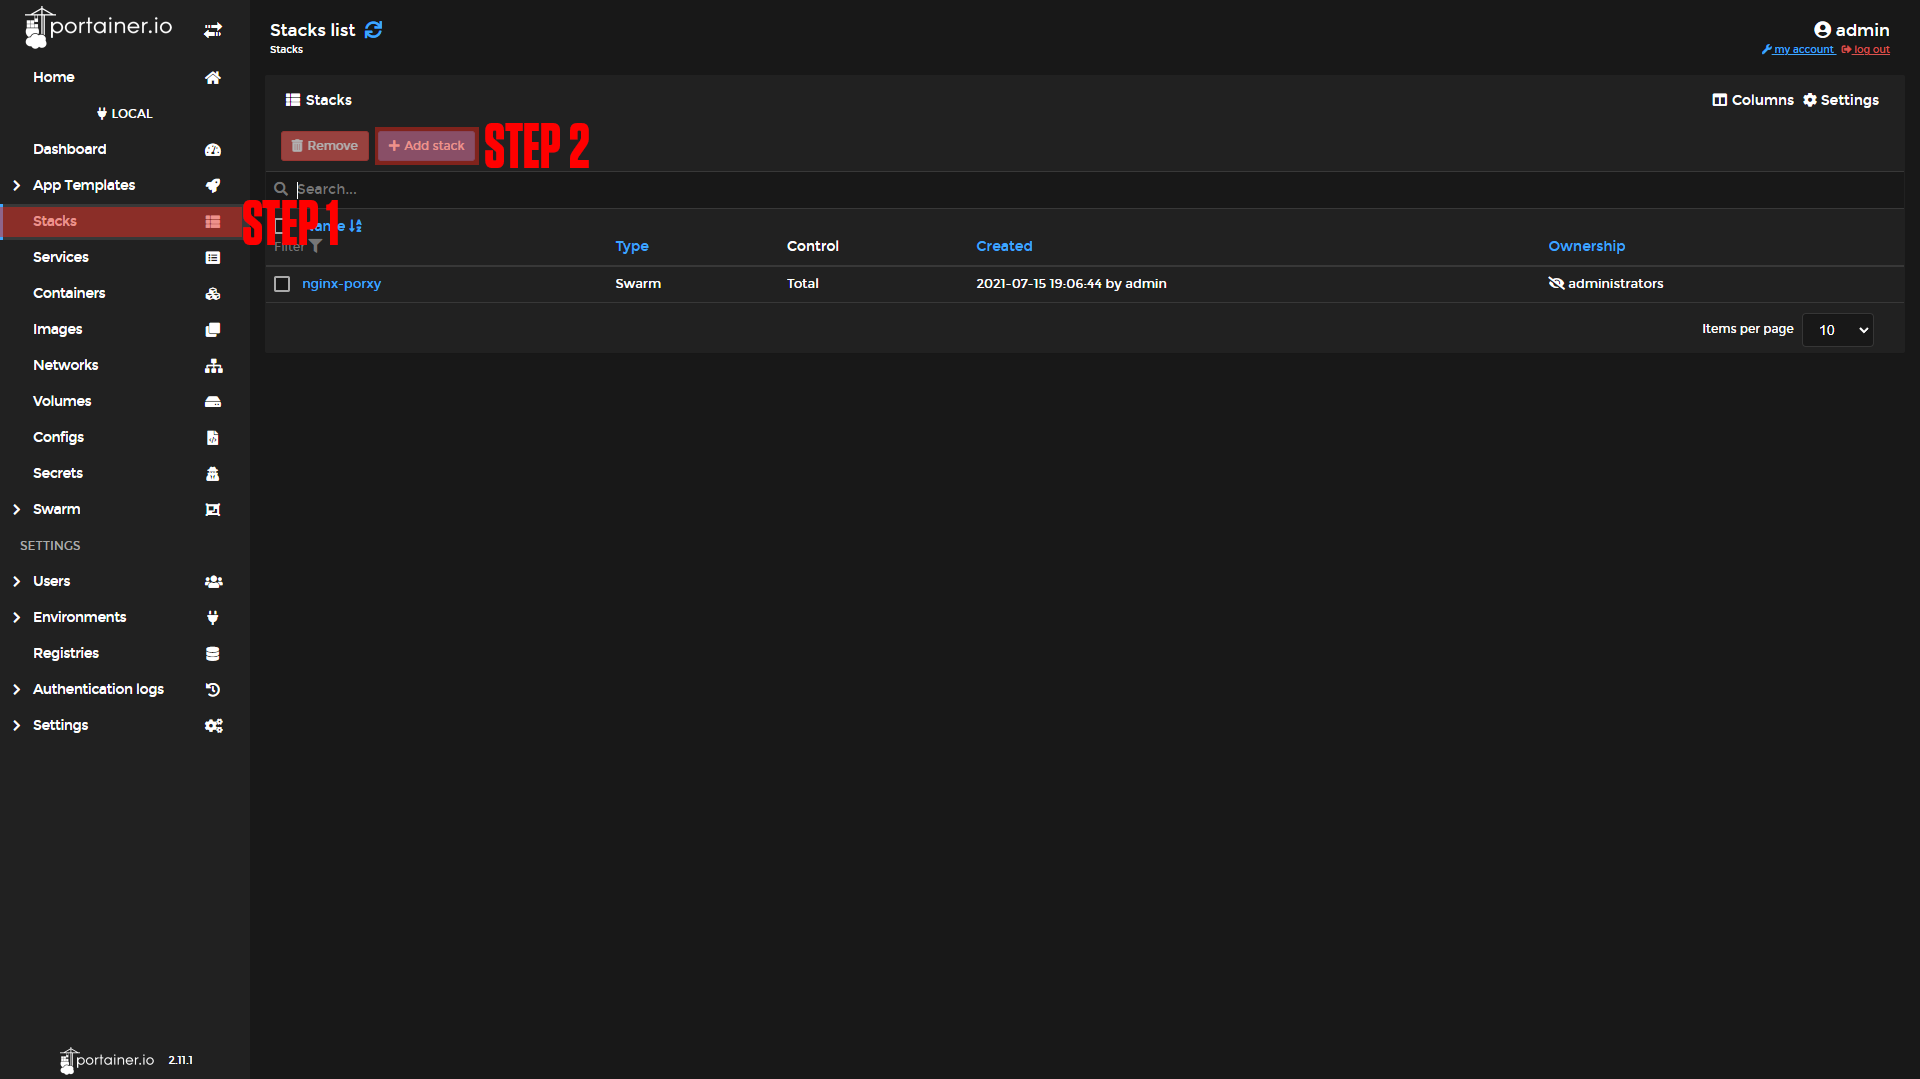
Step 1: Go to Stacks.
Step 2: Click Add Stack.
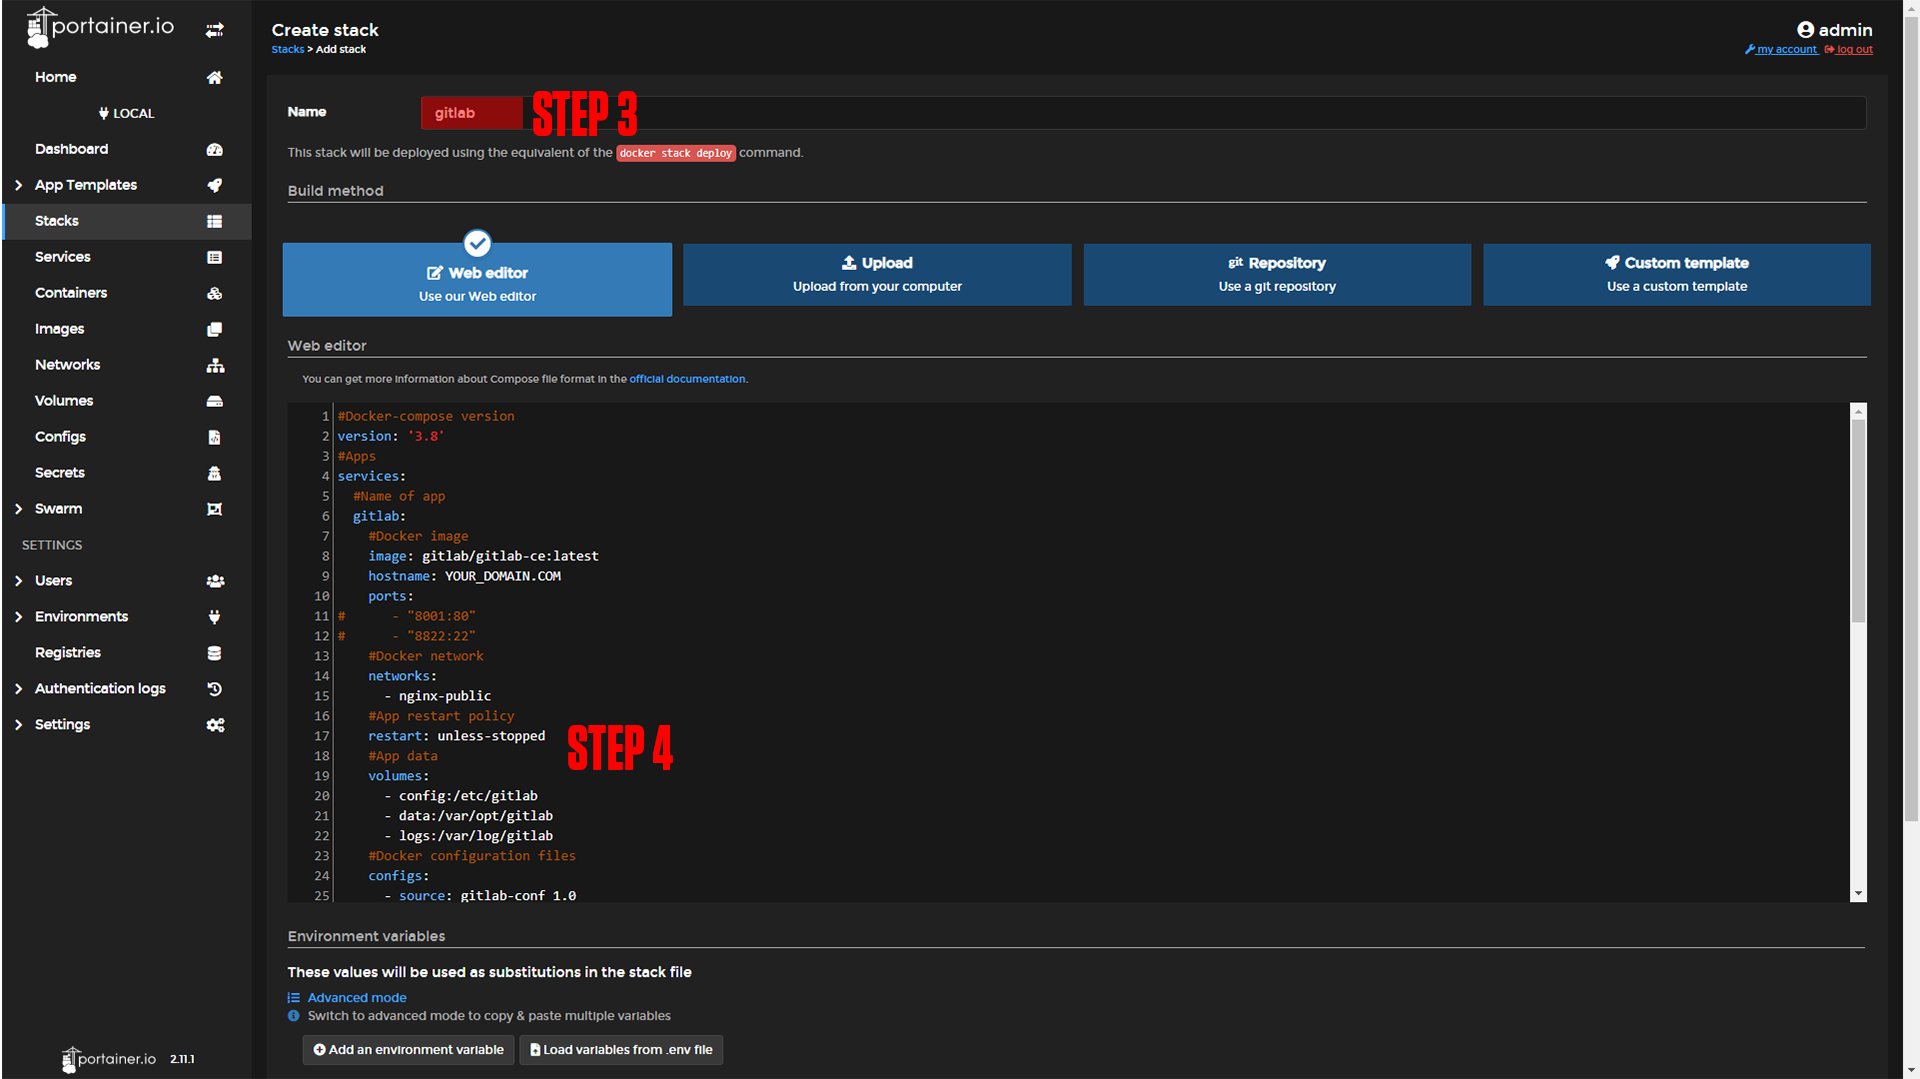
Step 3: Name your Stack (Ex. gitlab)
Step 4: Paste in the Contents Below.
Step 5: Deploy the Stack.
|
|
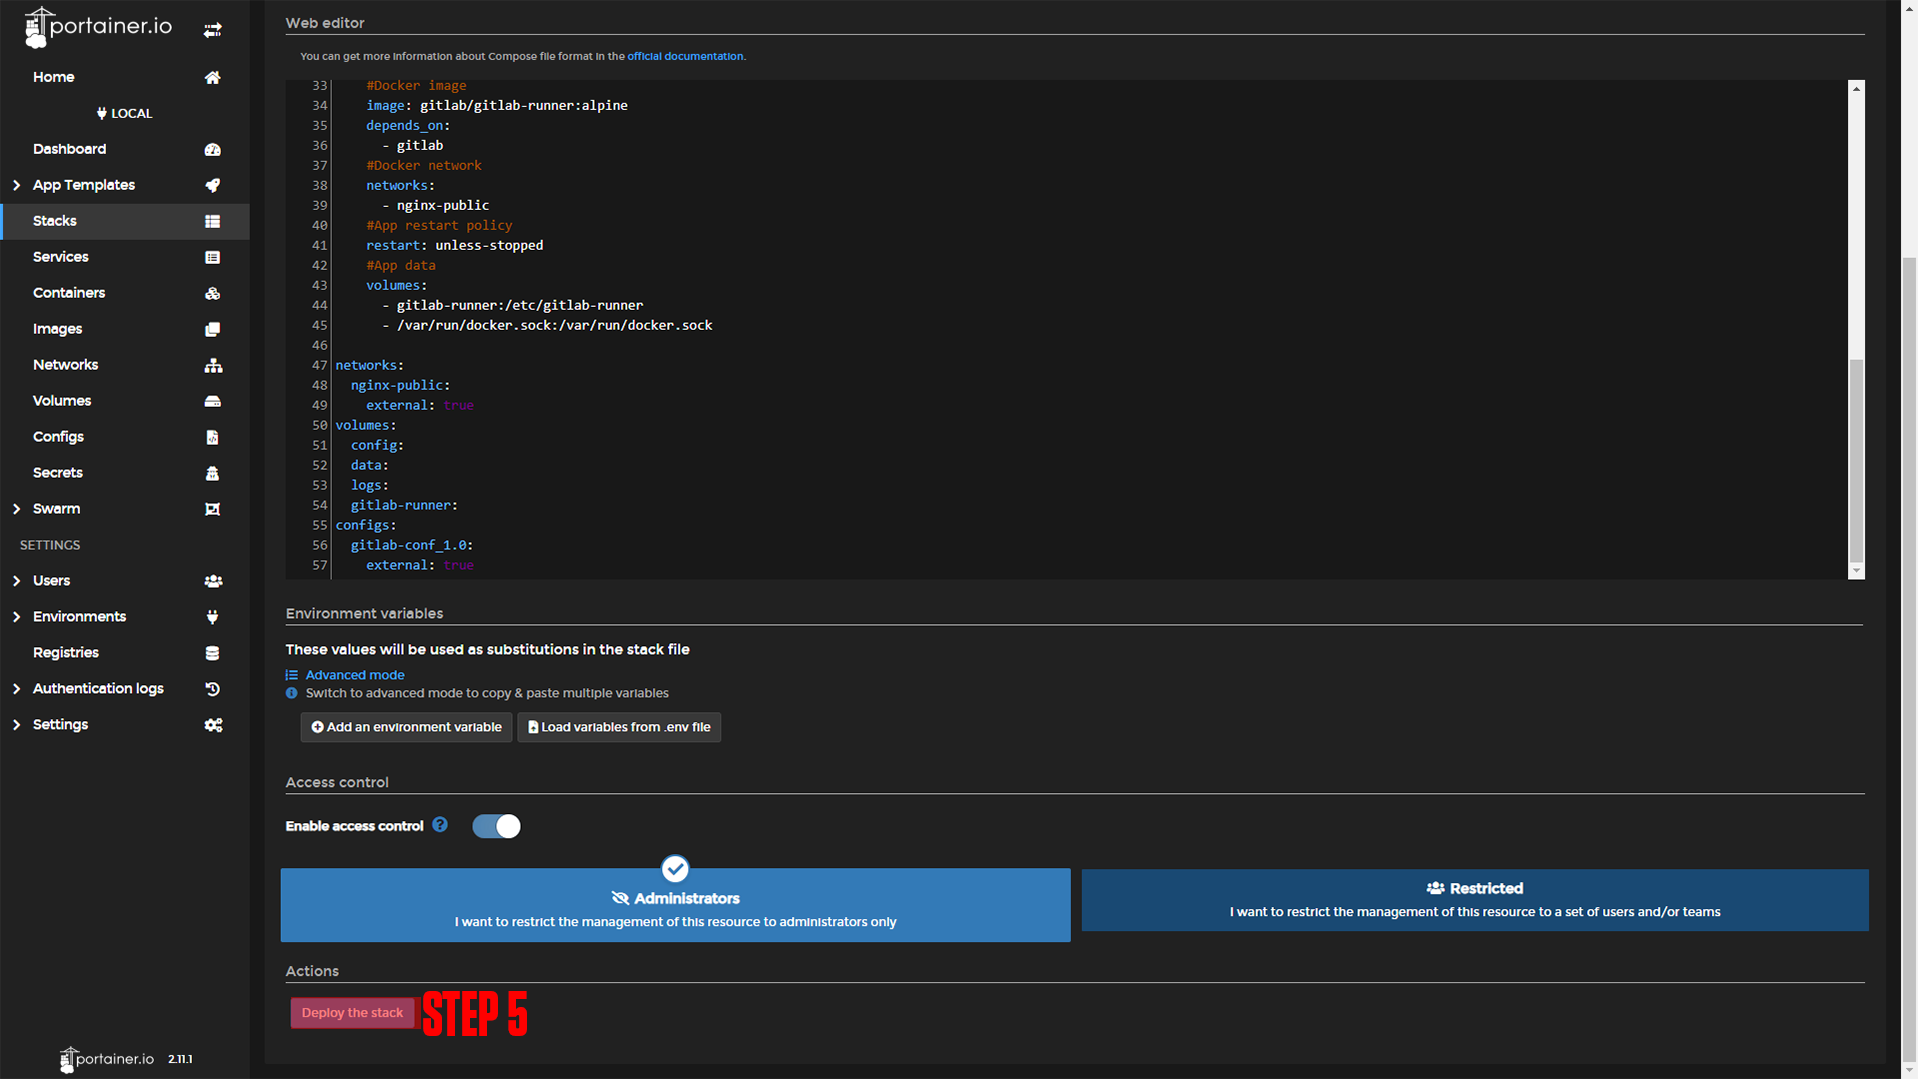
|
#Docker-compose version
version: '3.8'
#Apps
services:
  #Name of app
  gitlab:
    #Docker image
    image: gitlab/gitlab-ce:latest
    hostname: YOUR_DOMAIN.COM #make sure to change this!
#    ports:
#      - "8000:80"
#      - "8822:22"
    #Docker network
    networks:
      - nginx-public
    #App restart policy
    restart: unless-stopped
    #App data
    volumes:
      - config:/etc/gitlab
      - data:/var/opt/gitlab
      - logs:/var/log/gitlab
    #Docker configuration files
    configs:
      - source: gitlab-conf_1.0
        target: /omnibus_config.rb
        uid: '33'
        gid: '33'
        mode: 0440

  gitlab-runner:
    image: gitlab/gitlab-runner:alpine
    depends_on:
      - gitlab
    networks:
      - nginx-public
    #App restart policy
    restart: unless-stopped
    #App data
    volumes:
      - gitlab-runner:/etc/gitlab-runner
      - /var/run/docker.sock:/var/run/docker.sock

networks:
  nginx-public:
    external: true
volumes:
  config:
  data:
  logs:
  gitlab-runner:
configs:
  gitlab-conf_1.0:
external: true¶ Nginx-Proxy-Manager
Before we configure our apps, we will set up our domains using Nginx-Proxy-Manager. If you followed our Nginx-Proxy-Manager stack setup you should be able to copy everything we do step by step.
¶ GitLab Domain Setup
Step 1: Copy the GitLab-ce service name.
This should be gitlab_gitlab if you did not change the names of apps.
Step 2: Log in to Nginx-Proxy-Manager and create a new proxy host.
Step 3: Enter your Domain name (Ex. git.example.com)
Step 4: Add the service name to the Forward Hostname / IP at port 80.
Step 5: Enable Cache Assets, Block Common Exploits, and Websockets Support.
Step 6: Click Save.
Step 7 (Optional): Enable SSL (we say this is optional, but you should always have an SSL cert if possible).
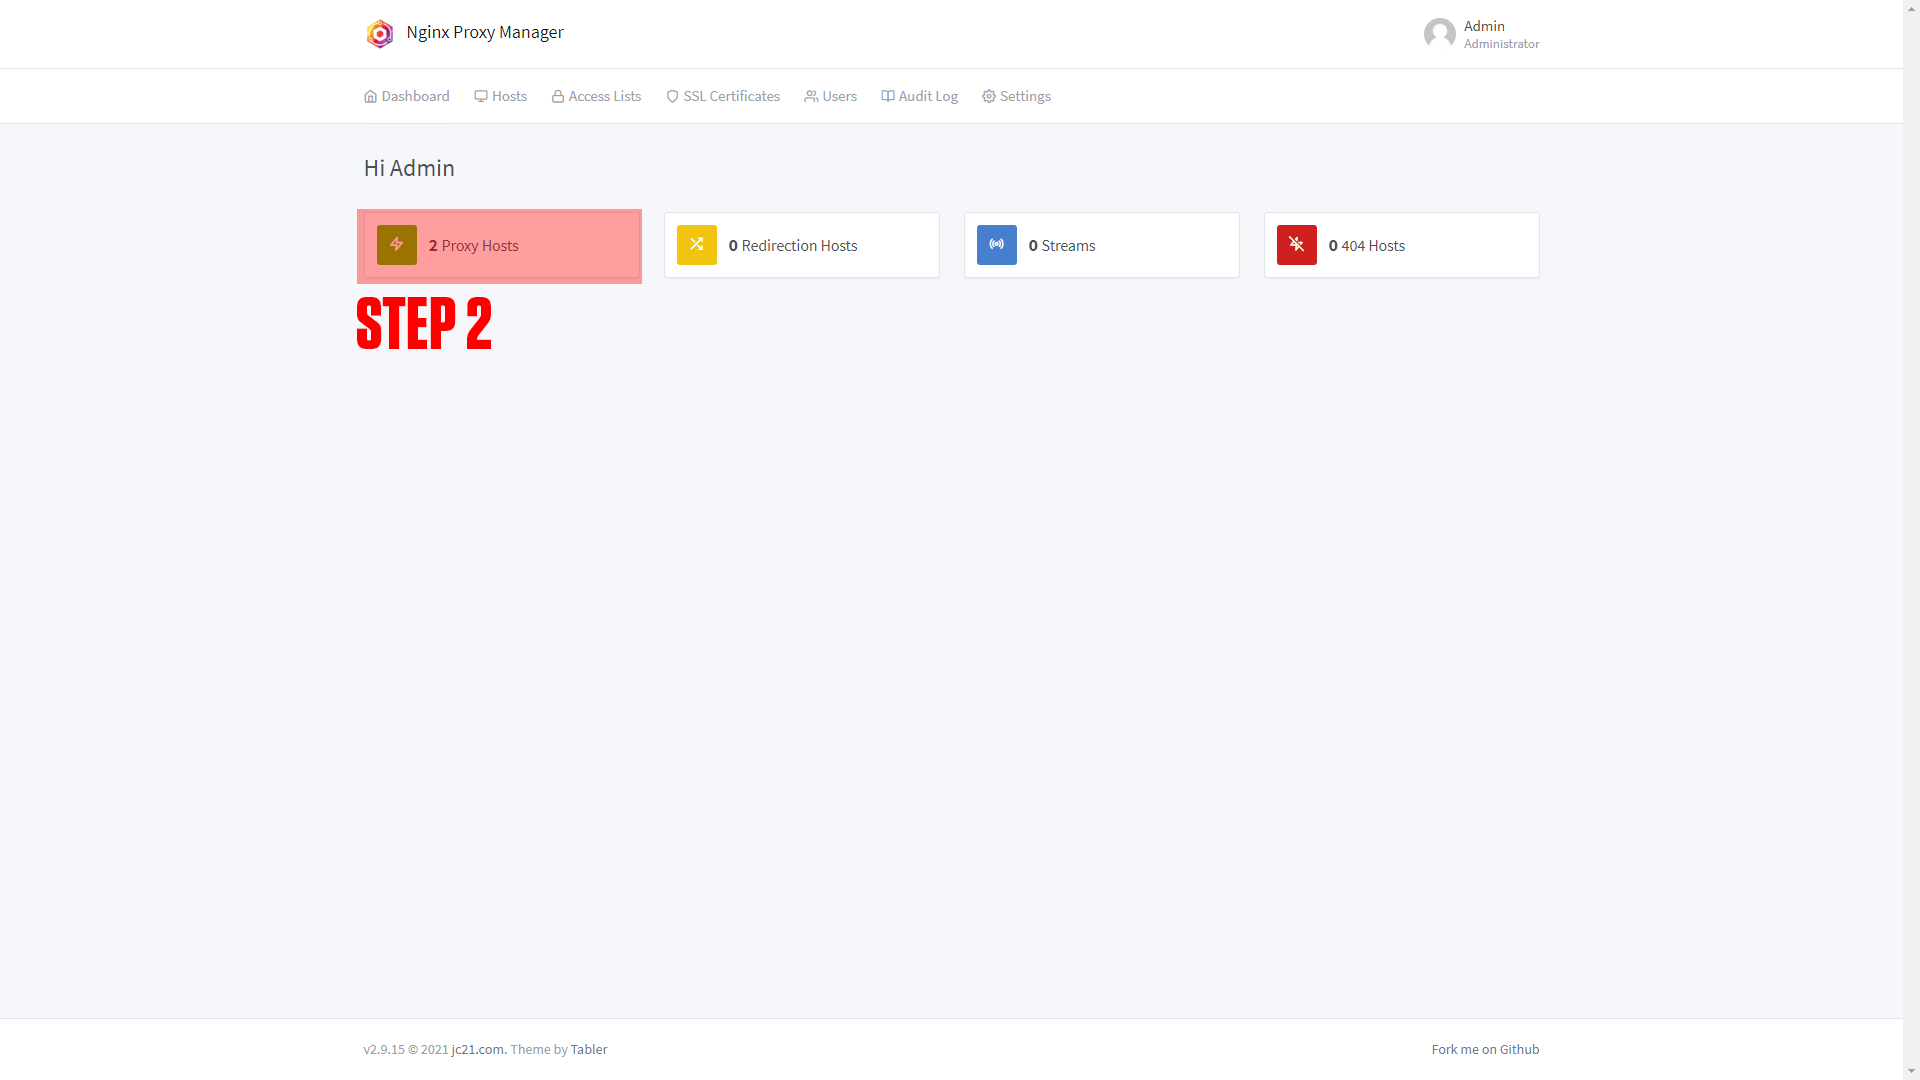
|

|
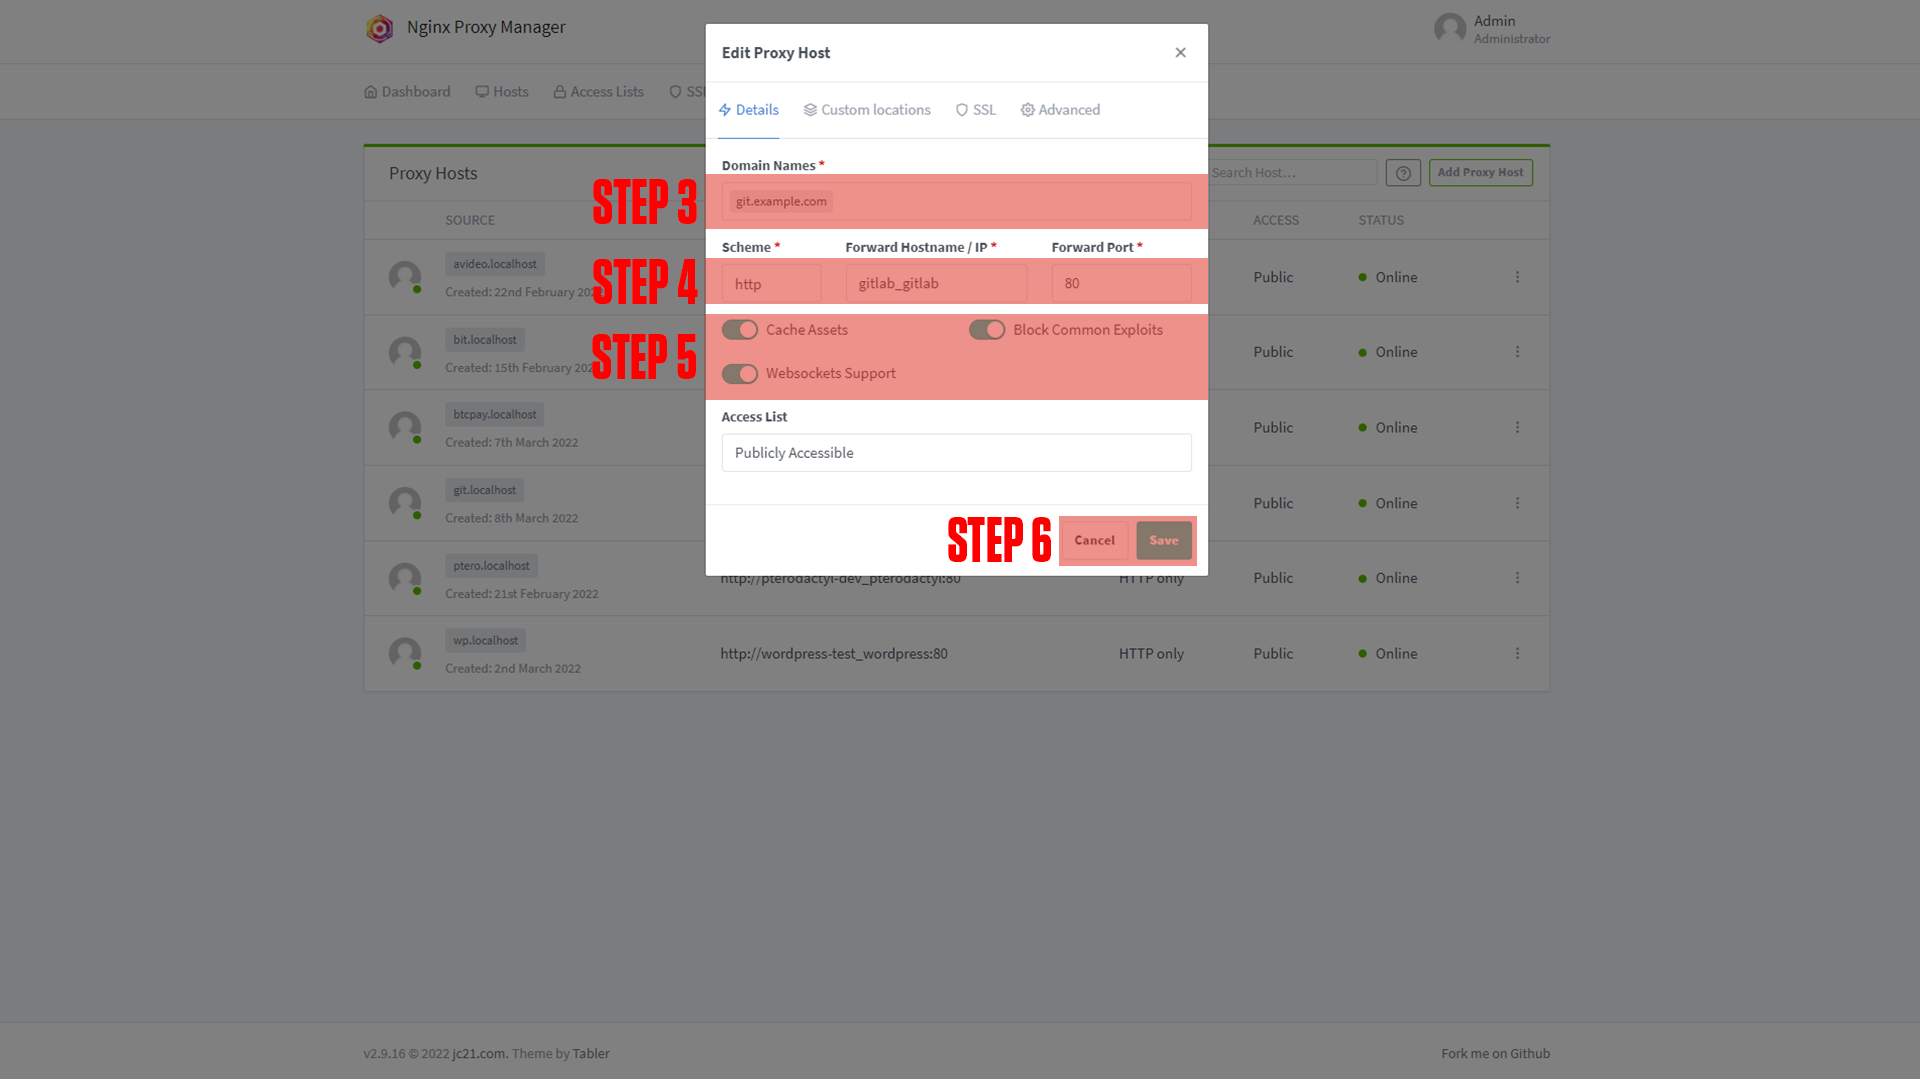
|
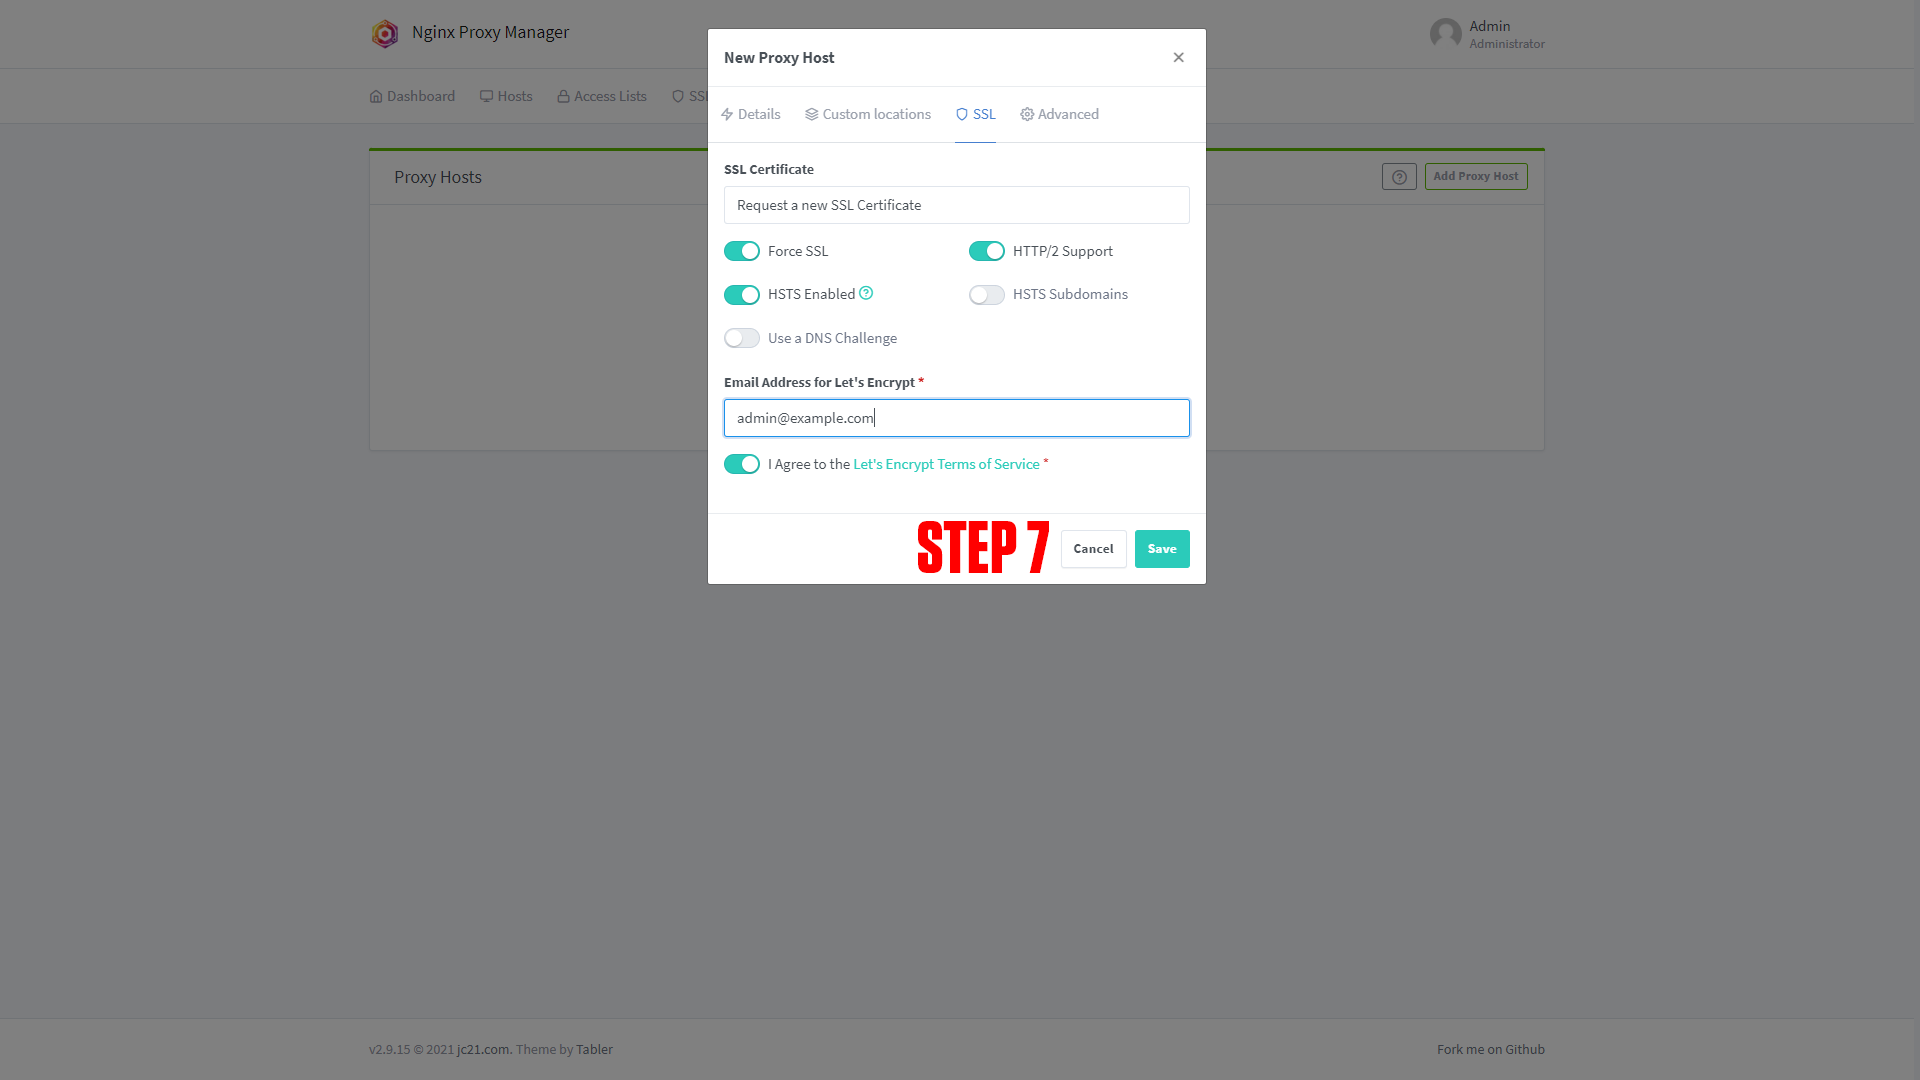
|
¶ Configuring GitLab
¶ (How to "Git" the root User Password)
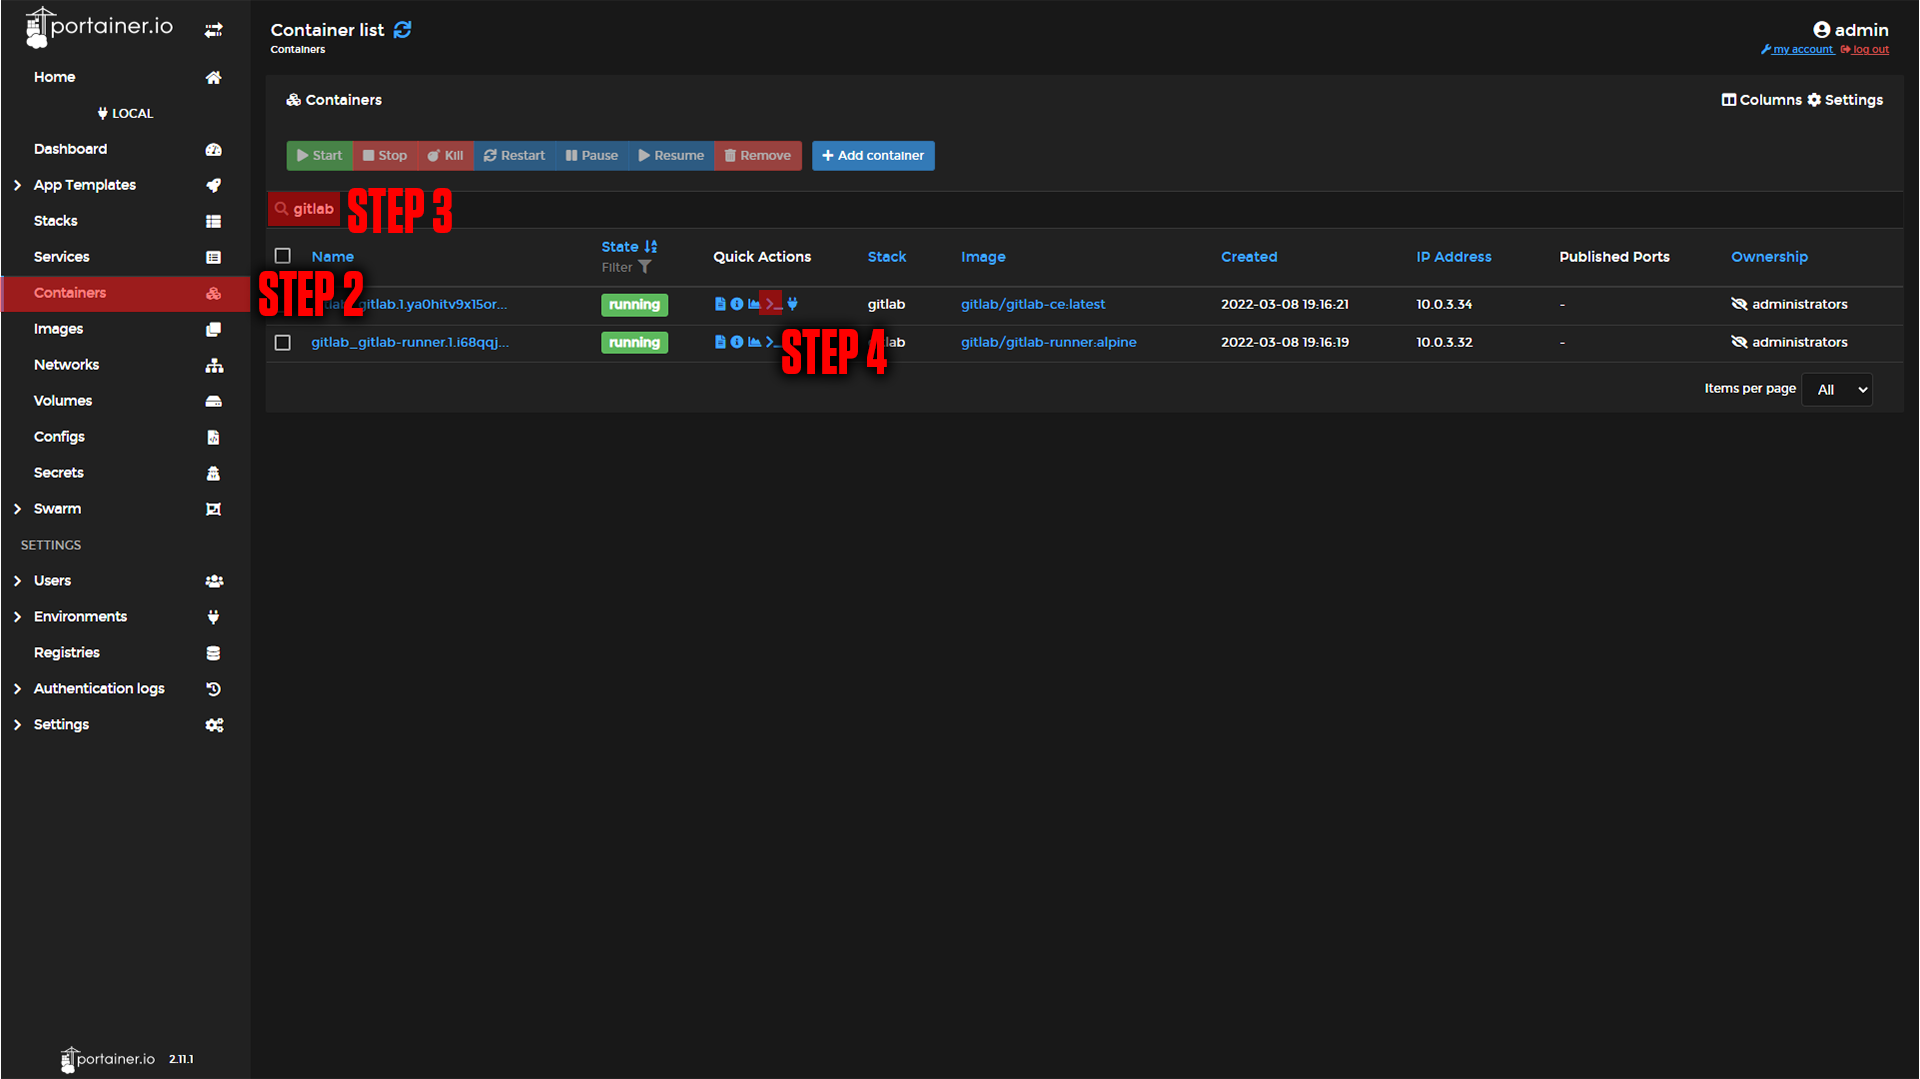
Step 1: Go back to portainer
Step 2: Click Containers
Step 3: Search gitlab (Make sure not to click the GitLab runner container)
Step 4: Click on the button that looks like this “>_”
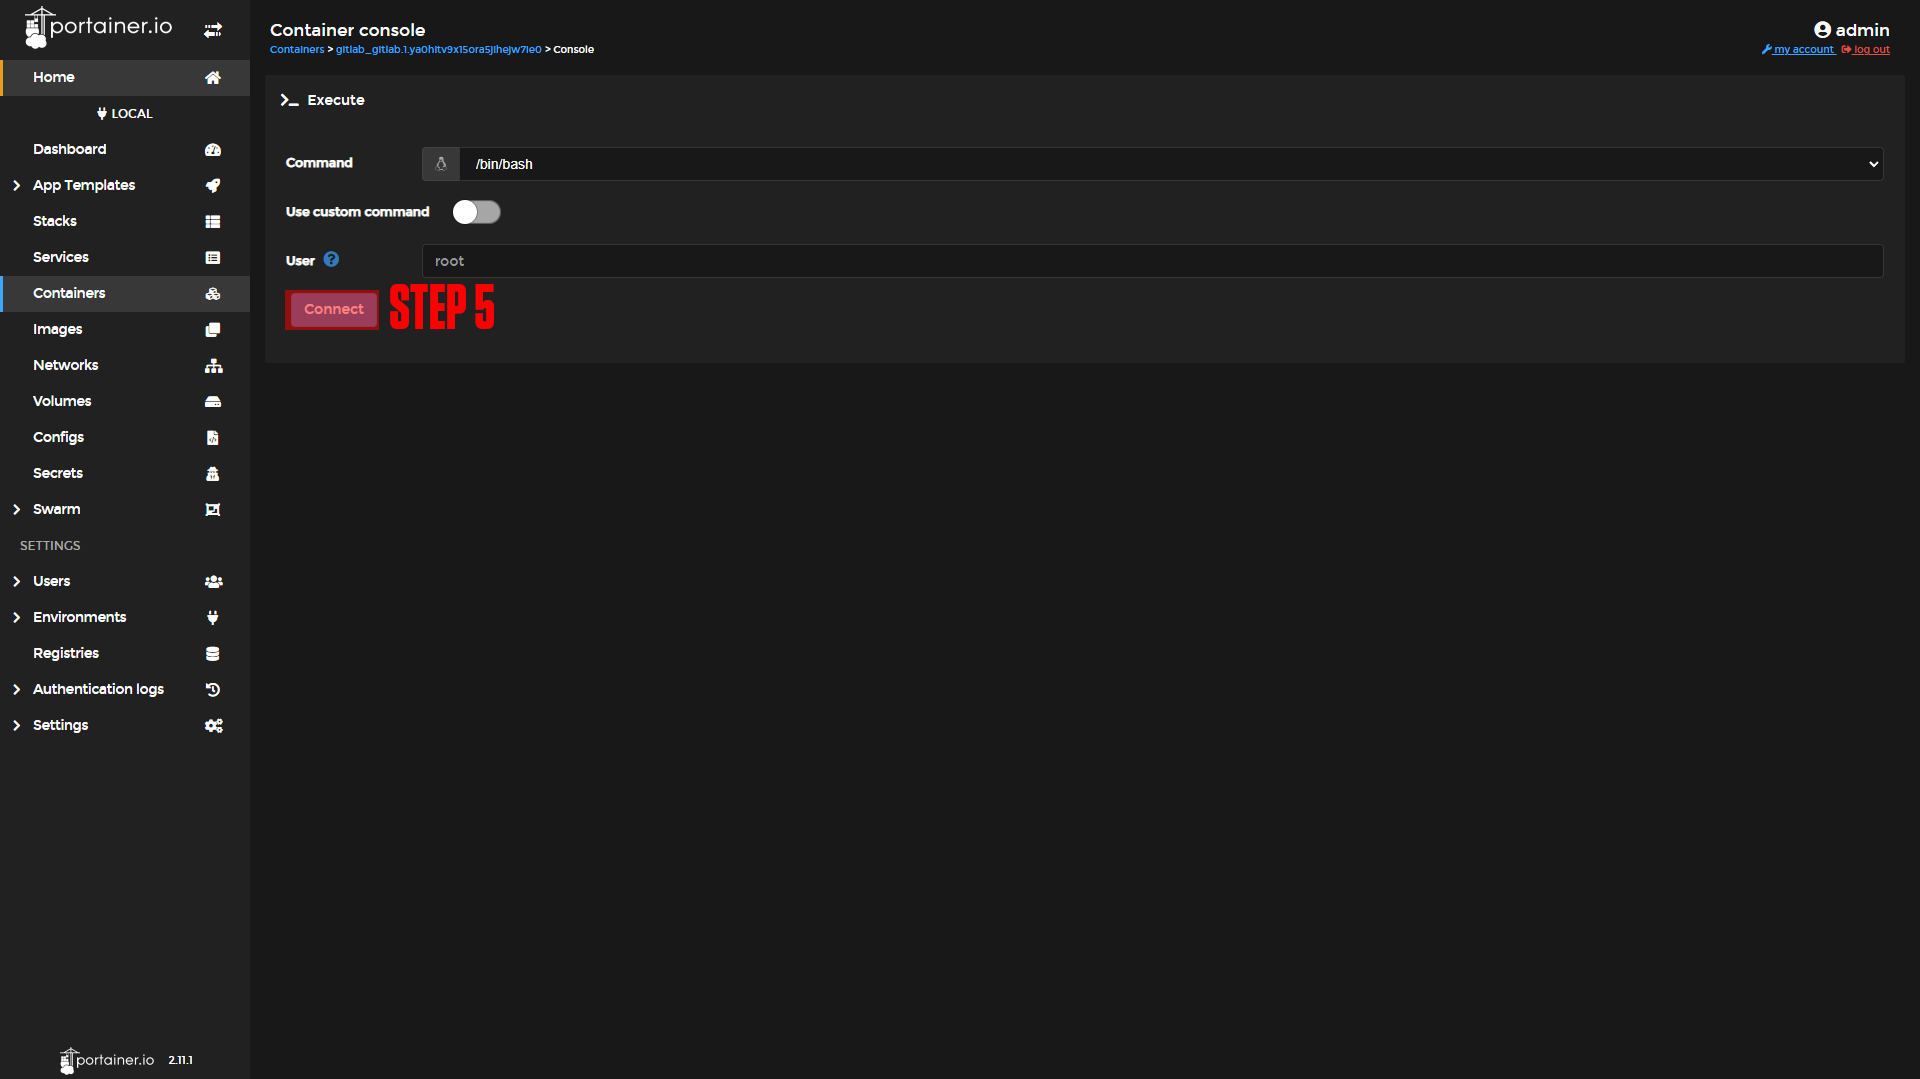
Step 5: Click Connect
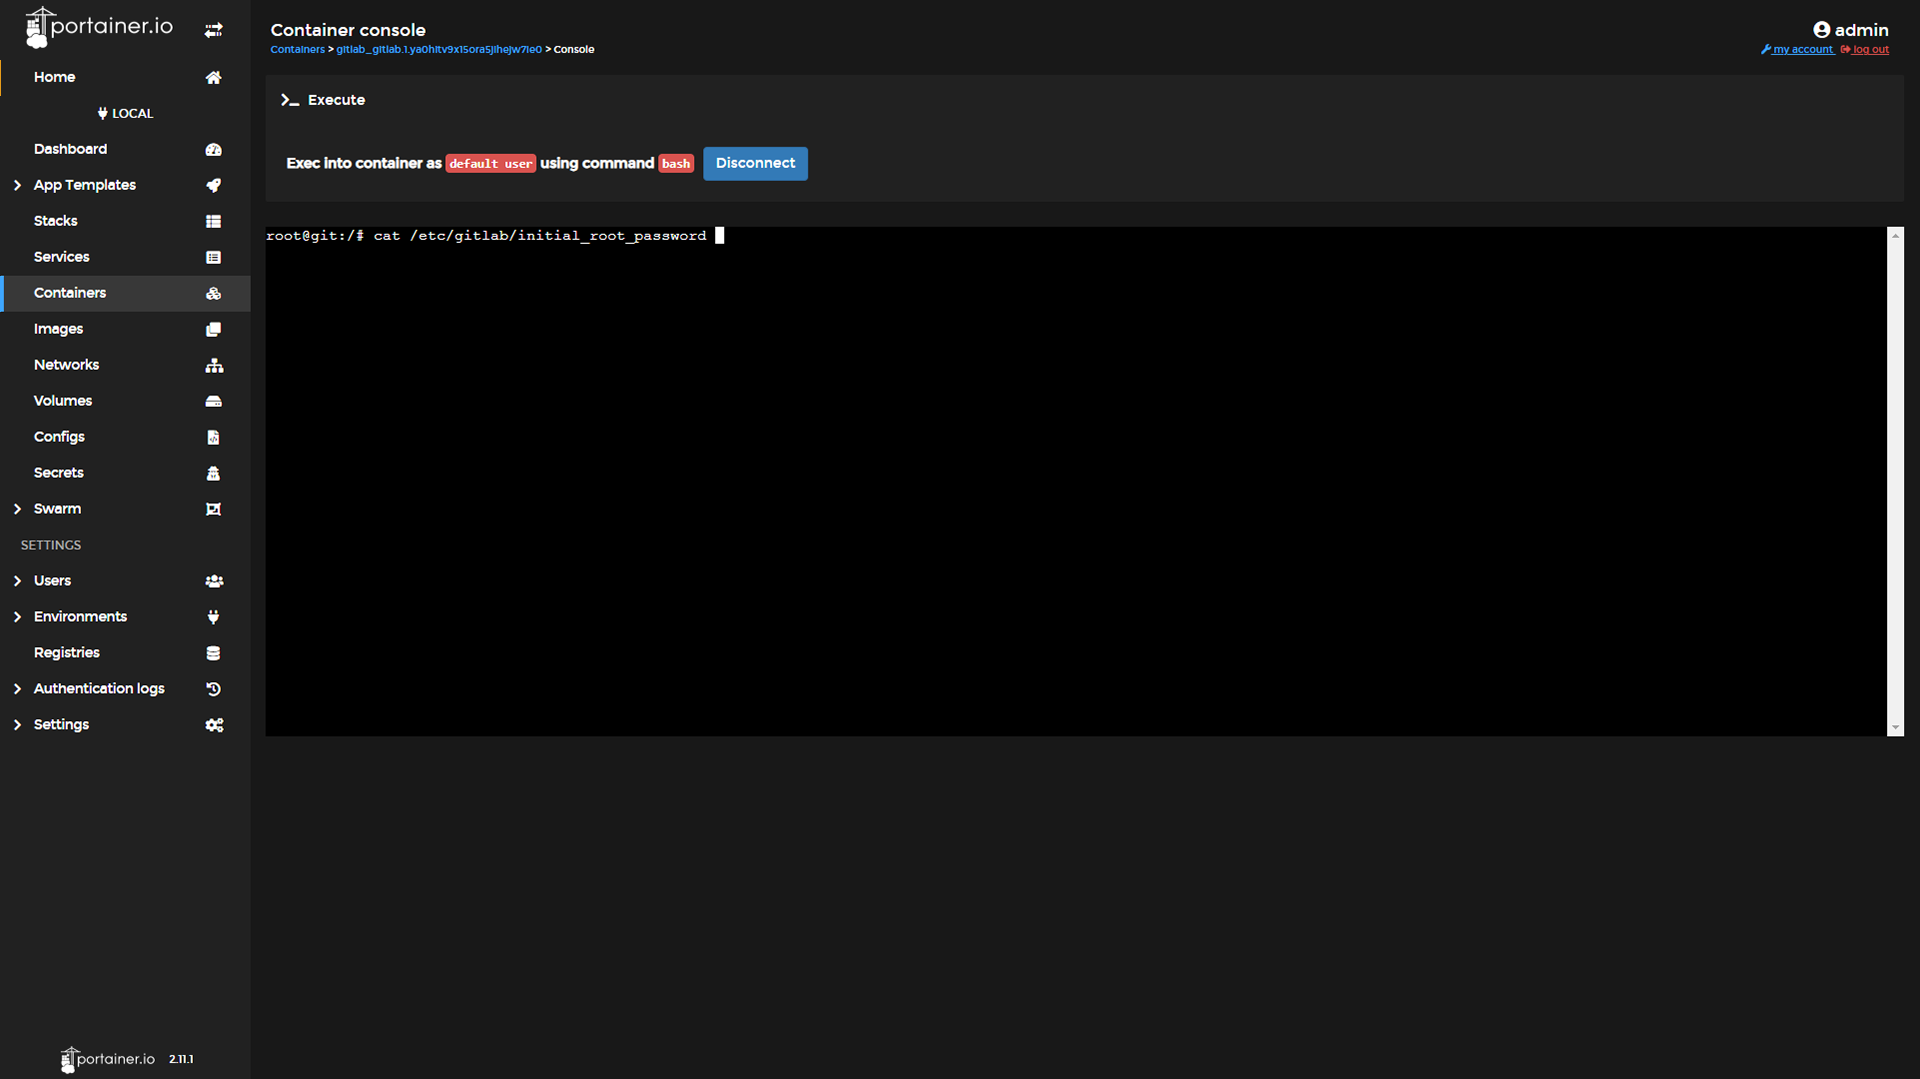
Step 6: Run this command cat /etc/gitlab/initial_root_password
Press Enter and your password should appear.
 |
 |
 |
¶ Logging in
After setting up your domain name and retrieving your password it's time to log in. Go to the URL you chose for your application. You should arrive at a screen like this!
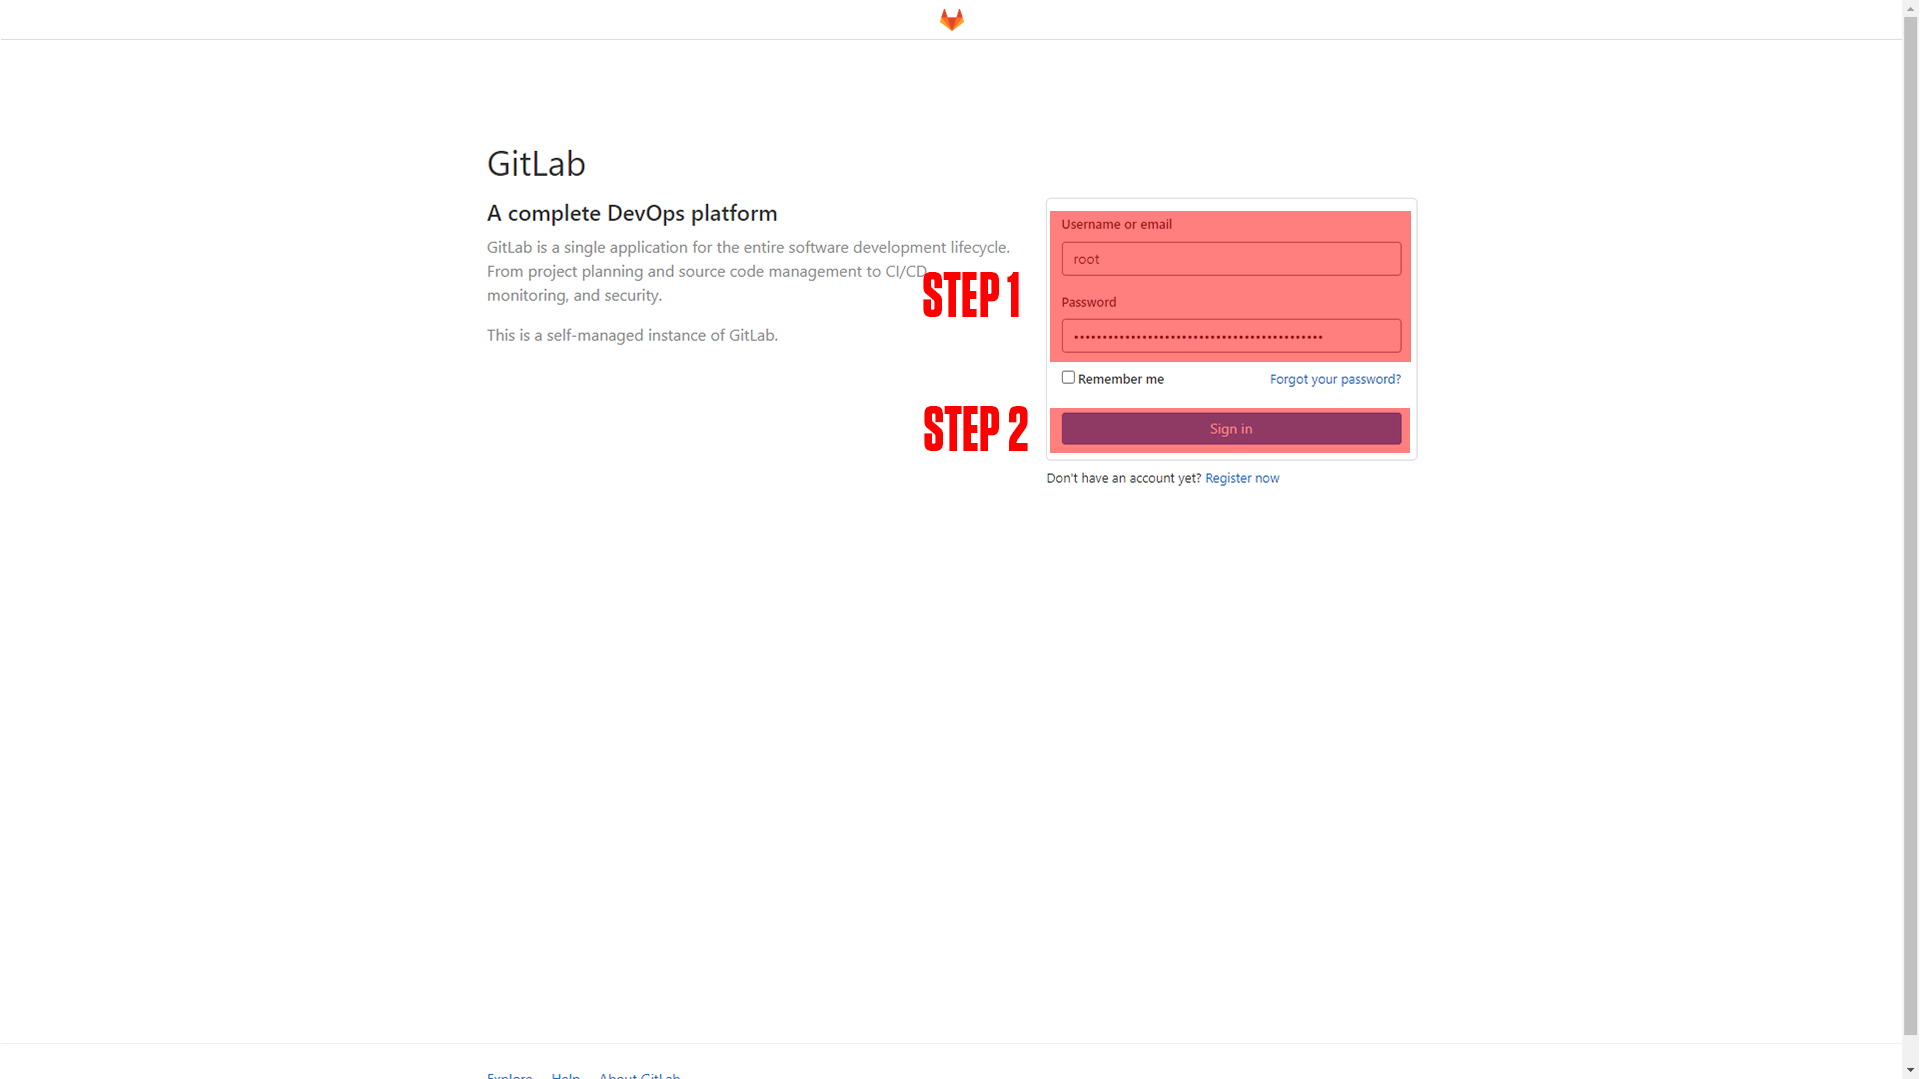
(If you do not arrive at a screen like this then something is wrong! Our premium members can open a support ticket Here!)
Step 1: Log in with the root account information.
- User: root
- The password for your root account can be found by going into the console of your container, and
cat /etc/gitlab/initial_root_password
Step 2: Sign in.
We highly recommend you change the root user password and create a new account. Use your created user account to create repositories and manage your GitLab instance.
¶ Conclusion
Congrats! This is the basic setup for GitLab, as mentioned at the beginning we have a more in-depth course available at TrueFreedomTech.com. To learn how to use GitLab go Here!