¶ Jellyfin: Media Server
Jellyfin is an open-source media server used to store primarily video. It also allows for photos, books, comics, music, Live TV, and Internet Radio.
You can learn more about Jellyfin from the links below:
¶ Introduction
Jellyfin is a great media server alternative to Plex or Kodi. We like it because it's open-source, self-hosted, and easy to use. It is important to note that True Freedom Tech does not support piracy considering that most of the content you may want to host here is not your own, or is easier and cheaper to pirate then lets say upload the files off of an official DVD or CD. You don't even have a disk tray! That being said all we are going to show you is how to get the app running and where to put the files. The files in question are all on you illegal or not. True Freedom Tech is not responsible for how this app is used and not liable for any damages you may face from pirating.
We will be running GitLab using Docker, Docker-Compose, Portainer, and Nginx Proxy Manager. We have an advanced course on how to do this at TrueFreedomTech.com covering multiple configurations and separating data from compute.
¶ Overview
We are going to assume you already have a working server with Docker, Portainer, and Nginx Proxy Manager running. We will go over the configuration file, docker-compose, and configuring Nginx-Proxy-Manager. We are not using our own images for this stack so please consult the Docker hub and GitHub links for more information regarding the Docker image and source code.
This is strictly how to get the app running. Once again, we cover how to do this at TrueFreedomTech.com in much more detail! This will get beginners running, and experts should be able to adapt this to their own configuration with relative ease.
¶ Docker Config
Open up Portainer and log in. If you are not familiar with Portainer here are the official docs:
We will be adding 1 custom configuration to our stack. The source code is linked below and can be found below the steps.
Add these files in Portainer:
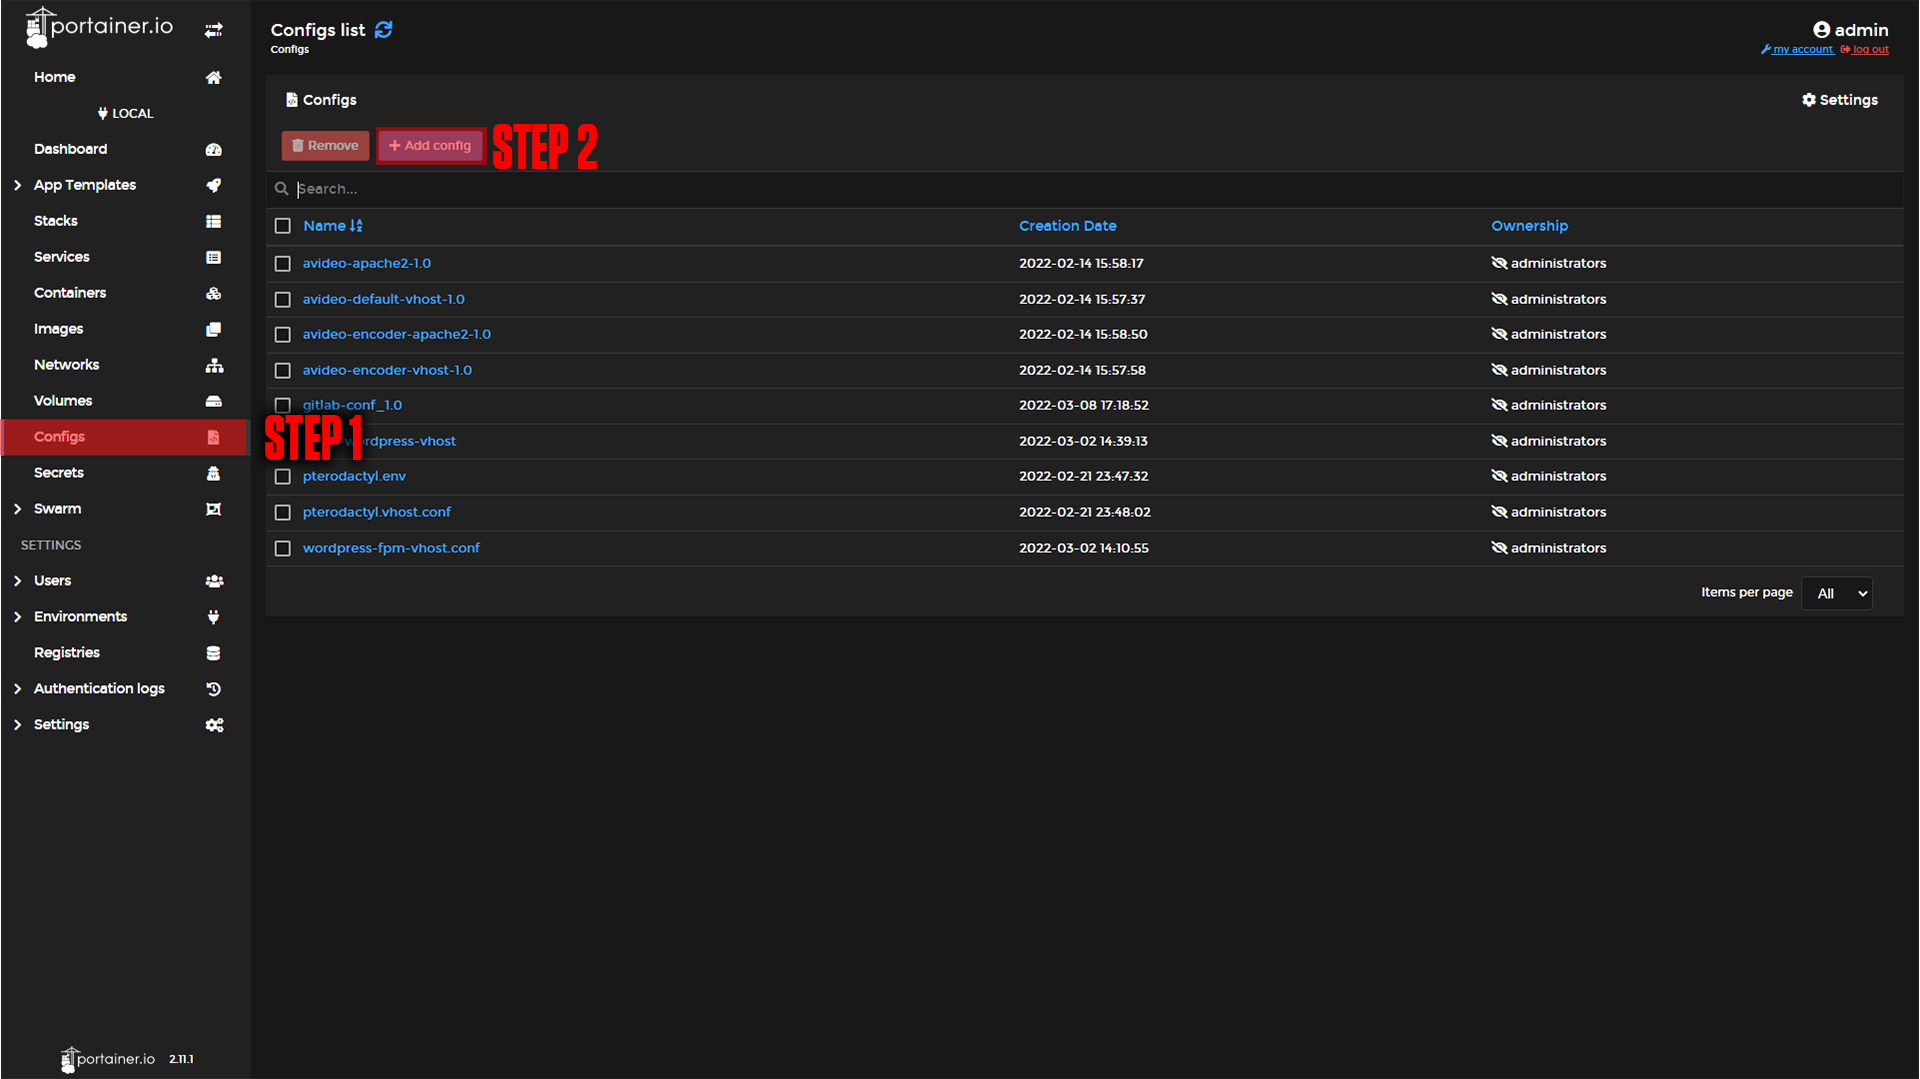
Step 1: Go to Configs.
Step 2: Click Add Config.
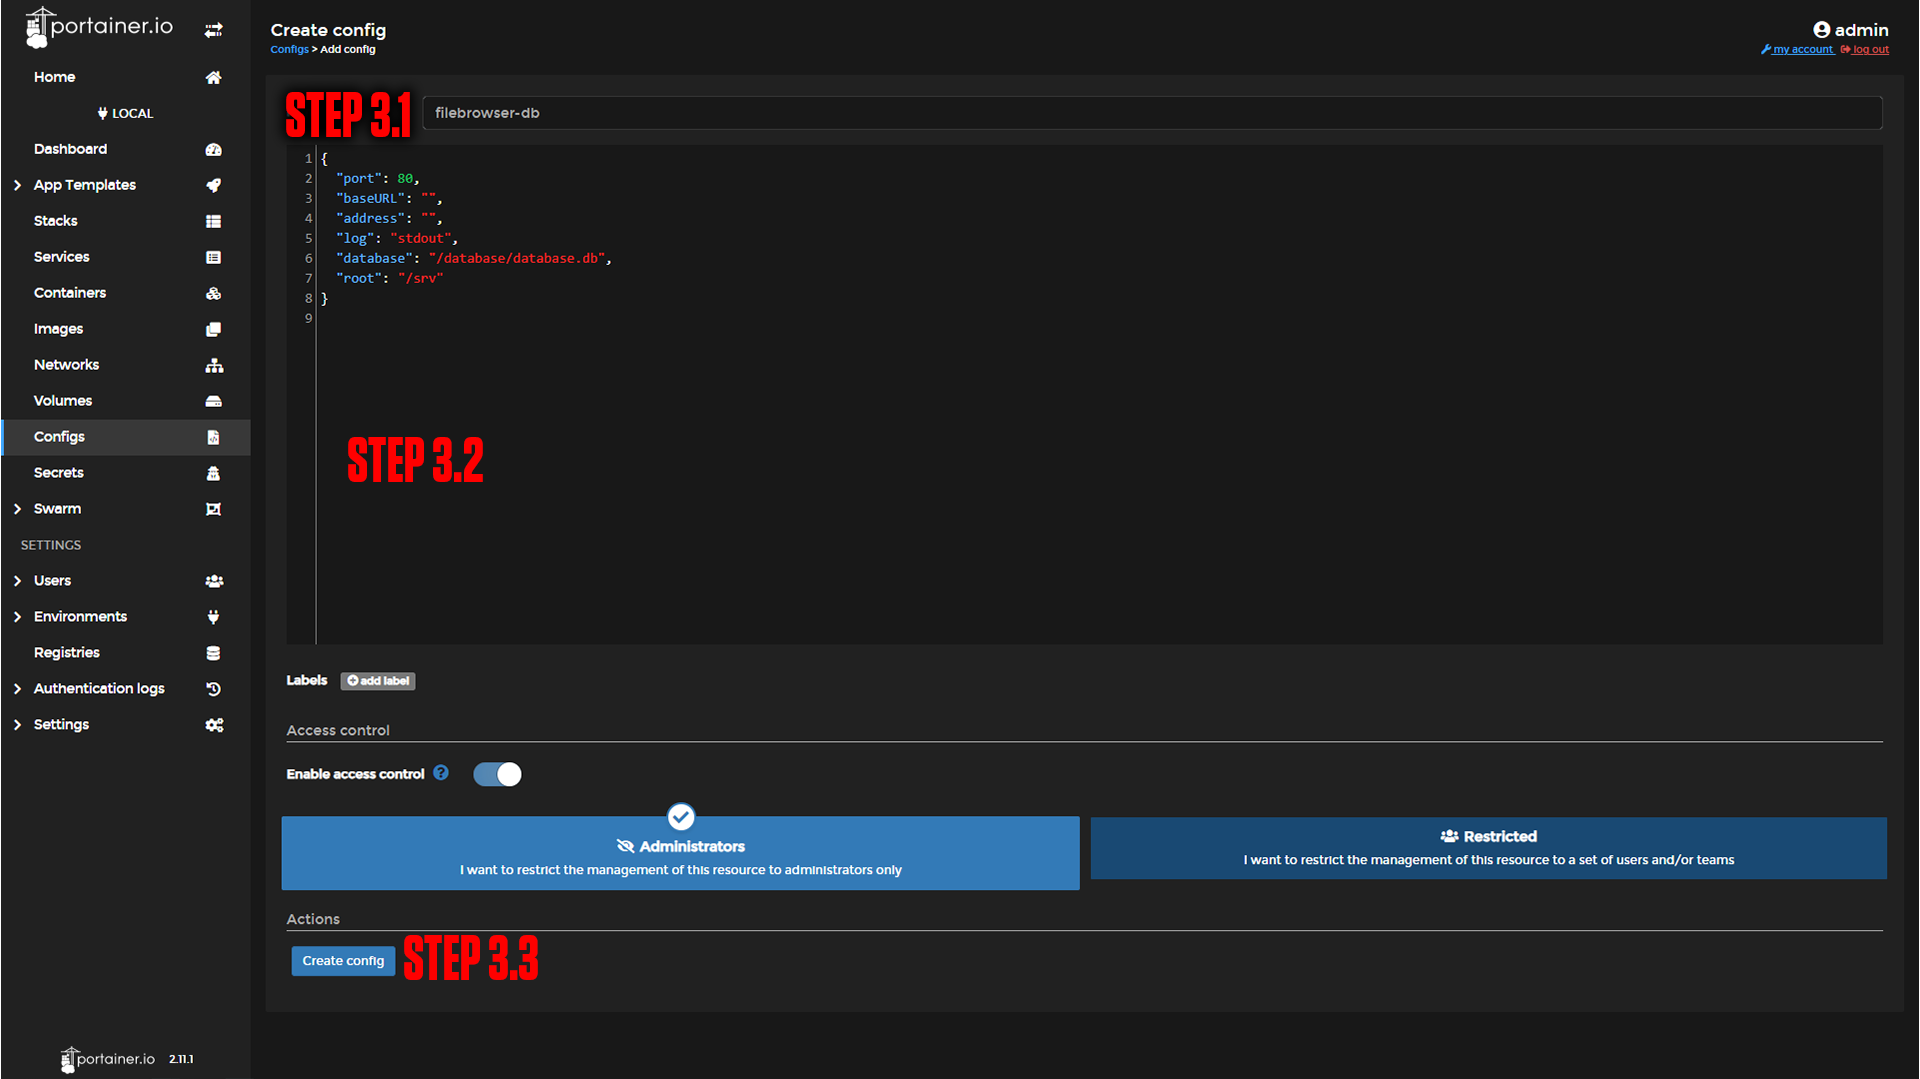
Step 3: Paste the name of the file and code as-is.
|
|
{
  "port": 80,
  "baseURL": "",
  "address": "",
  "log": "stdout",
  "database": "/database/database.db",
  "root": "/srv"
}Now moving on to the compose.
¶ Docker-Compose
The next step is our Docker-Compose. We will be deploying this with Portainer.
If you are not familiar with Portainer or Docker-Compose here are the official docs:
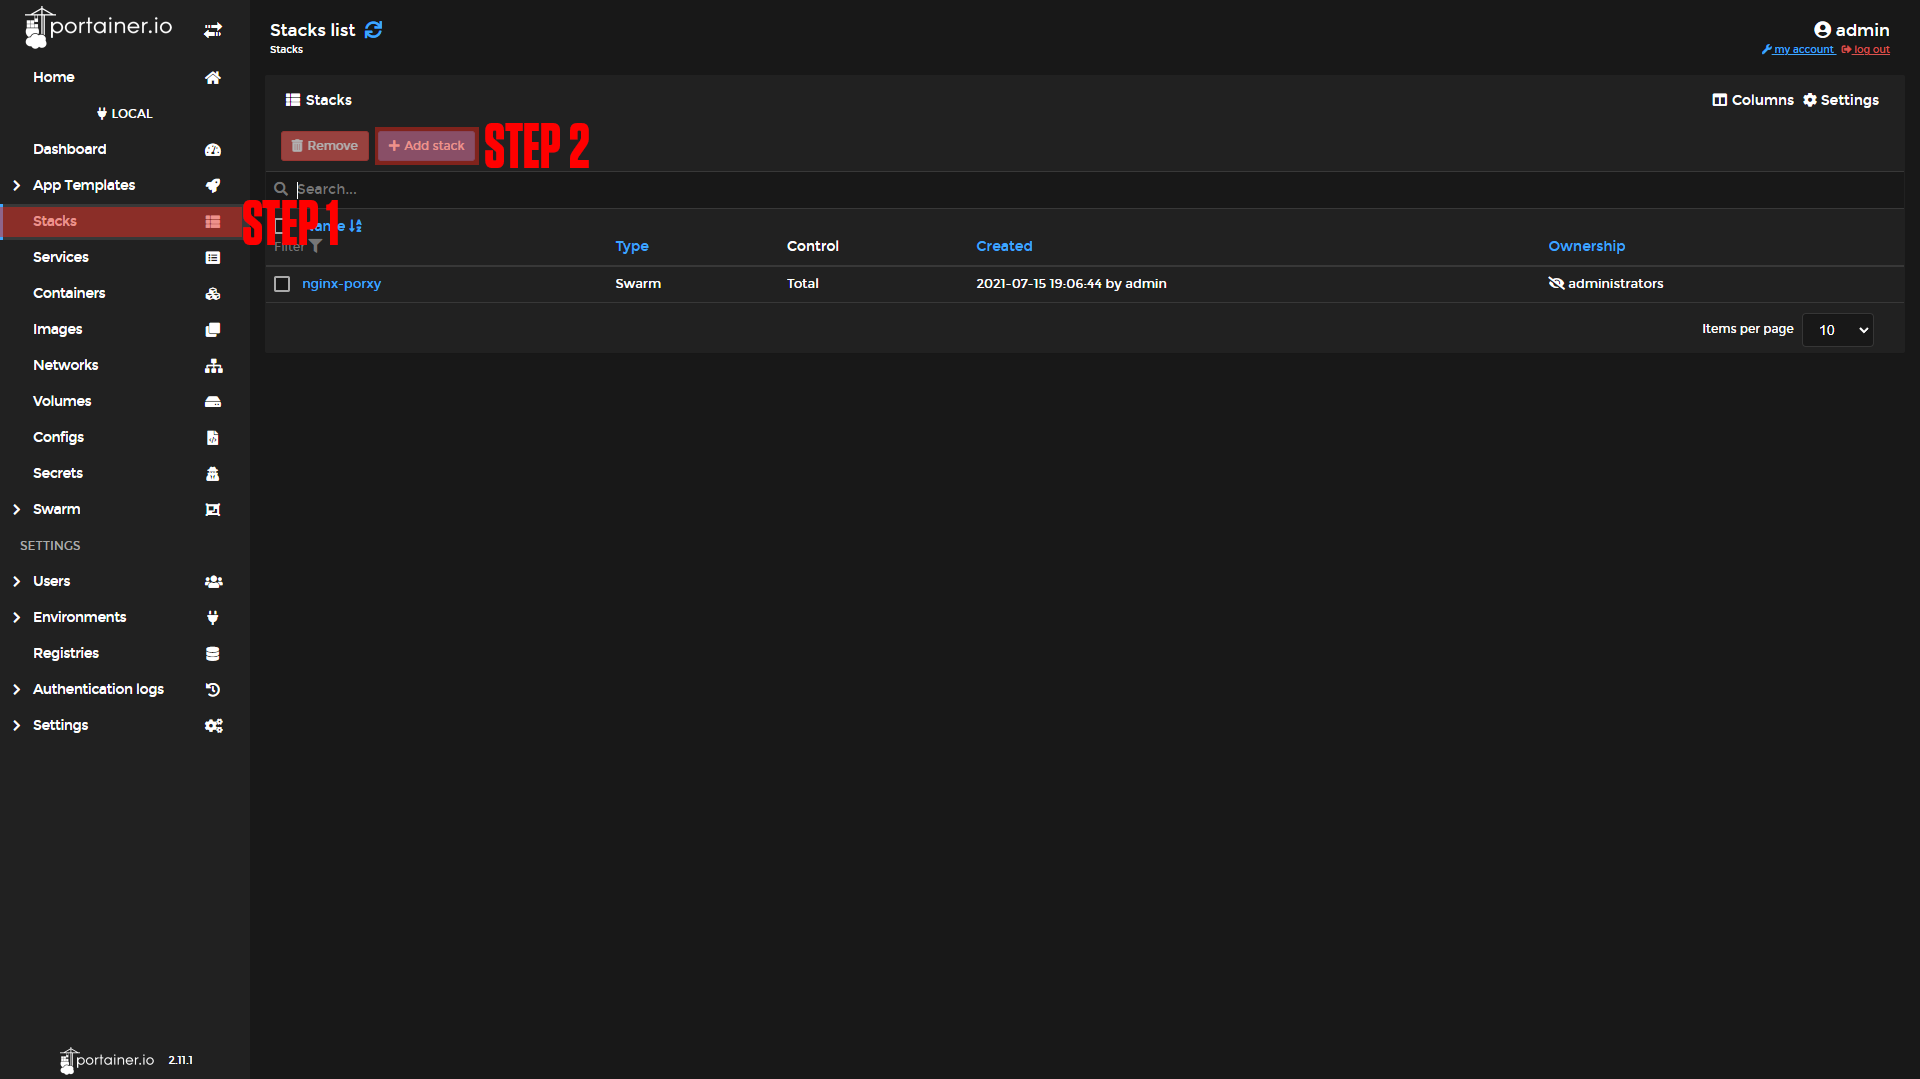
Step 1: Go to Stacks.
Step 2: Click Add Stack.
Step 3: Name your Stack (Ex. jellyfin)
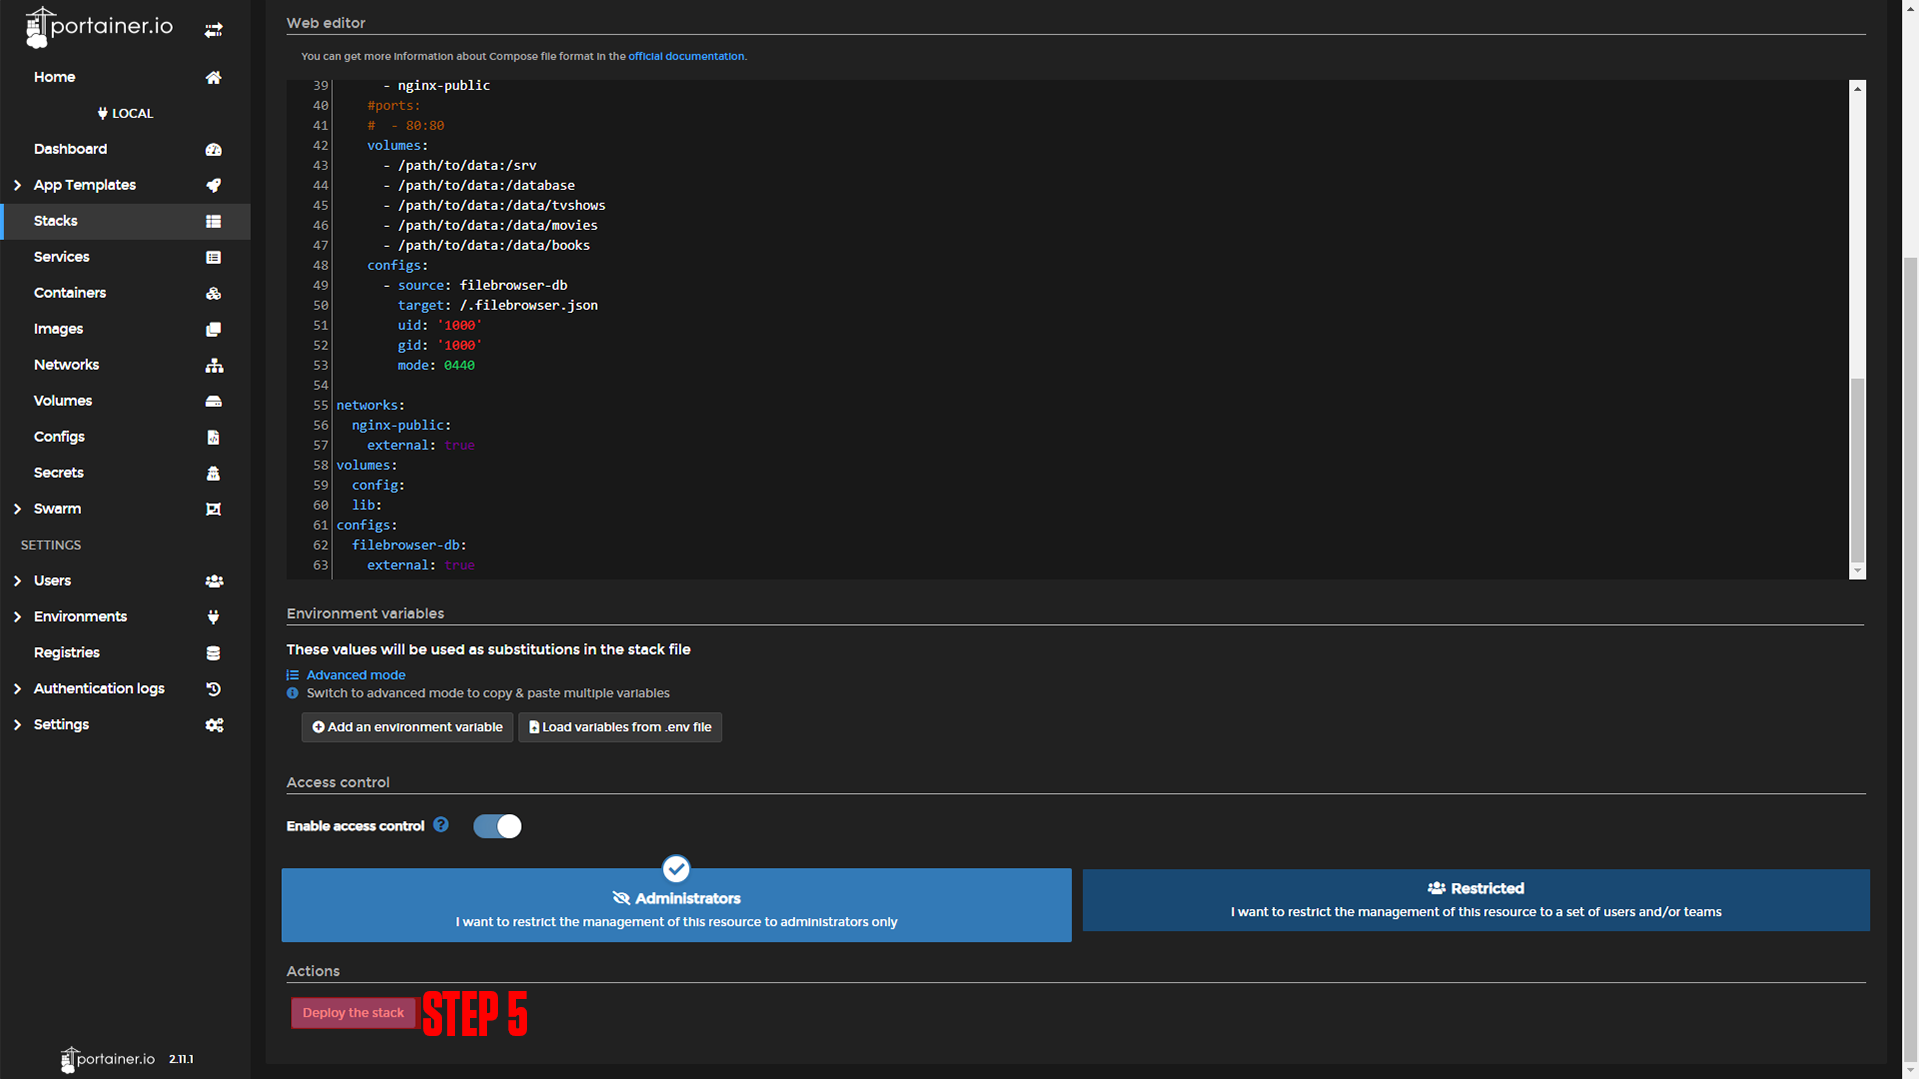
Step 4: Paste in the Contents Below. (make sure to change the Server URL and the volumes data path.)
*Note: The volumes data path should be unique for each volume to avoid all the data being in the same folder. (Ex. /etc/jellyfin/movies) This folder has to exist on your host machine in order to use a bind mount. This application uses bind mounts because 2 containers are manipulating the data simultaneously. If you are using Docker Swarm you would need a placement variable to keep the app from moving nodes or you would need to come up with a different solution for sending and receiving files to the server as jellyfin does not have a built in upload feature. Our paid course available at TrueFreedomTech.com explains this in depth and offers better solutions to the problem.
*Note: You can also use docker volumes for this. Change path/to/data to something link “tvshows:/data/tvshows” for jellyfin and “tvshows:/srv/tvshows” for file browser. make sure to define the volumes at the bottom of the stack as well.
Step 5: Deploy the Stack.
|

|
|
#Docker-compose version
version: '3.8'
#Apps
services:
  #Name of app
  jellyfin:
    #Docker image
    image: ghcr.io/linuxserver/jellyfin
    #Docker Network
    networks:
      - nginx-public
    #Ports to expose
    ports:
      - 8096:8096
      - 8097:8097
    #App restart policy
    restart: unless-stopped
    #Environmental variables
    environment:
      - PUID=1000
      - PGID=1000
      - TZ=america/new_york
      - JELLYFIN_PublishedServerUrl=https://Your-Domain.com
    #App data
    volumes:
      - config:/config
      - /path/to/data:/data/tvshows
      - /path/to/data:/data/movies
      - /path/to/data:/data/books
      - lib:/opt/vc/lib #optional
  filebrowser:
    image: filebrowser/filebrowser:latest
    restart: unless-stopped
    environment:
      - PUID=1000
      - PGID=1000
      - TZ=America/New_York
    networks:
      - nginx-public
    #ports:
    #  - 80:80
    volumes:
      - webdata:/srv
      - dbdata:/database
      - /path/to/data:/srv/tvshows
      - /path/to/data:/srv/movies
      - /path/to/data:/srv/books
    configs:
      - source: filebrowser-db
        target: /.filebrowser.json
        uid: '1000'
        gid: '1000'
        mode: 0440

networks:
  nginx-public:
    external: true
volumes:
  config:
  lib:
  webdata:
  dbdata:
configs:
  filebrowser-db:
external: true¶ Nginx-Proxy-Manager
Before we configure our apps, we will set up our domains using Nginx-Proxy-Manager. If you followed our Nginx-Proxy-Manager stack setup you should be able to copy everything we do step by step.
¶ Jellyfin Domain Setup
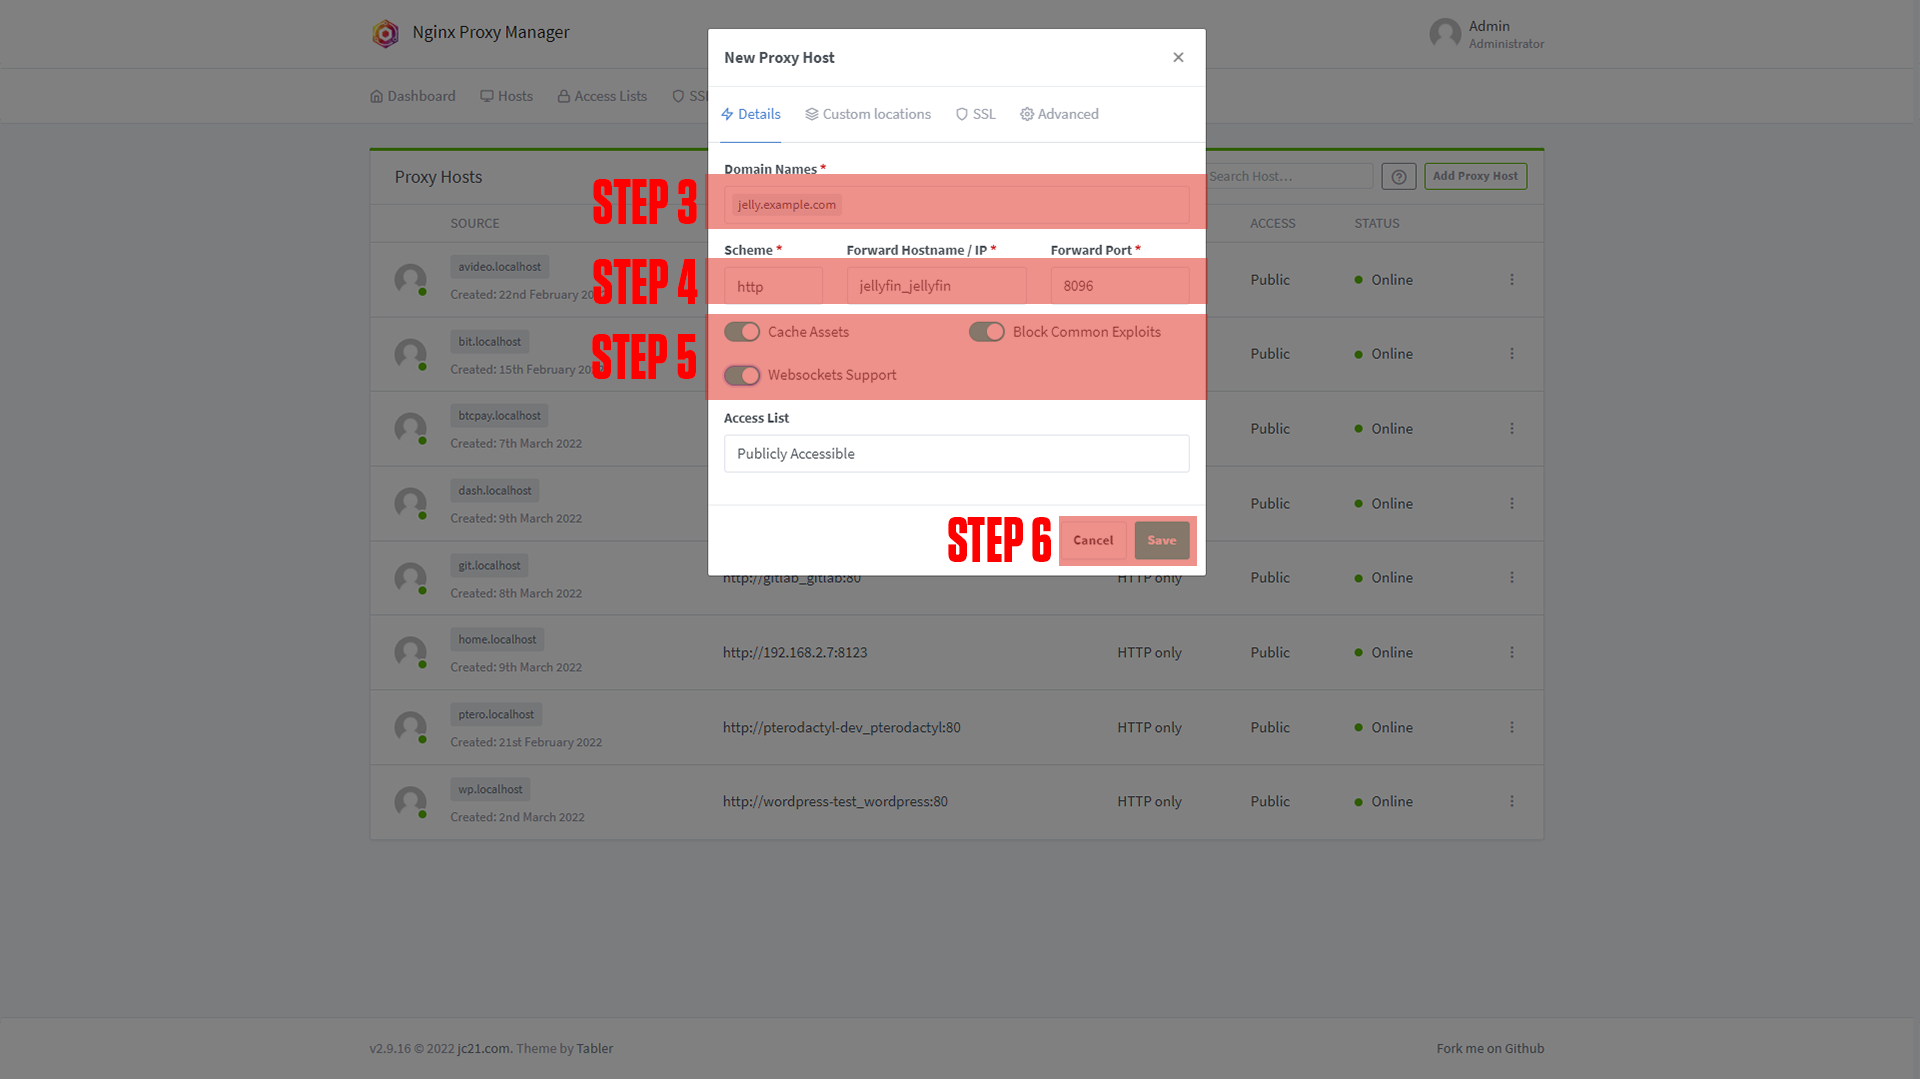
Step 1: Copy the jellyfin service name.
This should be jellyfin_jellyfin if you did not change the names of apps.
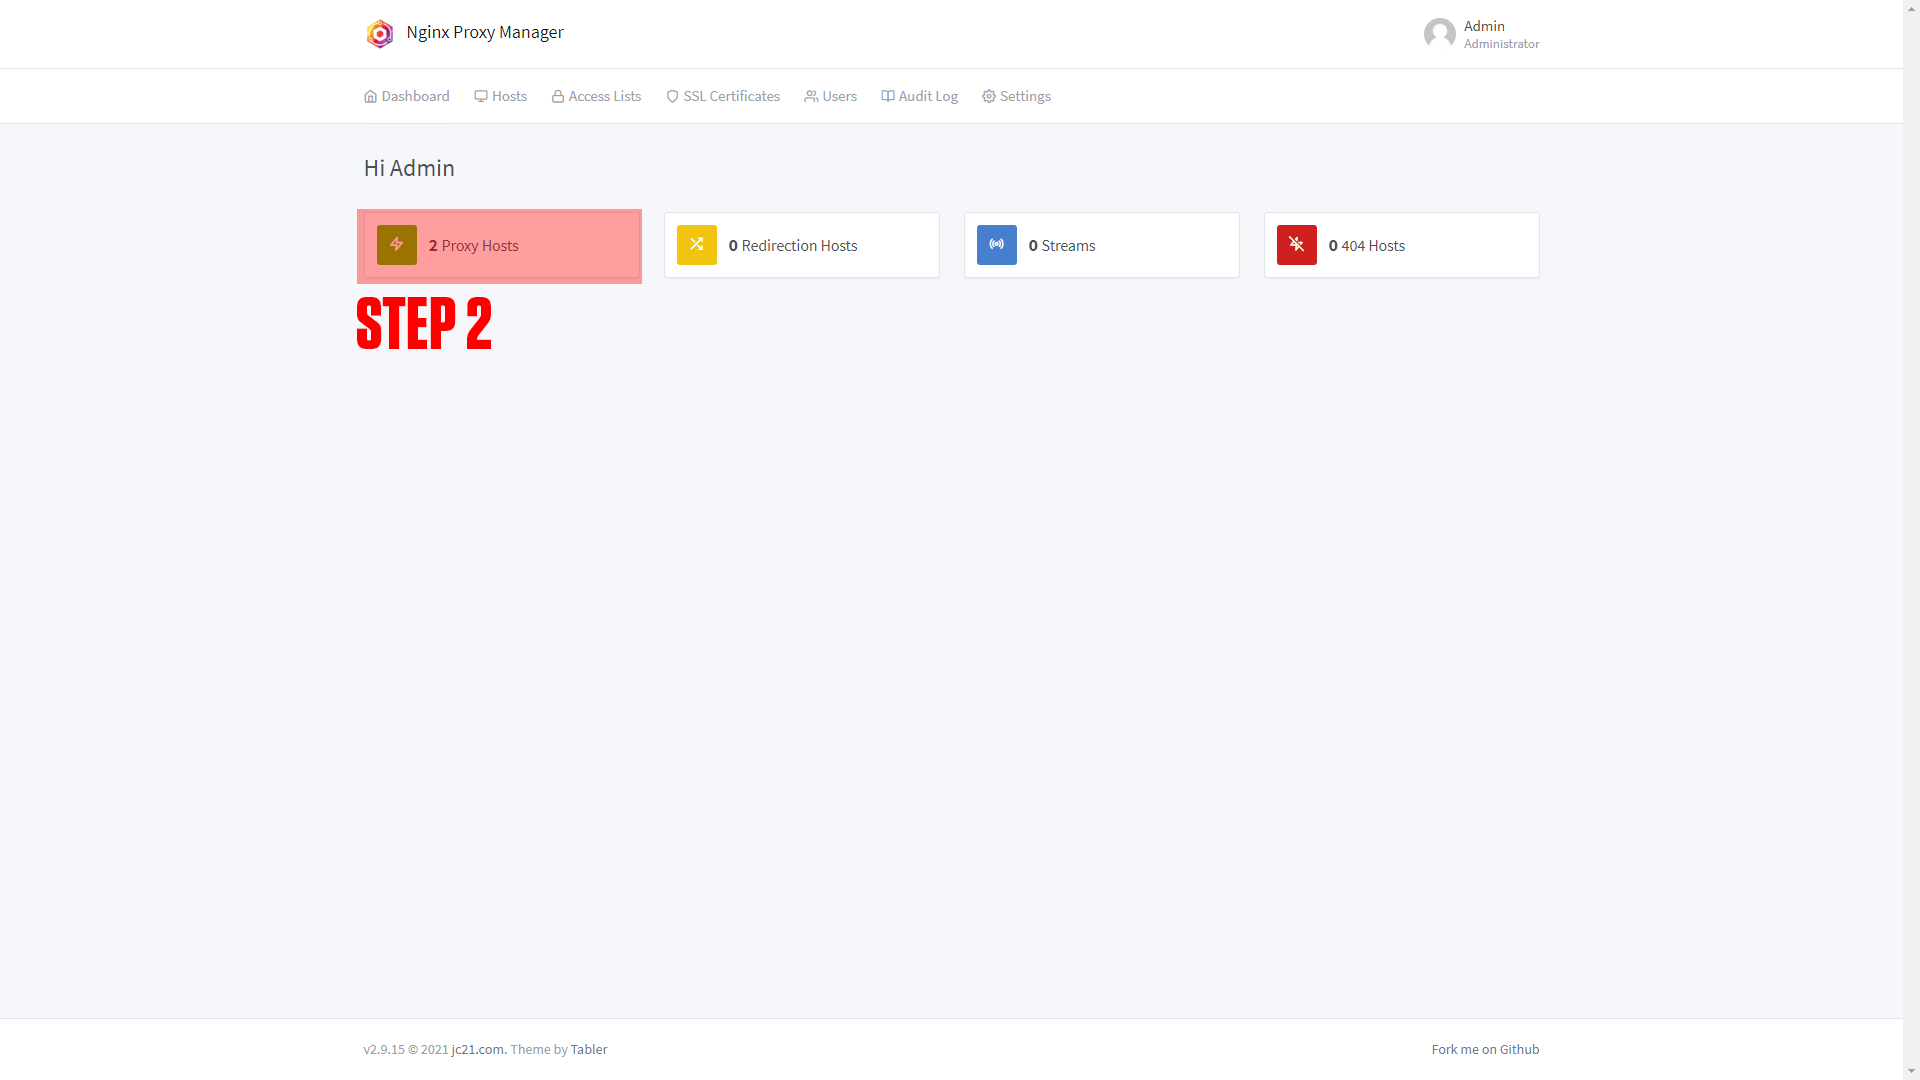
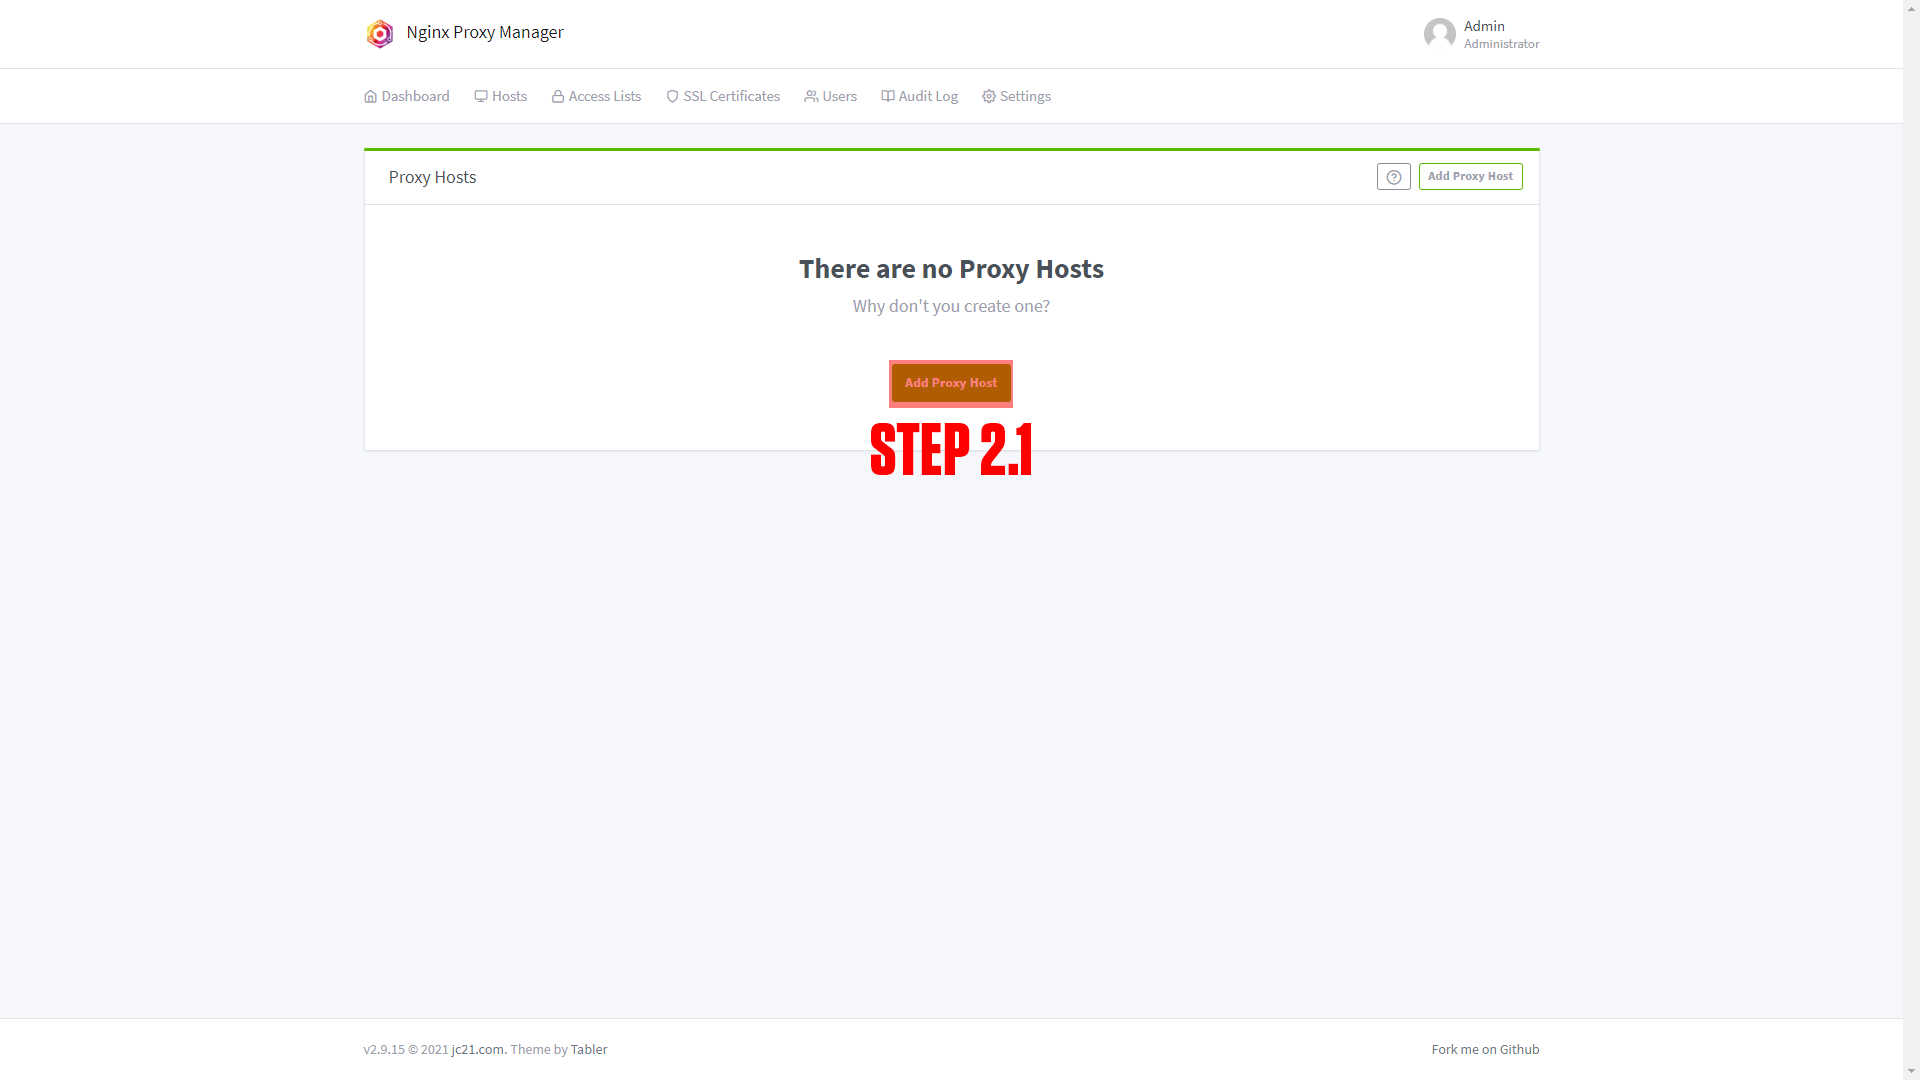
Step 2: Log in to Nginx-Proxy-Manager and create a new proxy host.
Step 3: Enter your Domain name (Ex. jelly.example.com)
Step 4: Add the service name to the Forward Hostname / IP at port 80.
Step 5: Enable Cache Assets, Block Common Exploits, and Websockets Support.
Step 6: Click Save.
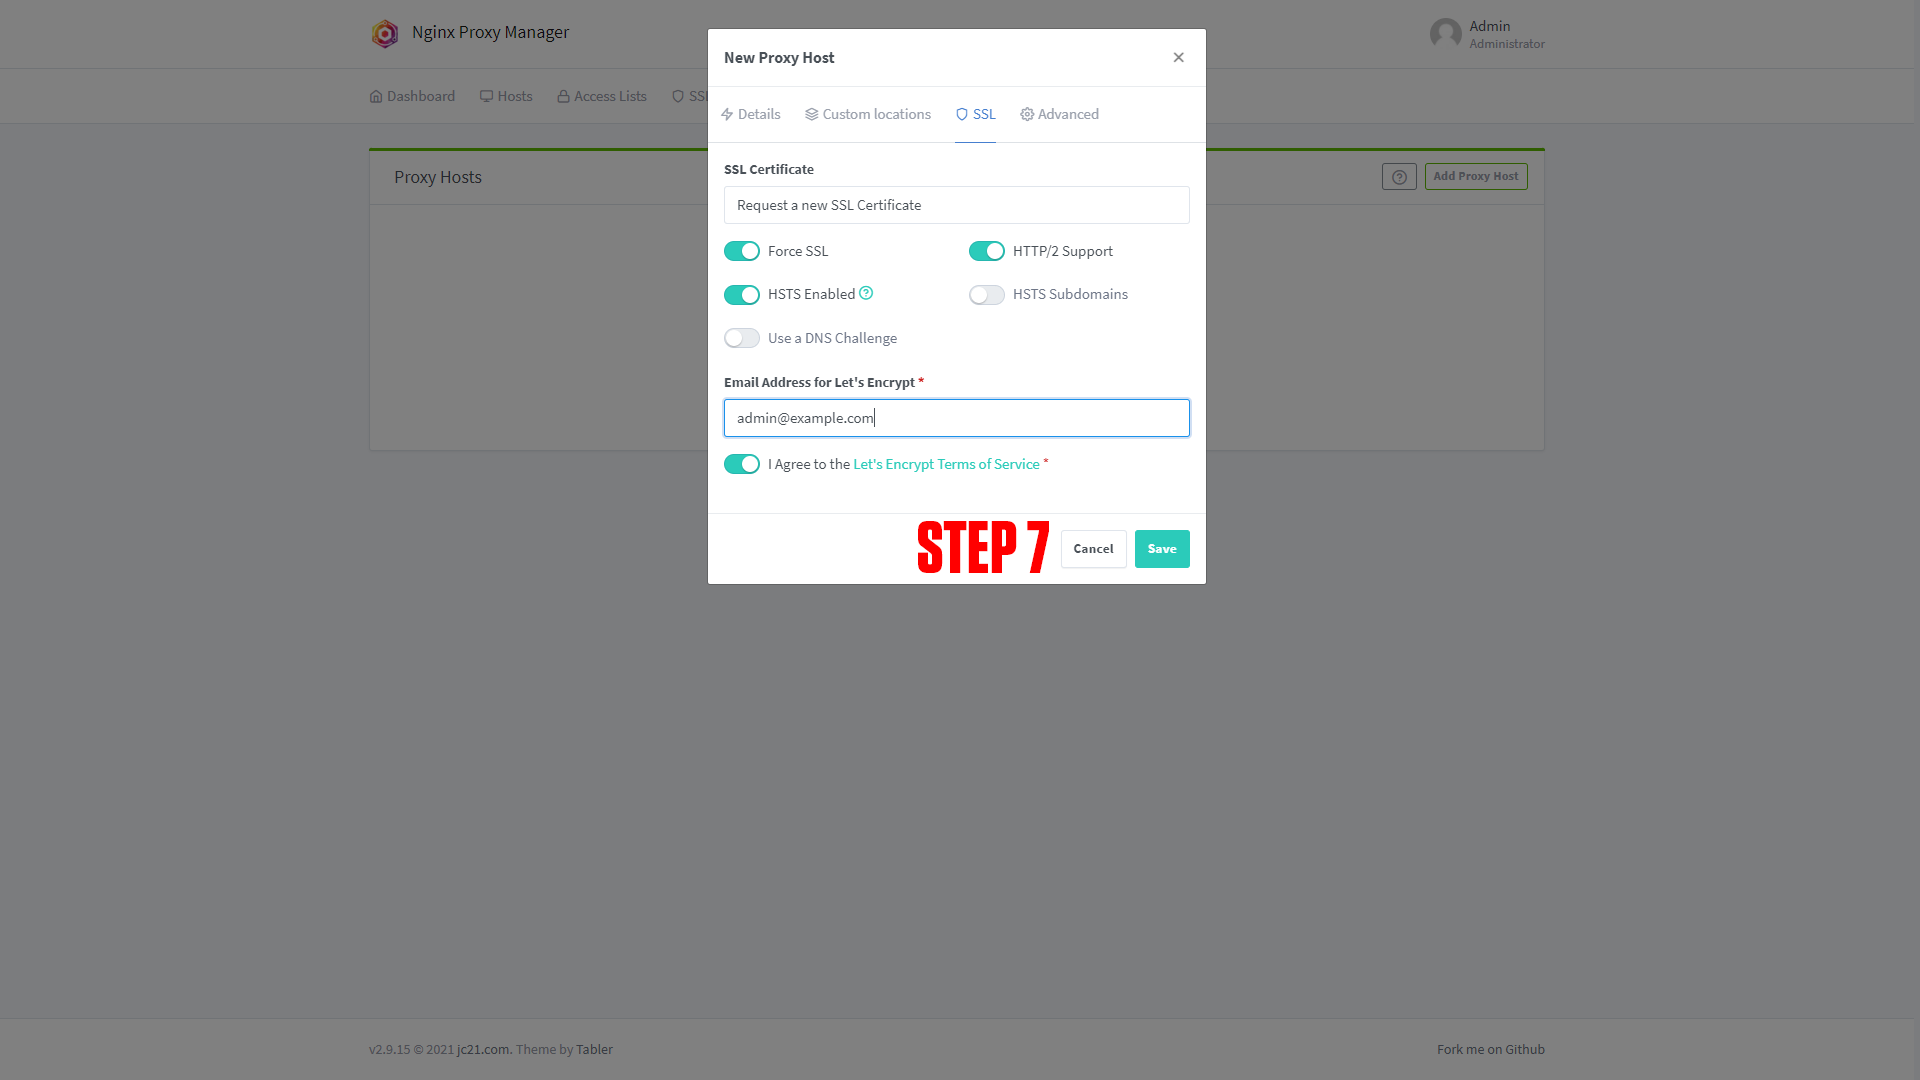
Step 7 (Optional): Enable SSL (we say this is optional, but you should always have an SSL cert if possible).
|
|
|
|
¶ File Browser Domain Setup
Step 1: Copy the File browser service name.
This should be jellyfin_filebrowser if you did not change the names of apps.
Step 2: Log in to Nginx-Proxy-Manager and create a new proxy host.
Step 3: Enter your Domain name (Ex. upload.example.com)
Step 4: Add the service name to the Forward Hostname / IP at port 80.
Step 5: Enable Cache Assets, Block Common Exploits, and Websockets Support.
Step 6: Click Save.
Step 7 (Optional): Enable SSL (we say this is optional, but you should always have an SSL cert if possible).
|
|
|

|
|
¶ Configuring Jellyfin
After setting up your domain name it's time to finish configuring the app. Go to the URL you chose for your application. You should arrive at a screen like this!
|
|

|

|
|
(If you do not arrive at a screen like this then something is wrong! Our premium members can open a support ticket Here!)
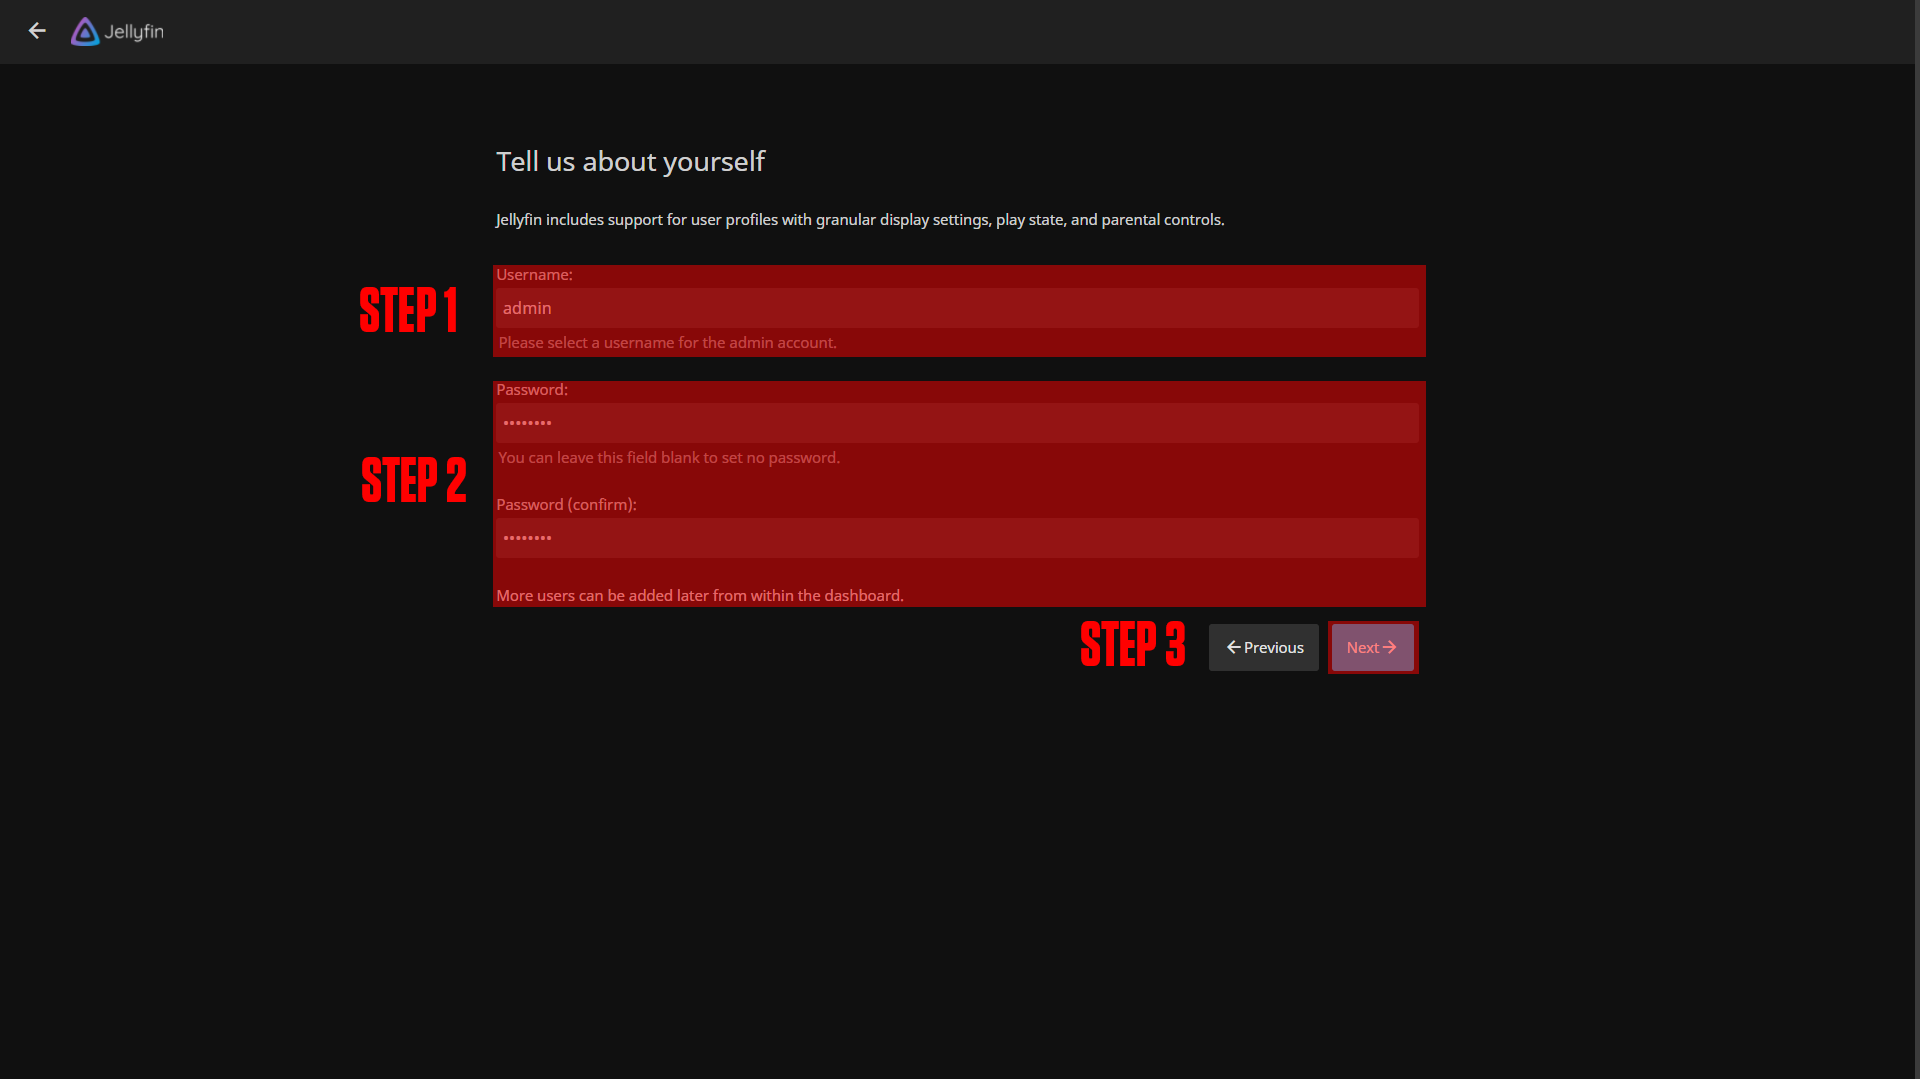
Step 1: Enter username.
Step 2: Enter password.
Step 3: Click Next.
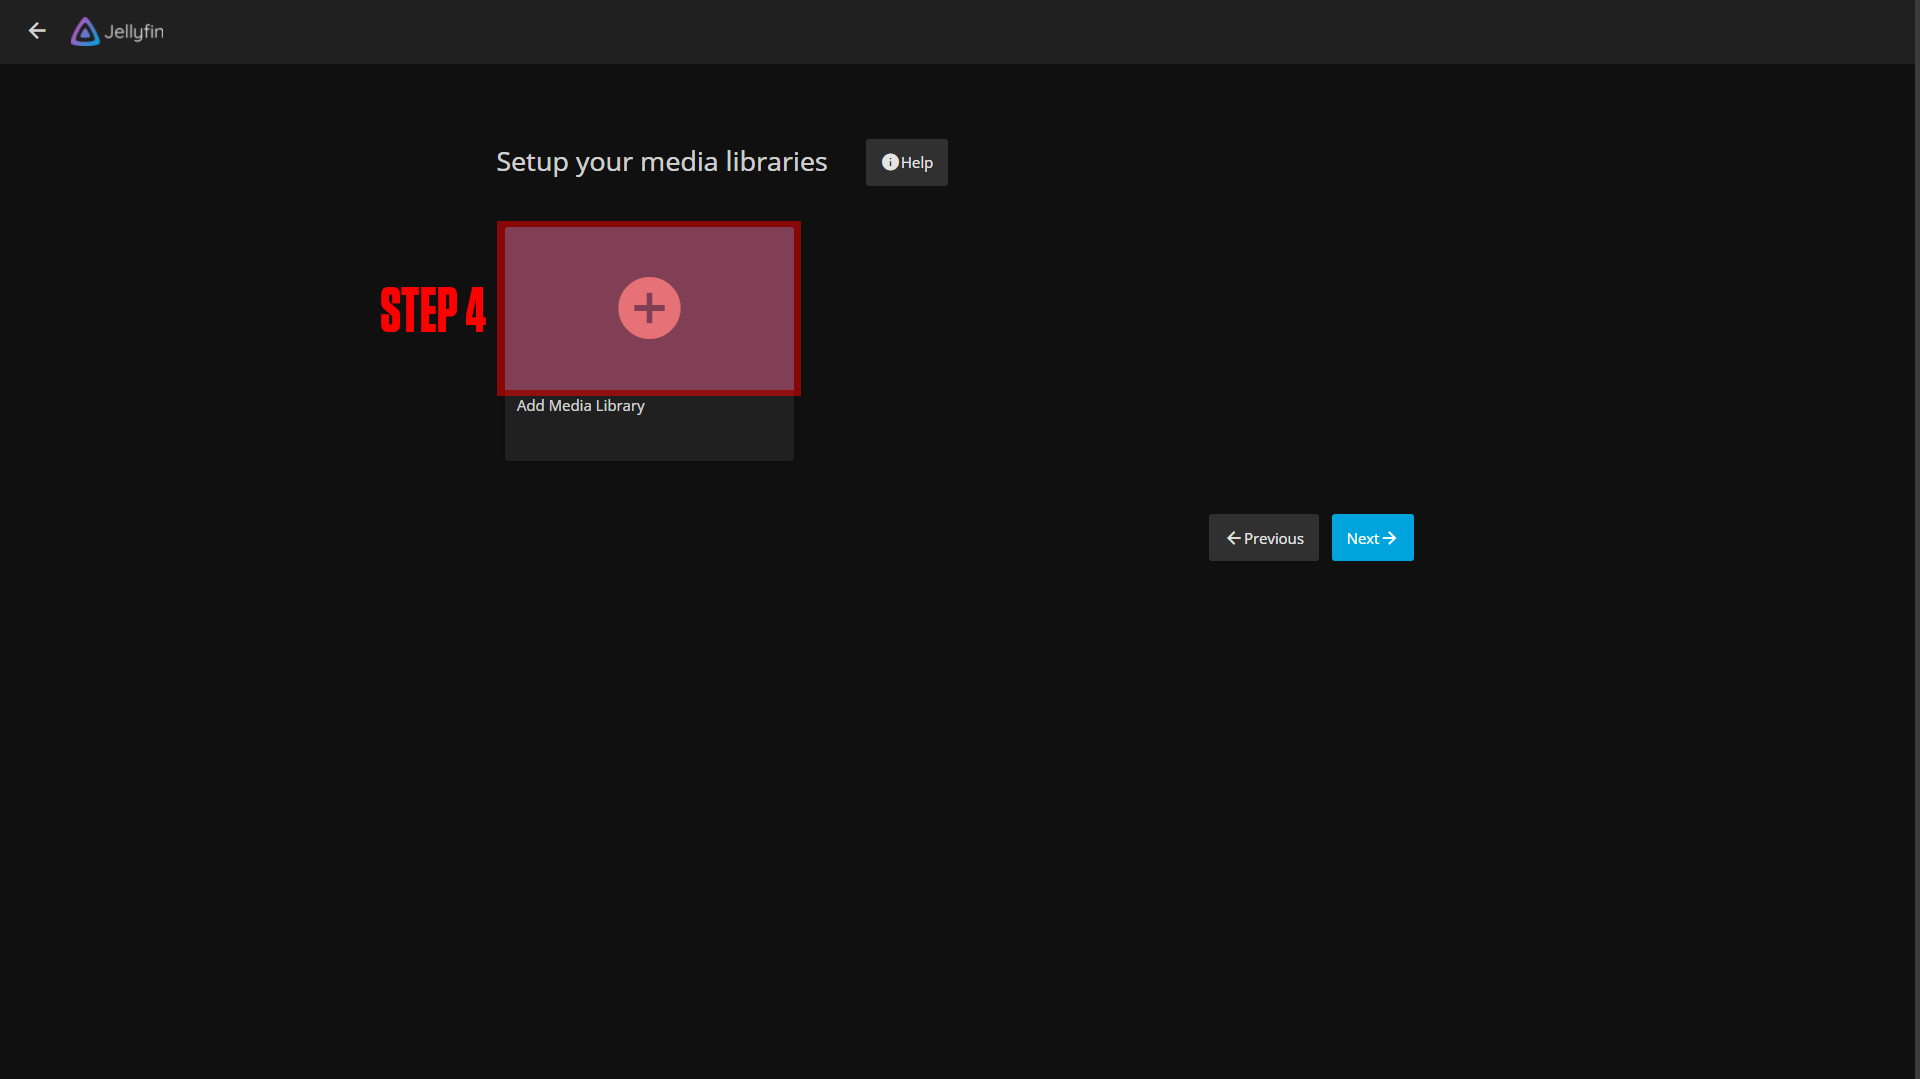
Step 4: Click Add media library.
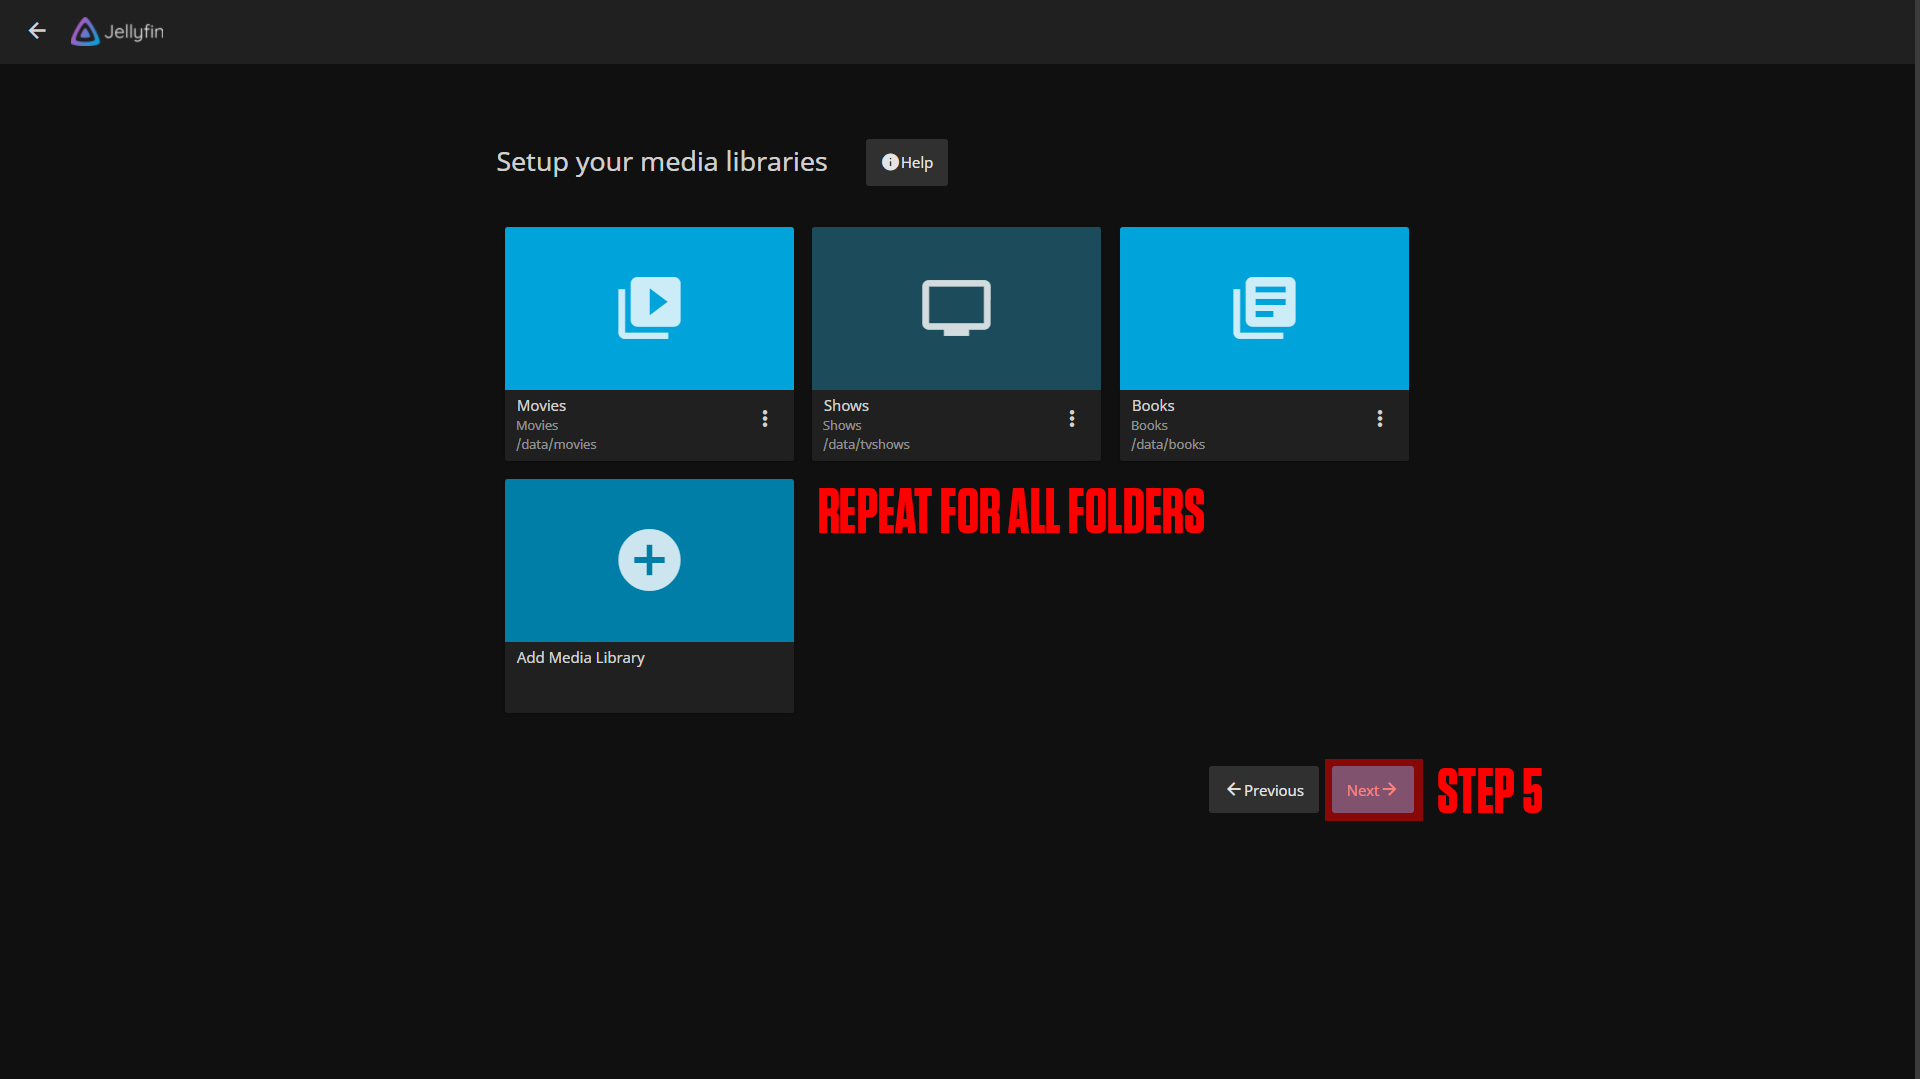
- Step 4.1: Select content type and enter the folder name.
- Step 4.2: Click the + icon.
- Step 4.3: Choose the folder.
- Step 4.4: Click Ok.
- Repeat this process for all folders.
Step 5: Click Next.
The rest should be self explanatory, eventually you will reach a screen like this:
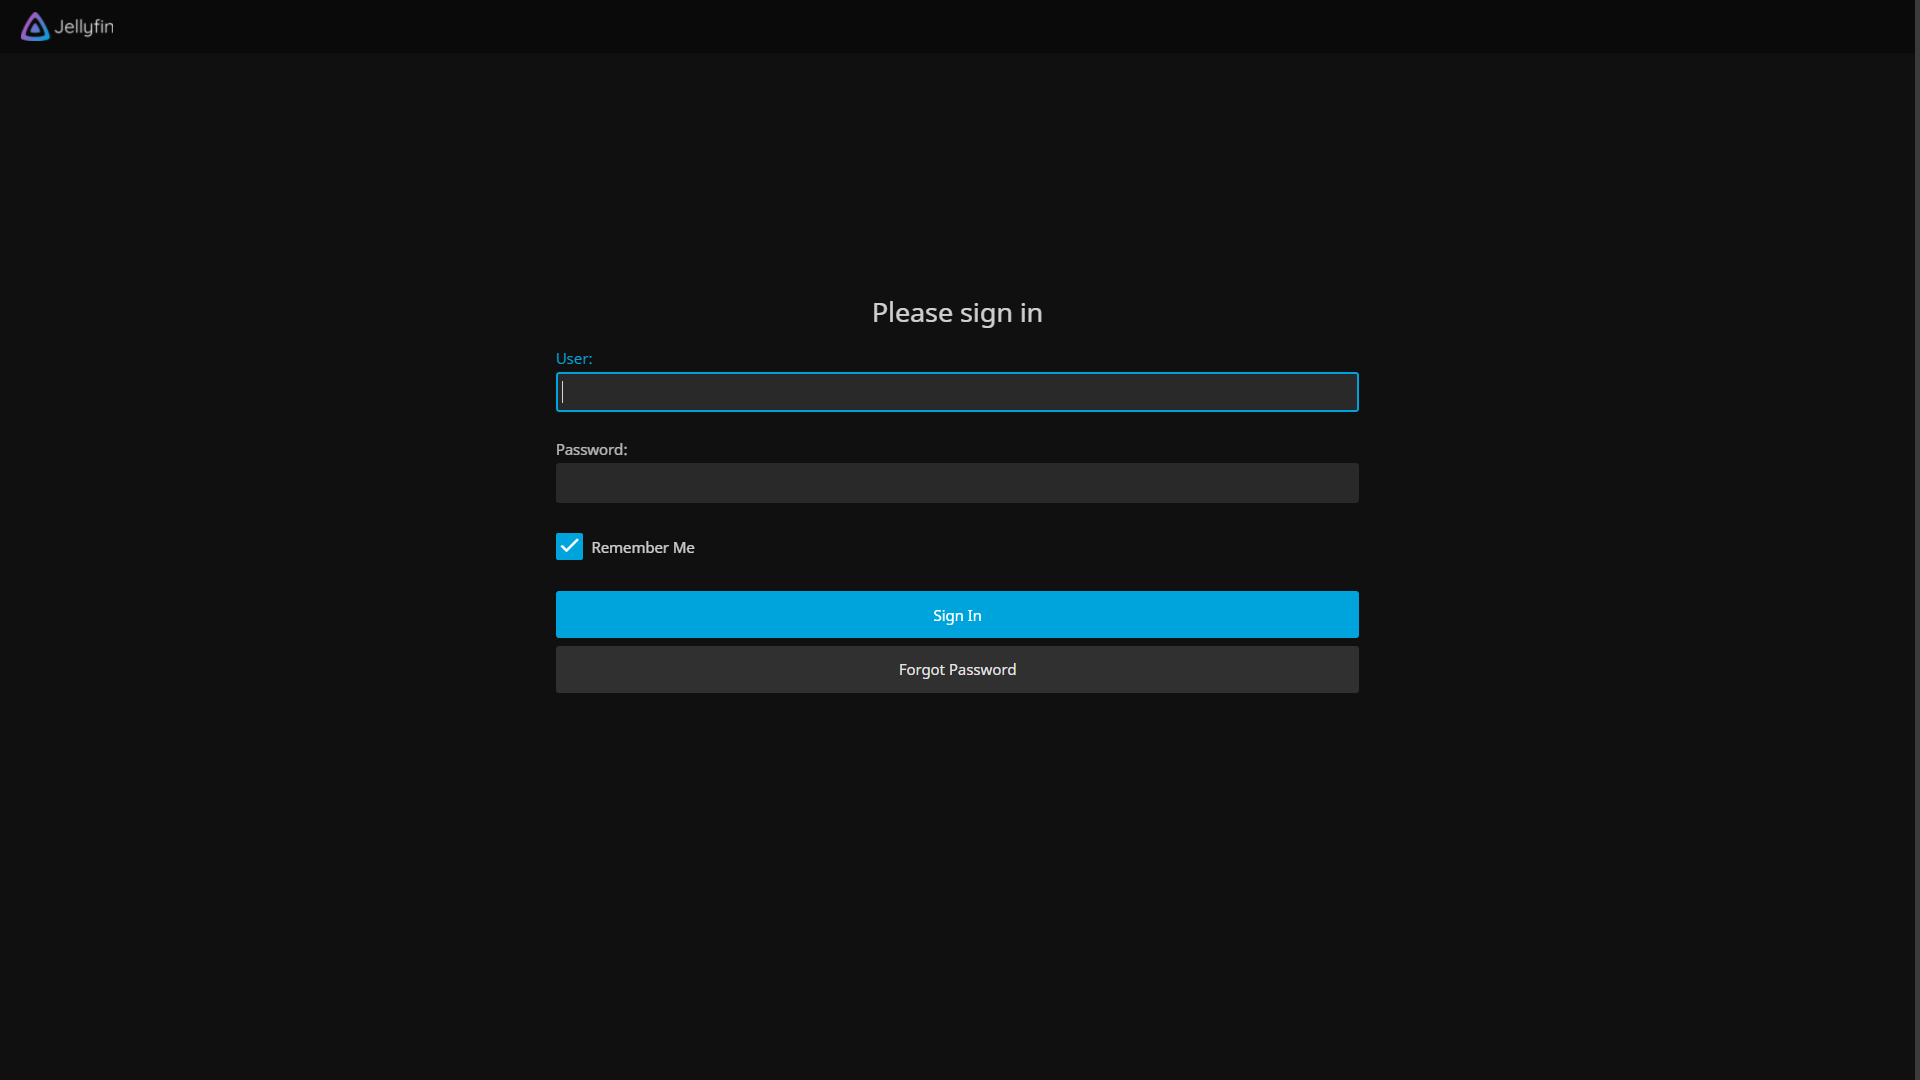
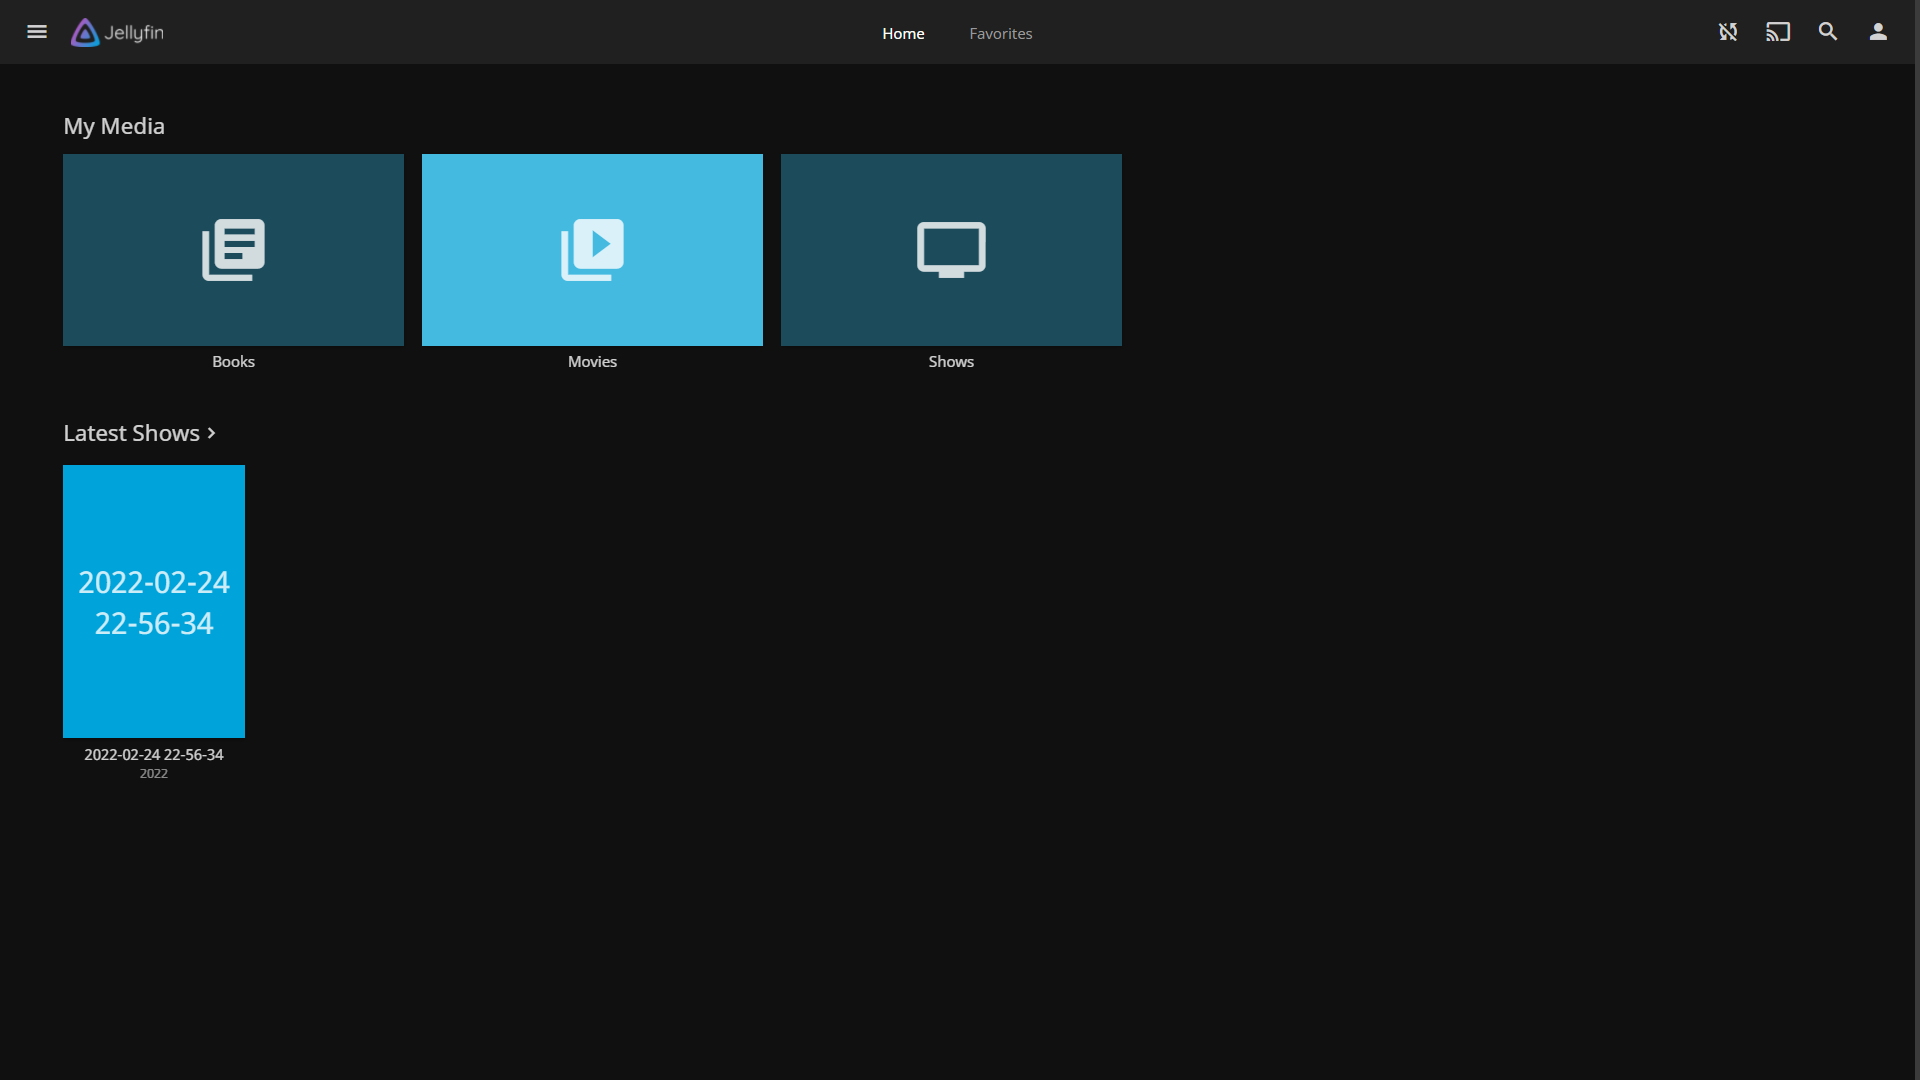
Login with the username and password you created in step 1-2. You will arrive at the Jellyfin homepage. Continue to the next section to learn how to upload files to Jellyfin using the File Browser.
¶ How to Upload Files
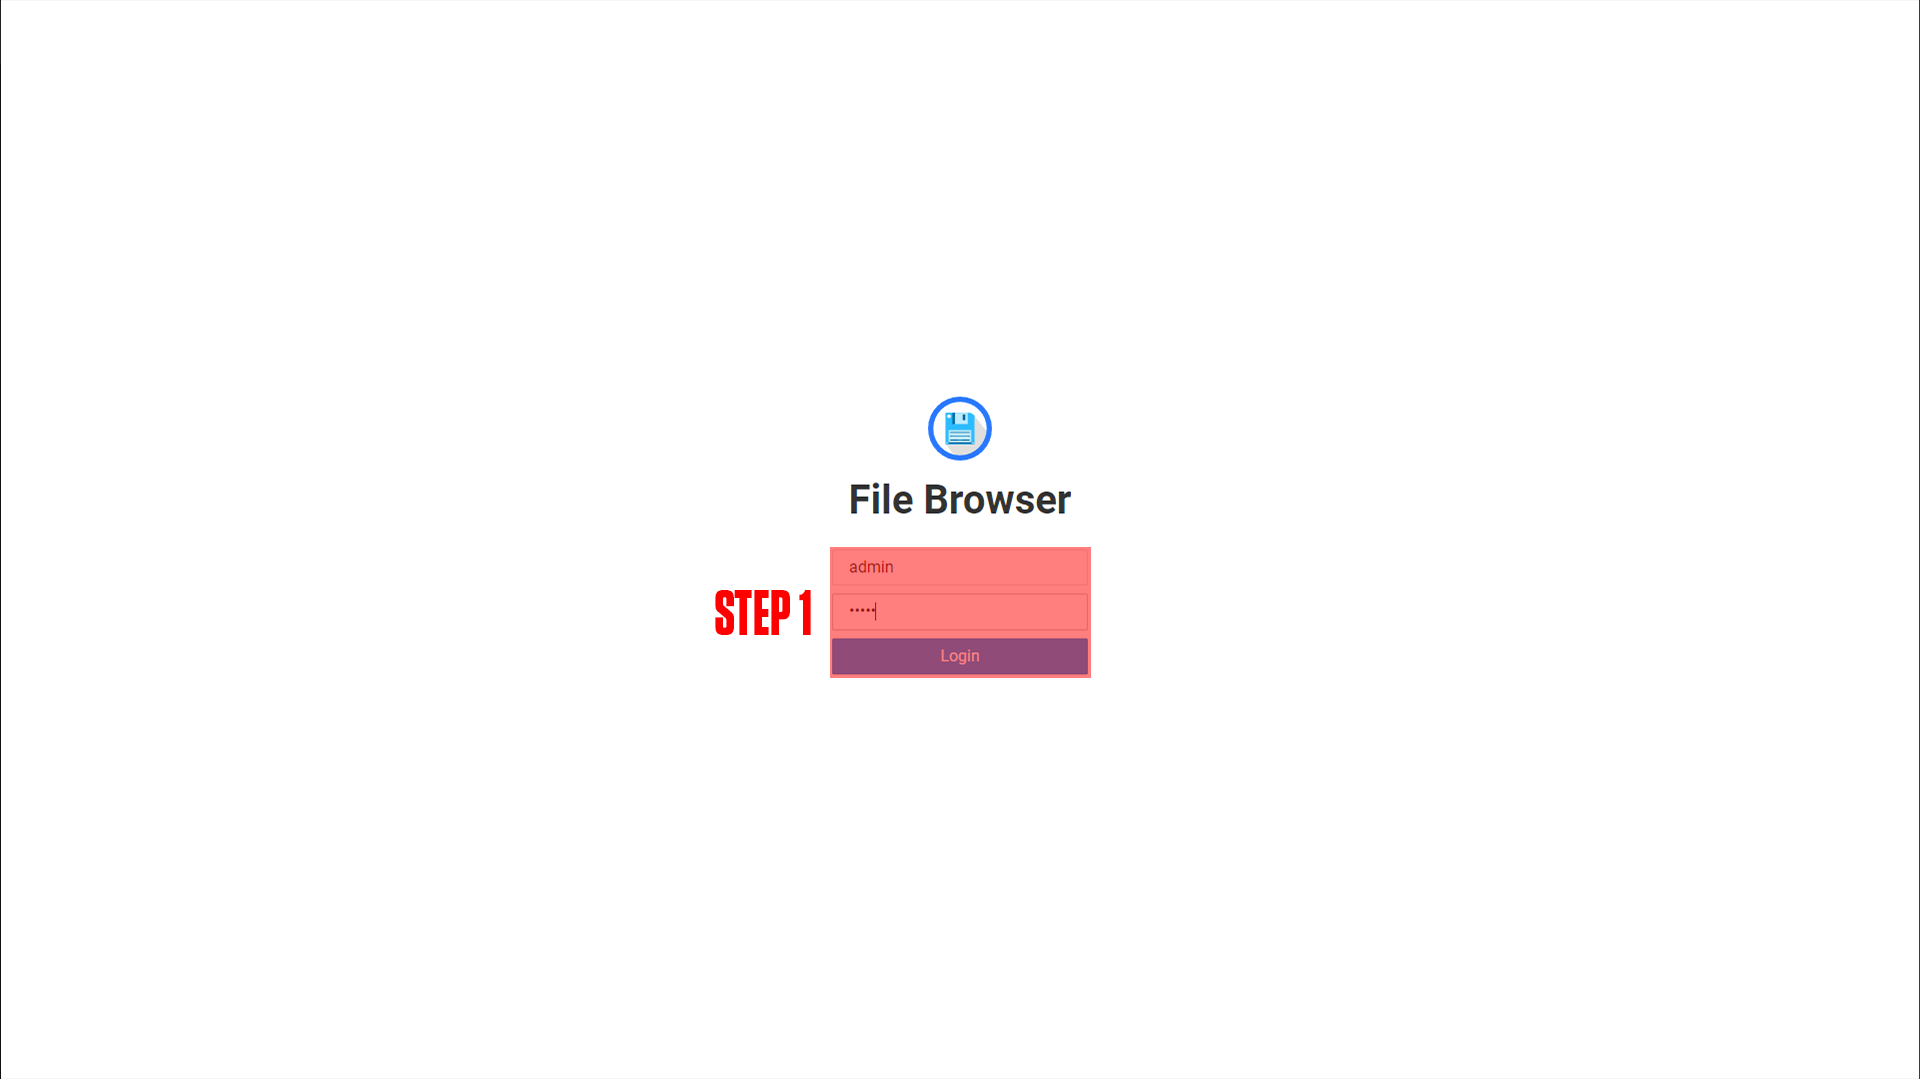
Step 1: Login using User: admin Pass: admin
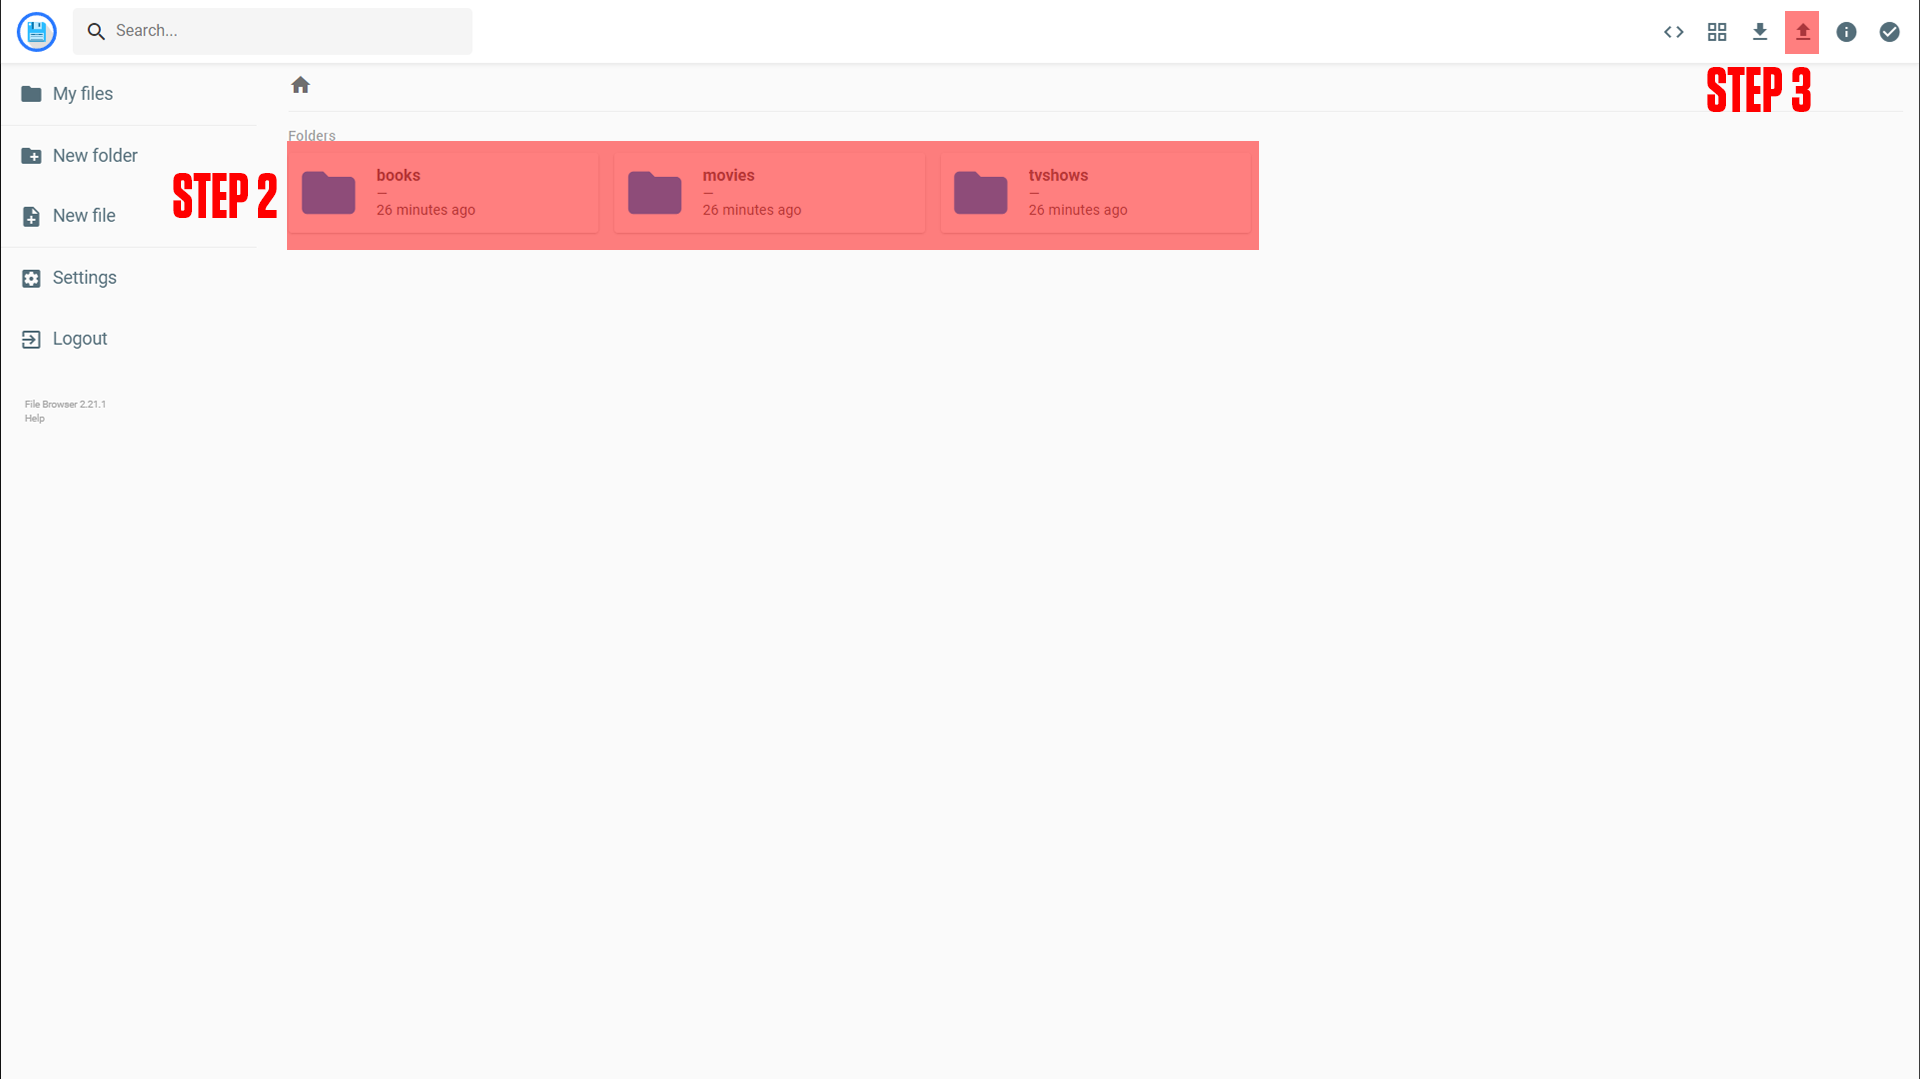
Step 2: Double click to open the desired folder.
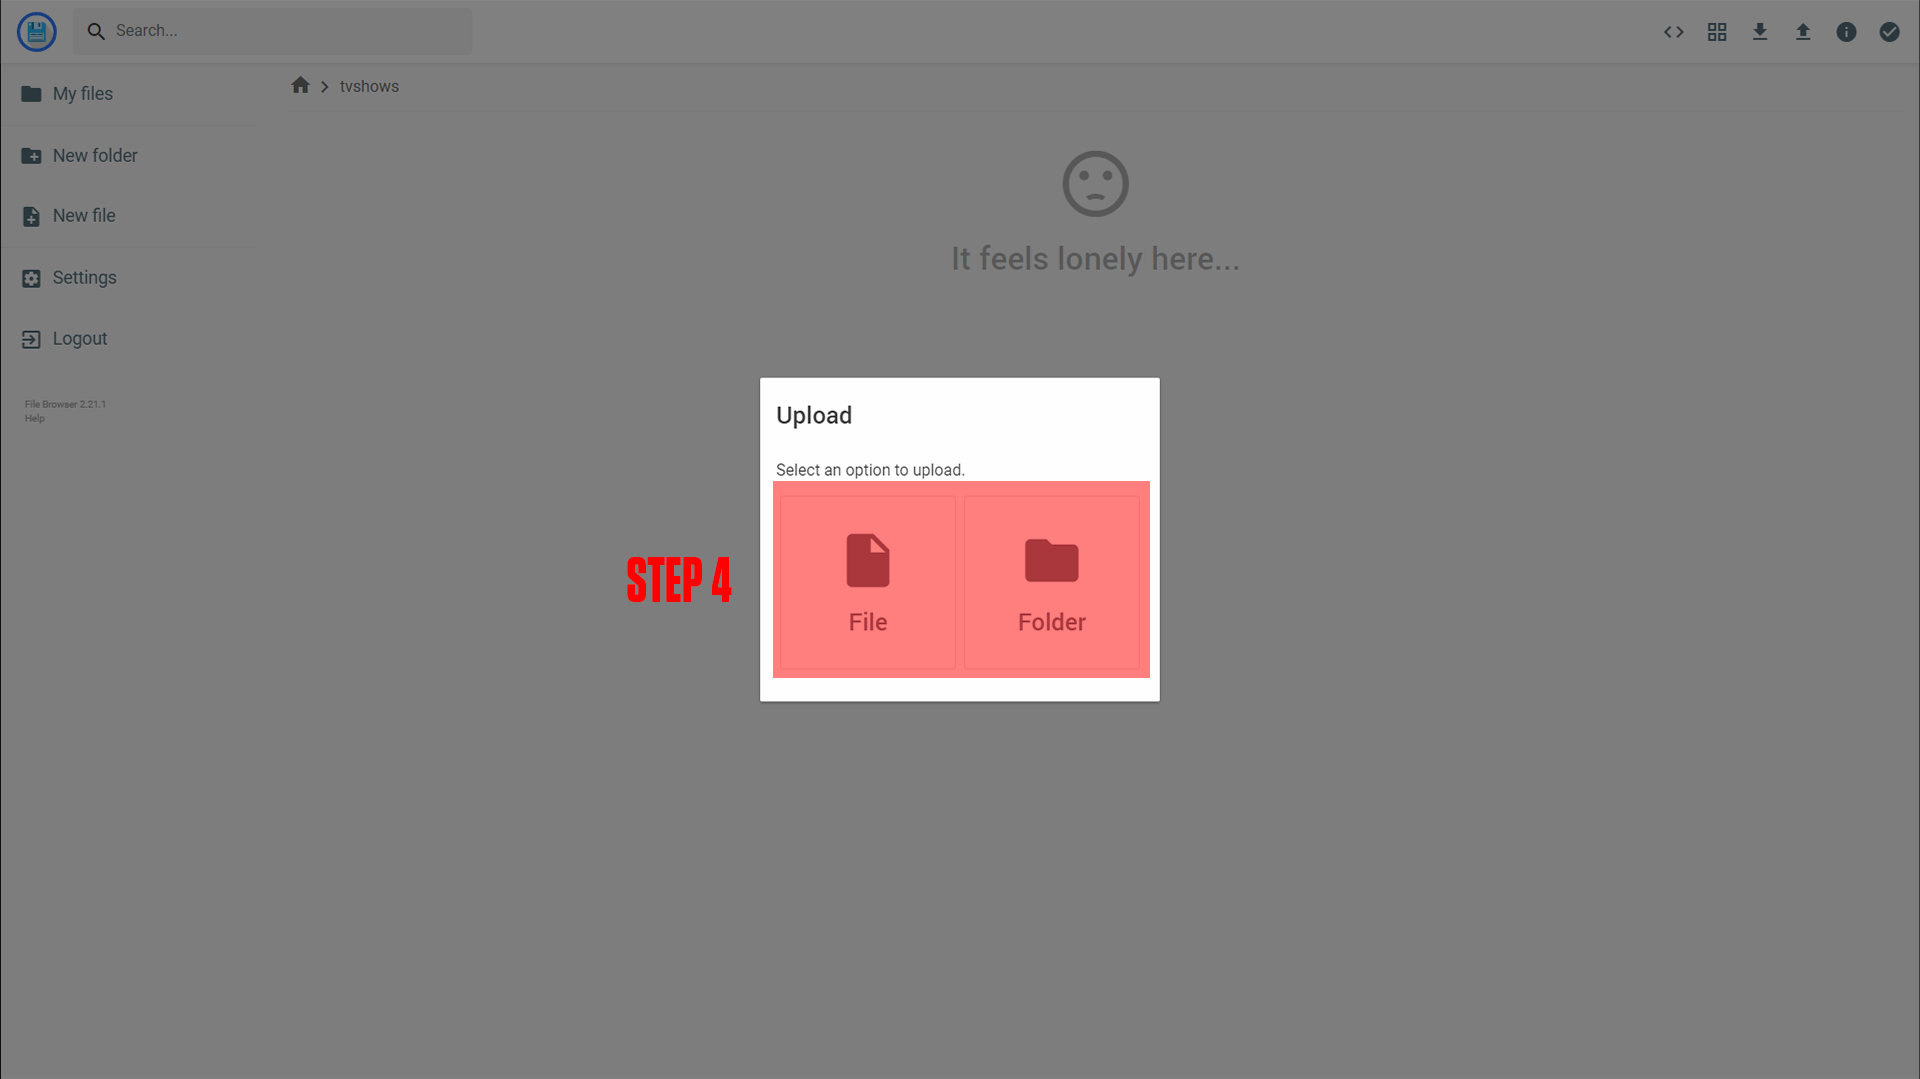
Step 3: Click the upload icon.
Step 4: Upload your files.
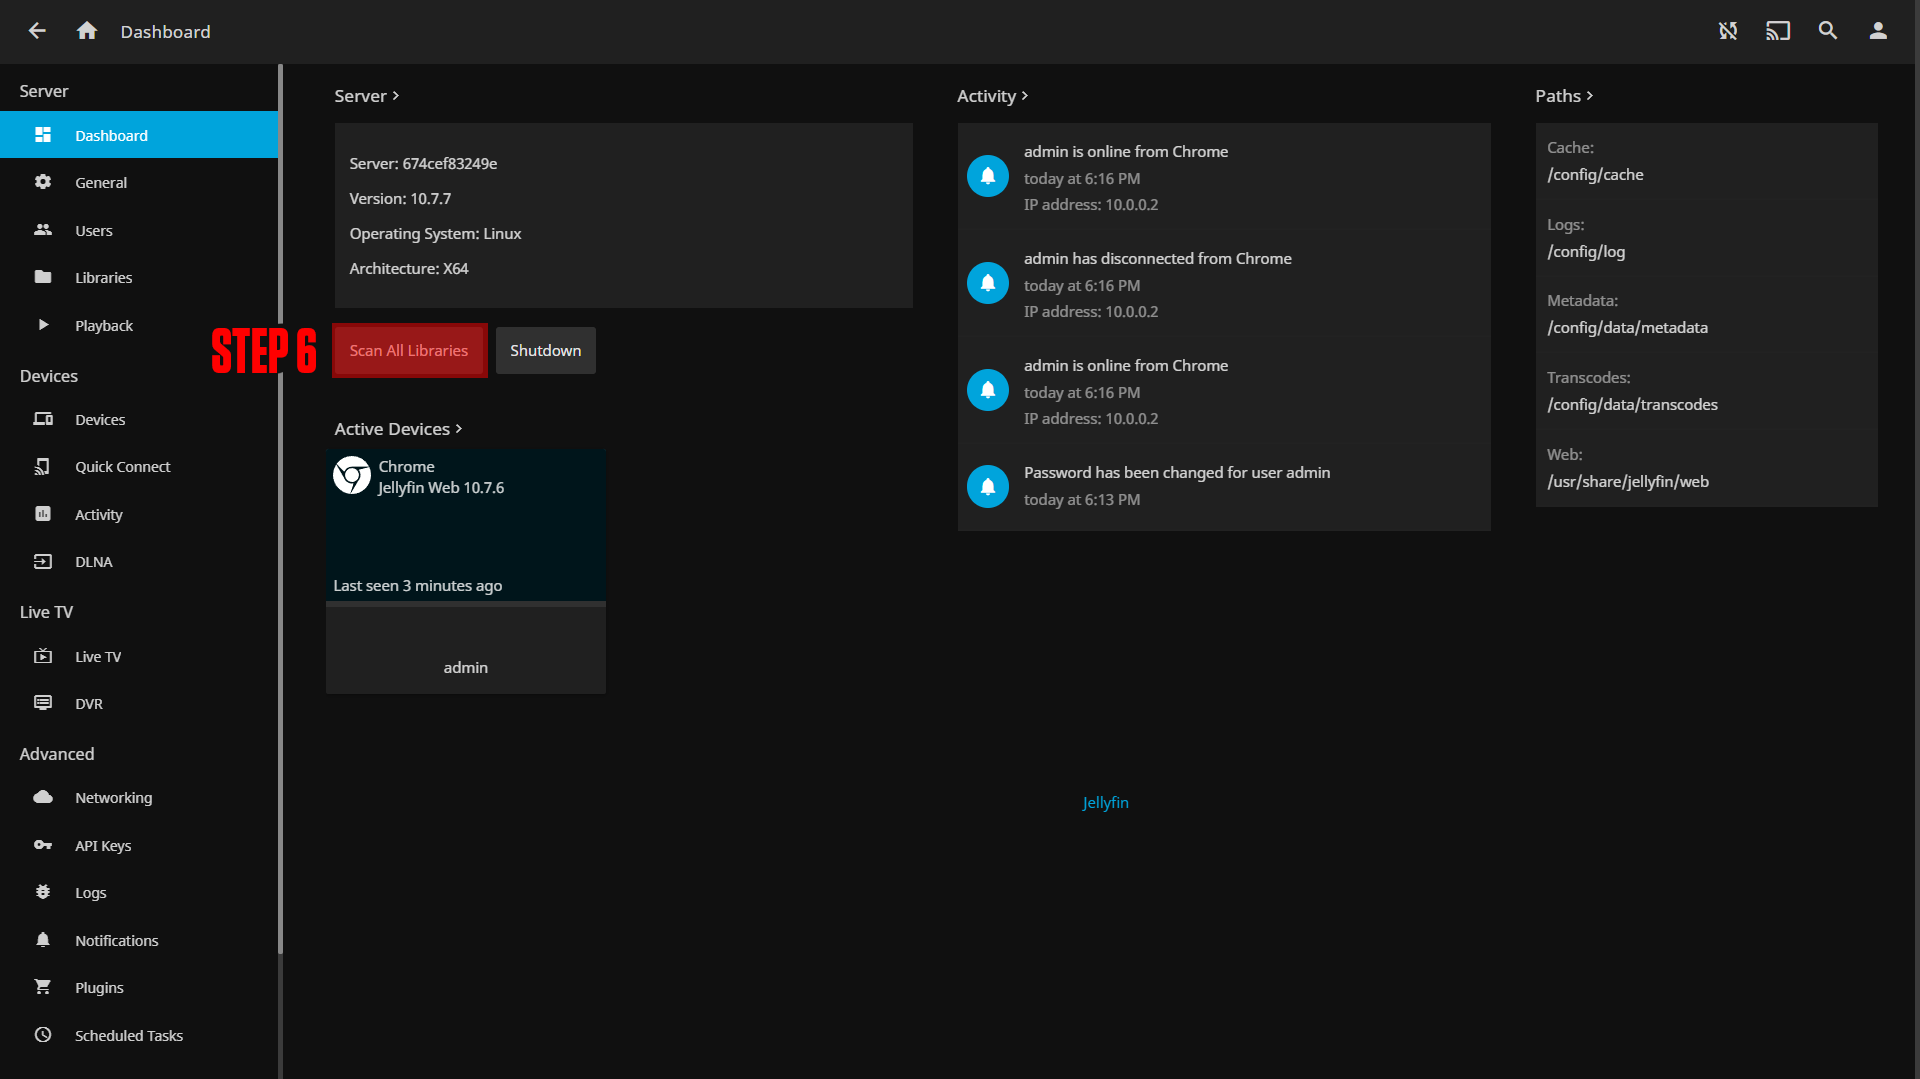
Step 5: Click the hamburger icon in the top left & select dashboard.
Step 6: Resync your folders.
|
|
|

|
|
Once you go back to the Jellyfin homepage you will see we have a new video below our categories.
¶ Conclusion
Congrats! This is the basic setup for Jellyfin, as mentioned at the beginning we have a more in-depth course available at TrueFreedomTech.com.