¶ Poste.io: Email Server
Poste.io is a docker container that combines SMTP, IMAP, POP3, Antispam, and Antivirus to make an easy-to-use email server complete with an administration dashboard for adding multiple domains and email accounts, checking and blocking spam, and much more. Poste.io uses RoundCube as the frontend webmail client. It has a simple design and features everything you can find on major email servers. You can learn more about poste.io from the links below:
Poste.io is built on open-source but does not offer the source code publically.
¶ Introduction
Poste.io is a very powerful way to start using email in less than 5 minutes (according to us and them)! Poste.io has great functionality like Clamav & Rspamd built-in to help keep your mail server secure. (*Note: this can be an issue for some hosts running older or less performant hardware, but definitely should be used if possible.) It's also is a good way to get a professional-looking white-labeled email account using your website domain and greatly reduces the risks of being caught in a massive hack by using free email services online.
We will be running Poste.io using Docker, Docker-Compose, Portainer, and Nginx Proxy Manager. We have an advanced course on how to do this at TrueFreedomTech.com covering multiple configurations and separating data from compute.
¶ Overview
We are going to assume you already have a working server with Docker, Portainer, and Nginx Proxy Manager running. We will go over the docker-compose, and configuring Nginx-Proxy-Manager. We are not using our own images for this stack so please consult the Docker hub link for more information regarding the Docker image.
This is strictly how to get the app running. Once again, we cover how to do this at TrueFreedomTech.com in much more detail! This will get beginners running, and experts should be able to adapt this to their own configuration with relative ease.
Ready?
¶ Docker-Compose
We begin by configuring our Docker-Compose. We will be deploying this with Portainer.
If you are not familiar with Portainer or Docker-Compose here are the official docs:
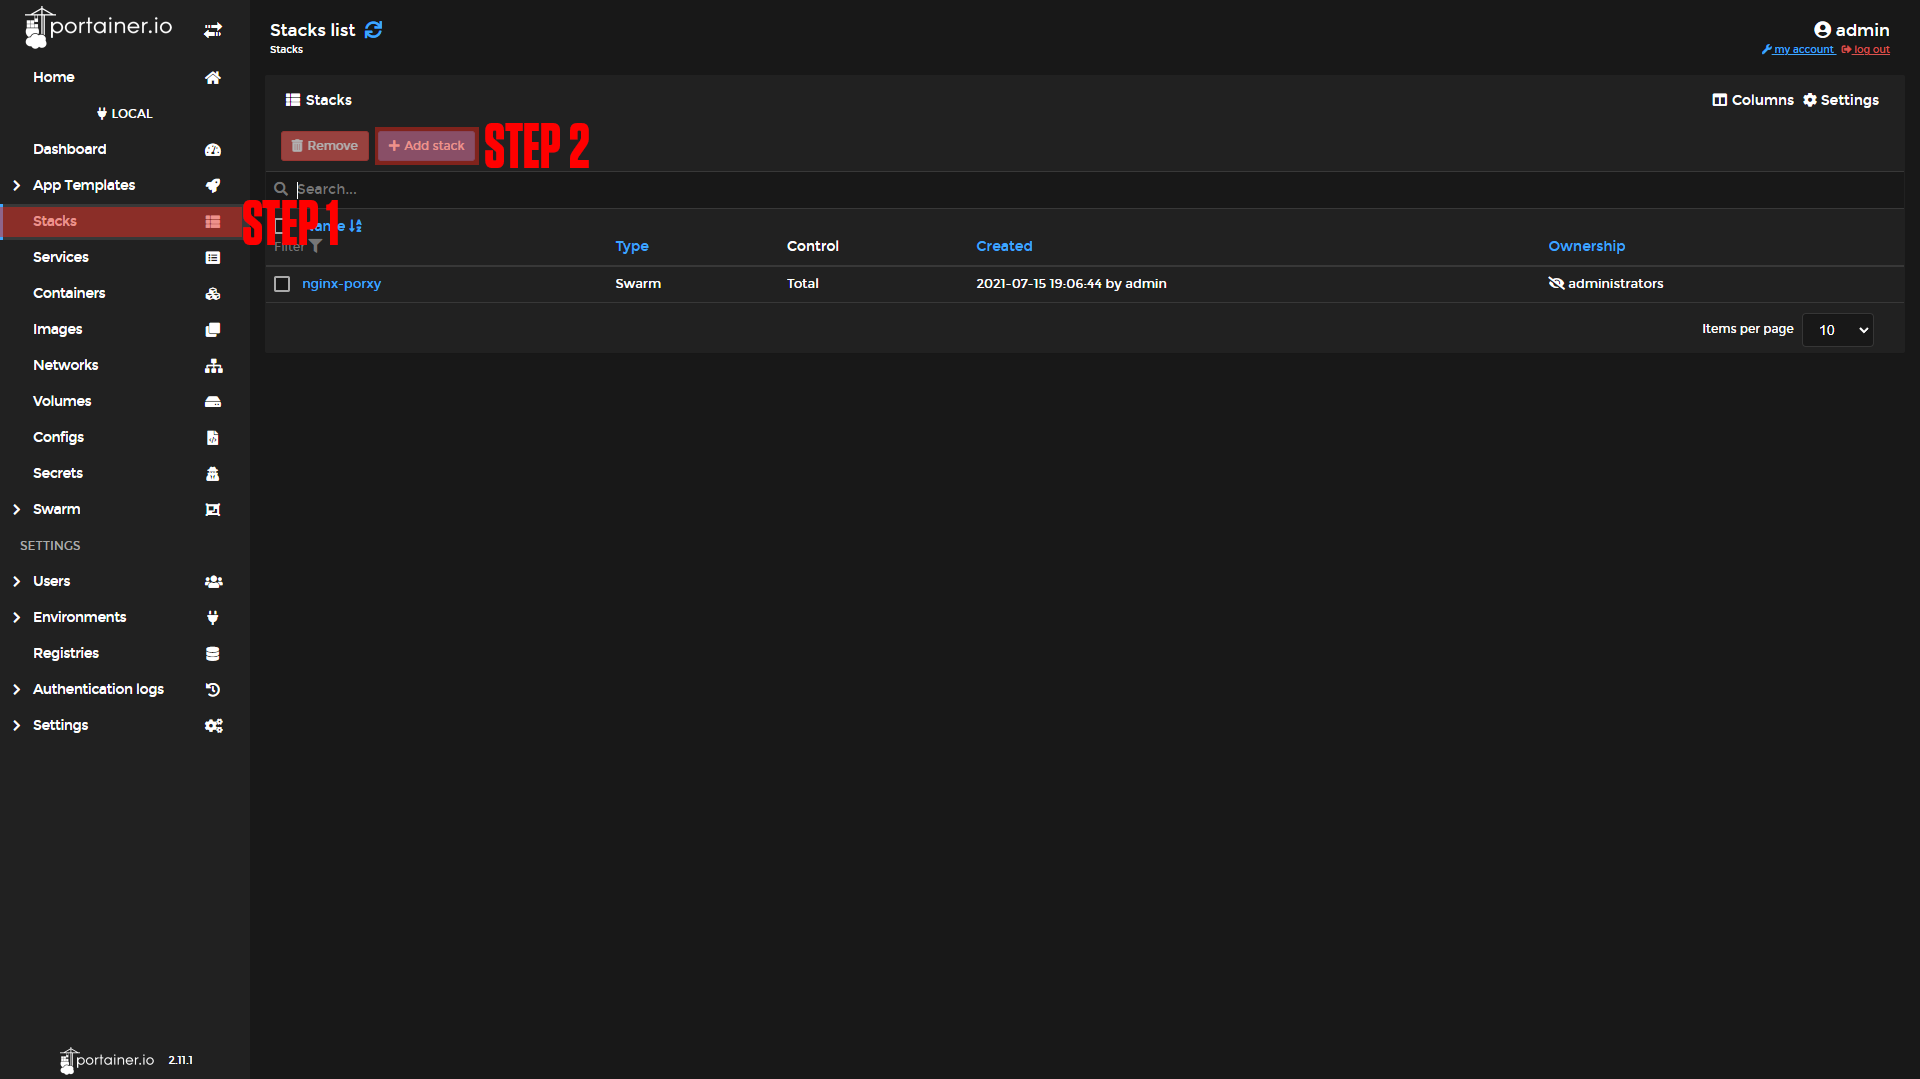
Step 1: Go to Stacks.
Step 2: Click Add Stack.
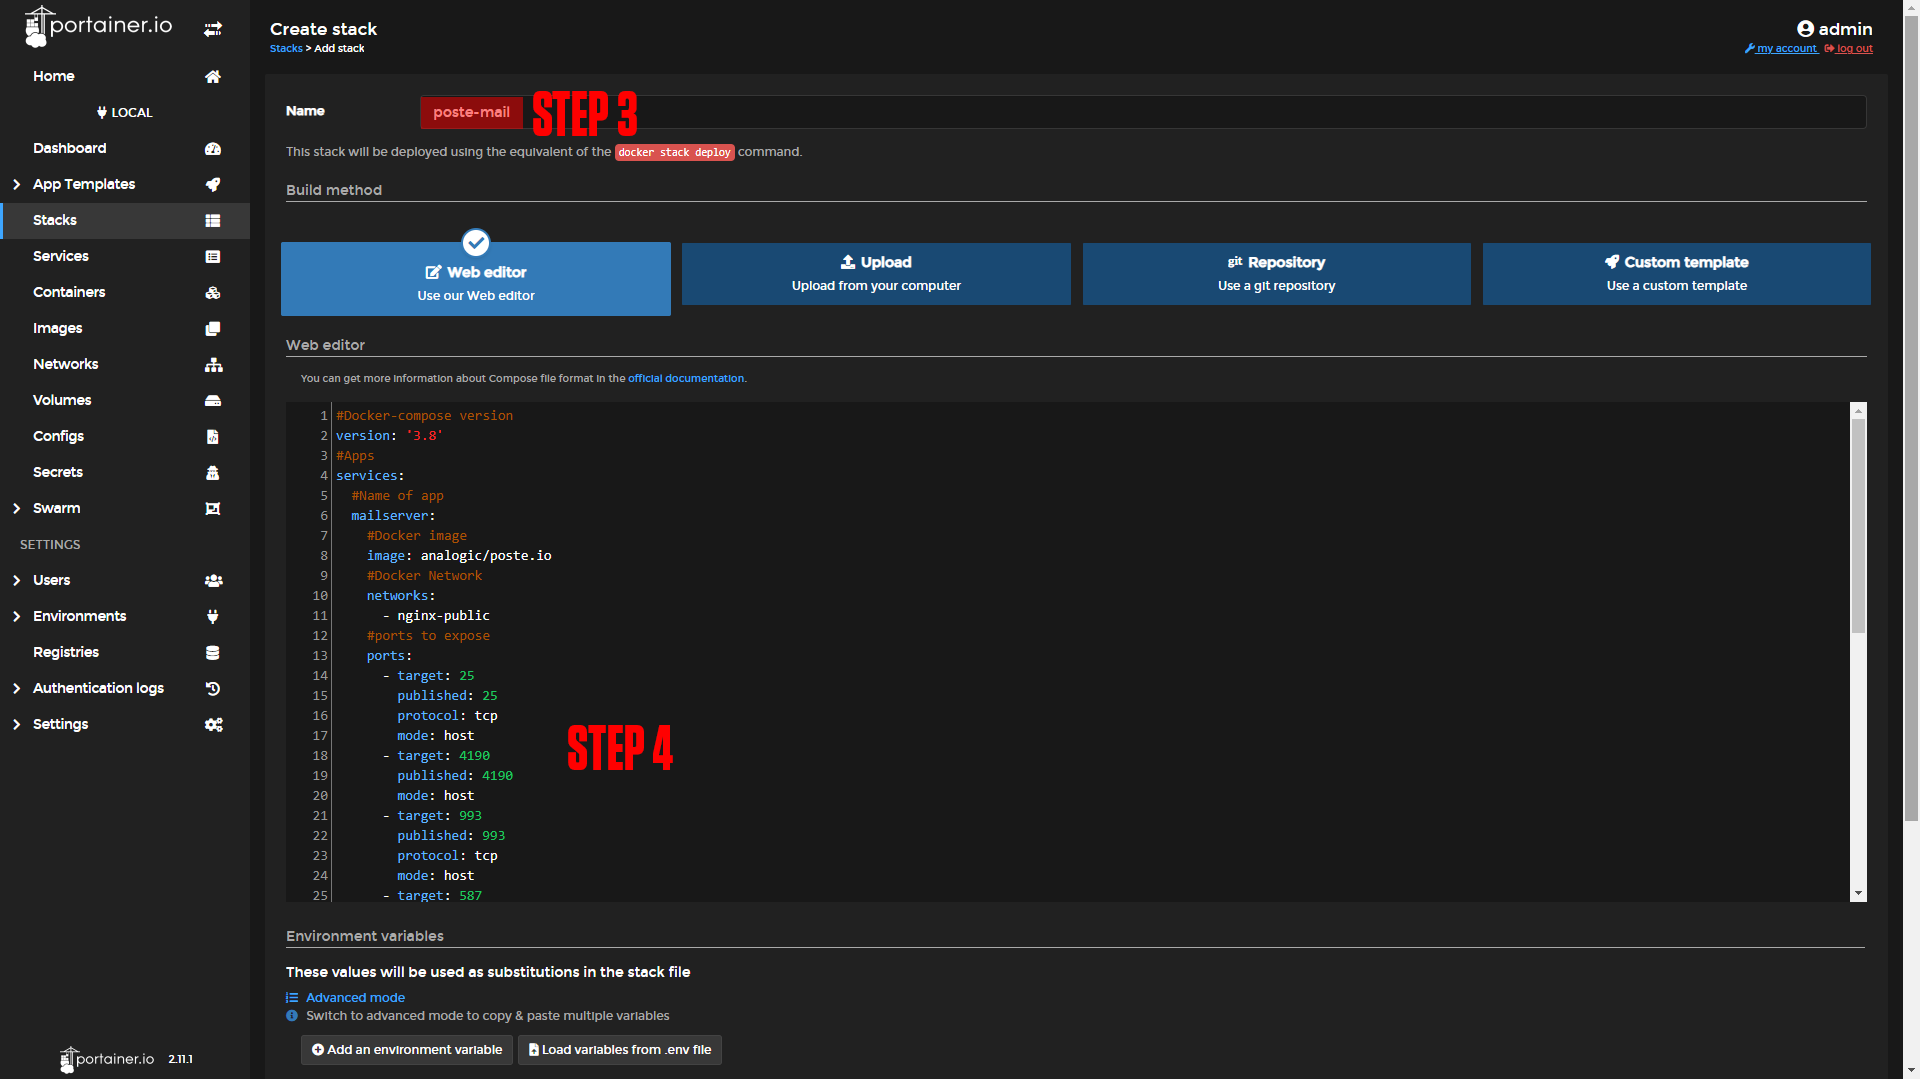
Step 3: Name your Stack (Ex. poste-mail)
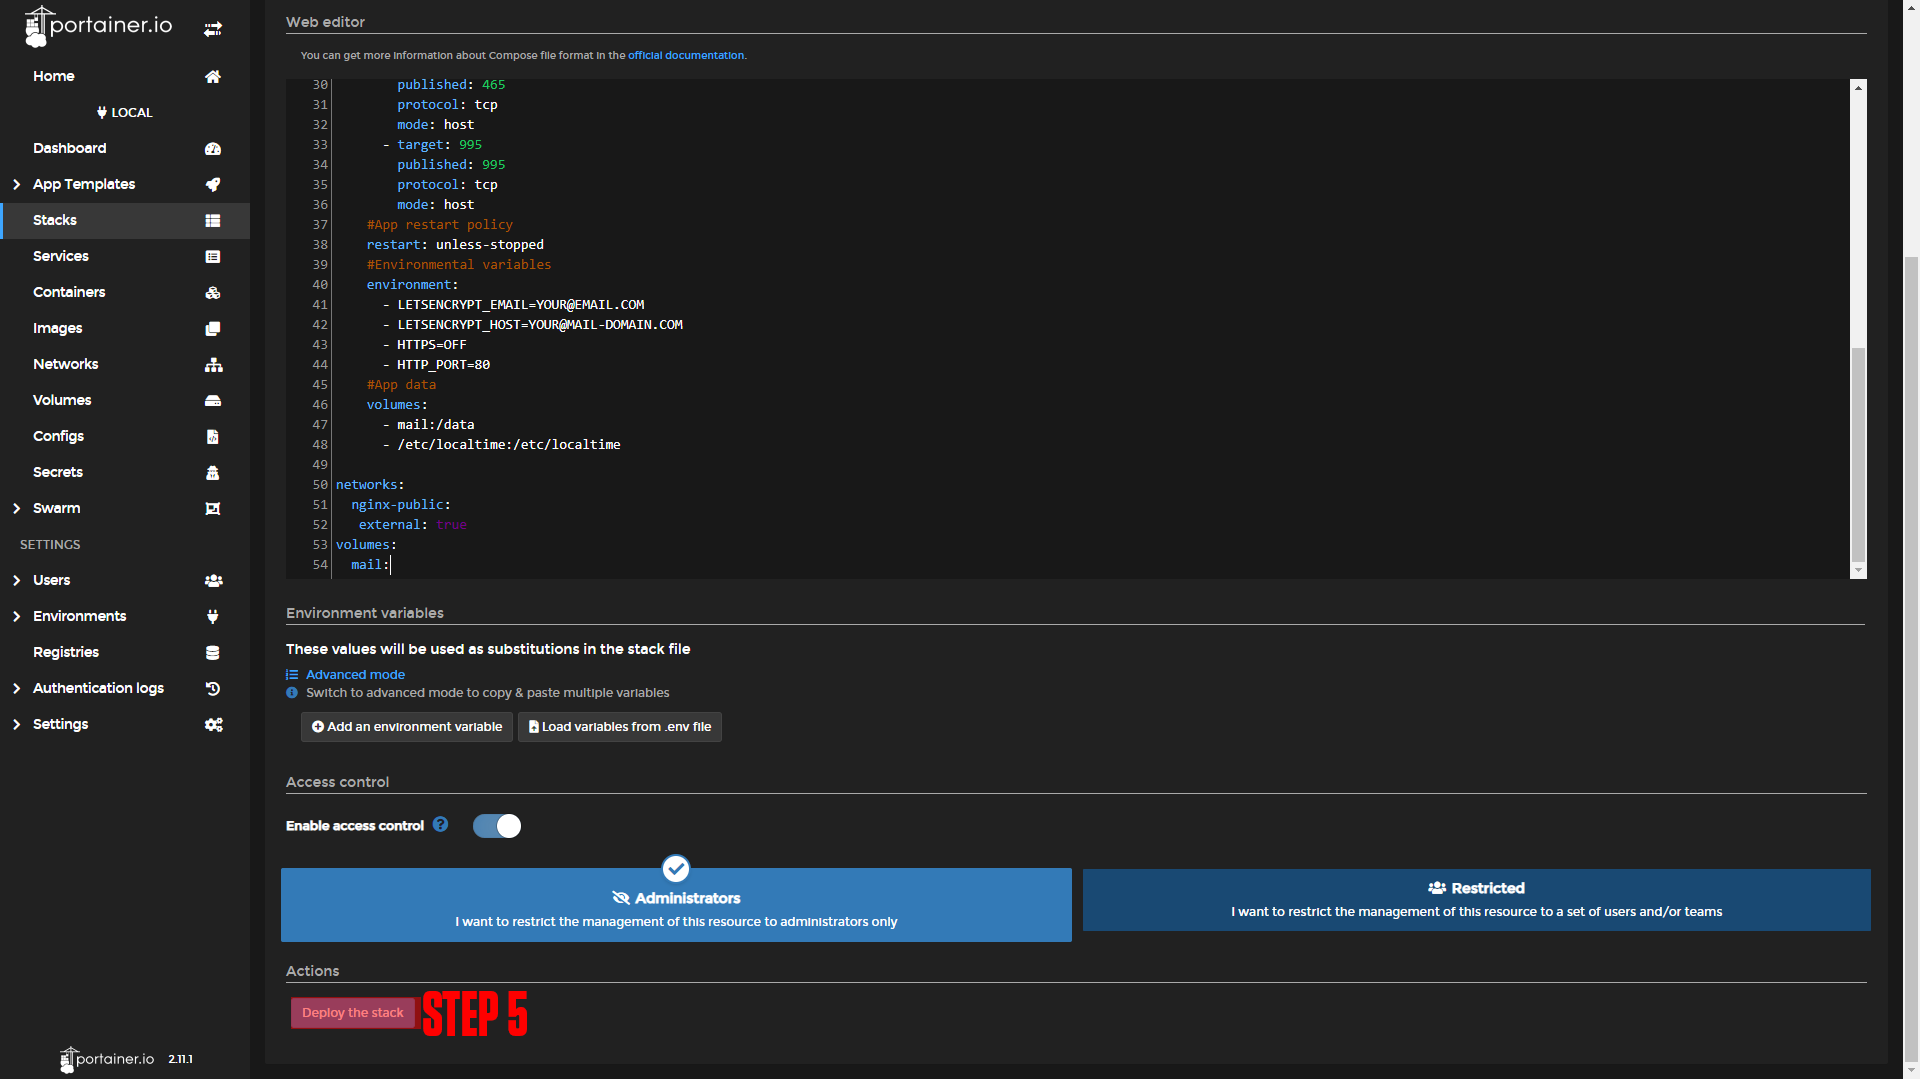
Step 4: Paste in the Contents Below. (*Make sure to change the Let's Encrypt information under environmental variables.)
Step 5: Deploy the Stack.
|
|
|
#Docker-compose version
version: '3.8'
#Apps
services:
  #Name of app
  mailserver:
    #Docker image
    image: analogic/poste.io
    #Docker Network
    networks:
      - nginx-public
    #ports to expose
    ports:
      - target: 25
        published: 25
        protocol: tcp
        mode: host
      - target: 4190
        published: 4190
        mode: host
      - target: 993
        published: 993
        protocol: tcp
        mode: host
      - target: 587
        published: 587
        protocol: tcp
        mode: host
      - target: 465
        published: 465
        protocol: tcp
        mode: host
      - target: 995
        published: 995
        protocol: tcp
        mode: host
    #App restart policy
    restart: unless-stopped
    #Environmental variables
    environment:
      - LETSENCRYPT_EMAIL=YOUR@EMAIL.COM
      - LETSENCRYPT_HOST=YOUR@MAIL-DOMAIN.COM
      - HTTPS=OFF
      - HTTP_PORT=80
    #App data
    volumes:
      - mail:/data
      - /etc/localtime:/etc/localtime

networks:
  nginx-public:
   external: true
volumes:
mail:¶ Nginx-Proxy-Manager
Before we configure our apps, we will set up our domains using Nginx-Proxy-Manager. If you followed our Nginx-Proxy-Manager stack setup you should be able to copy everything we do step by step.
¶ Poste.io Domain Setup
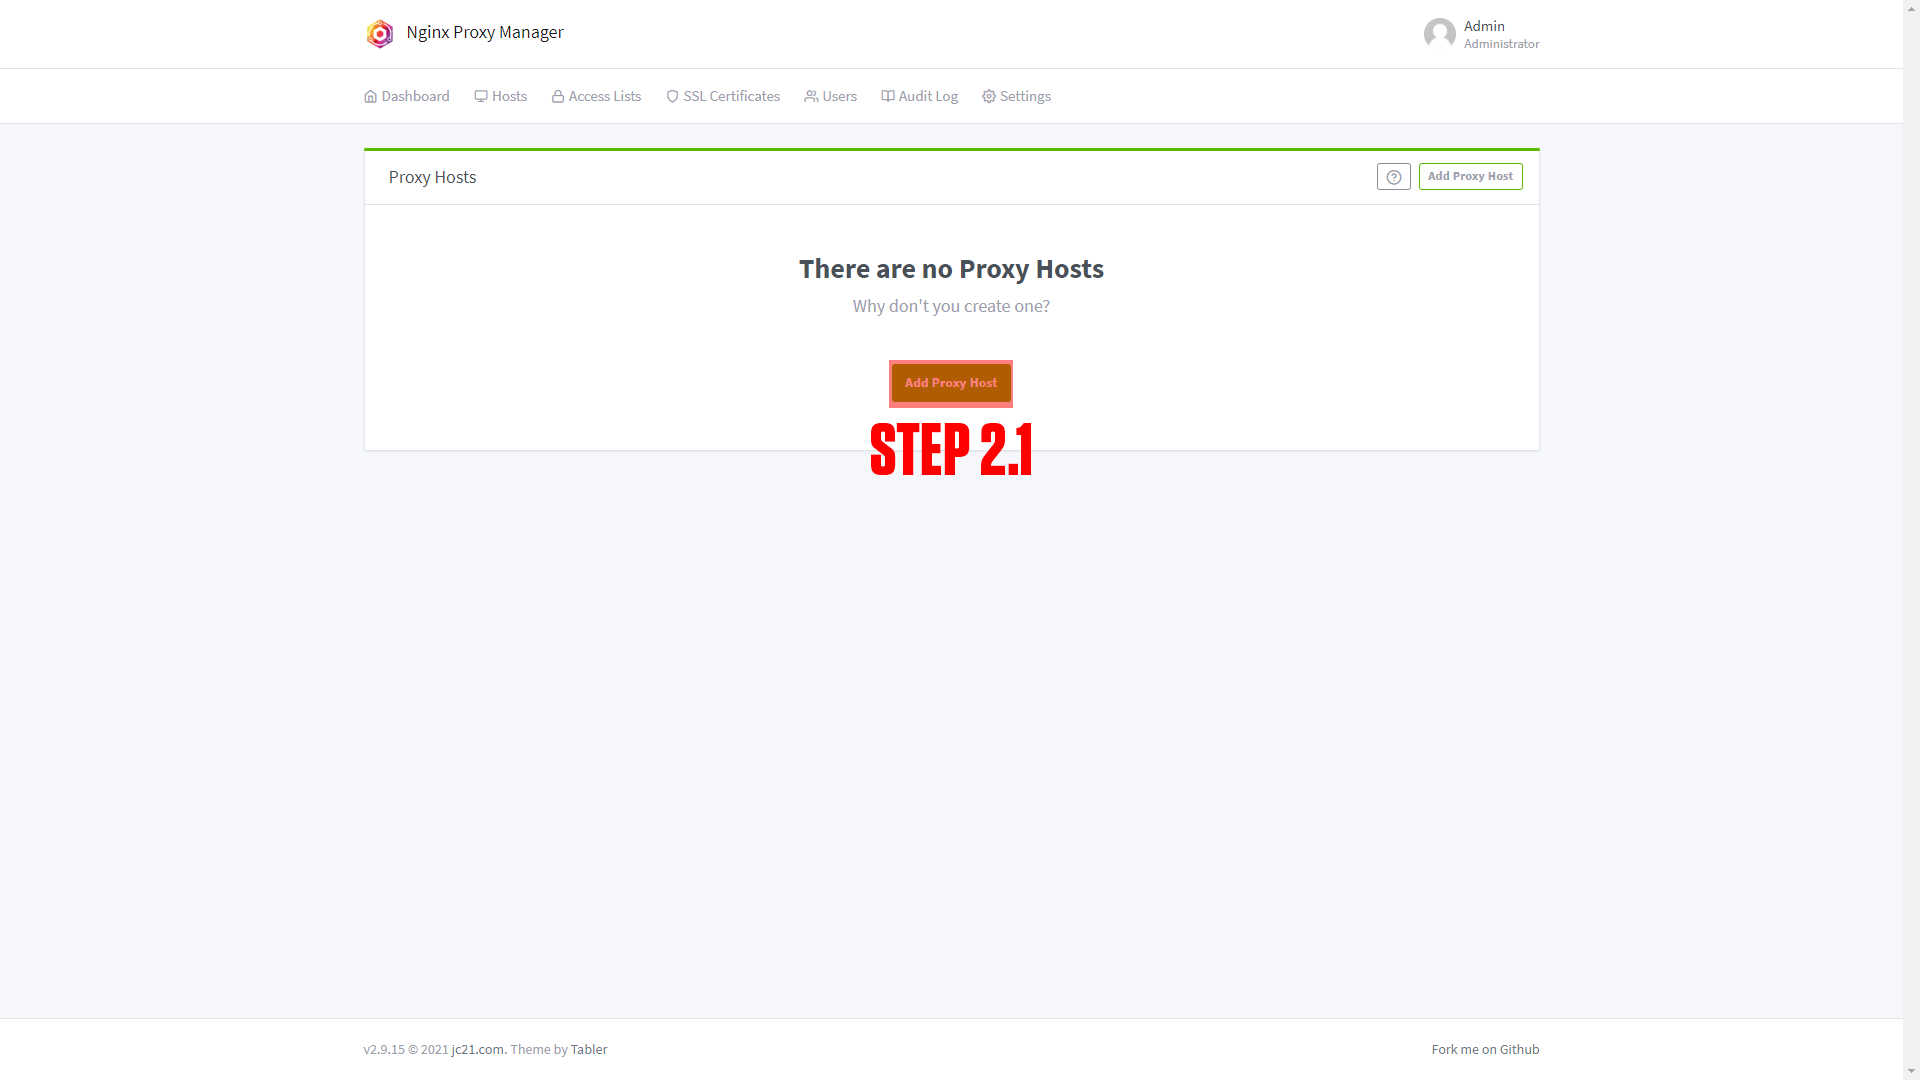
Step 1: Copy the poste-mail service name.
This should be poste-mail_mailserver if you did not change the names of apps.
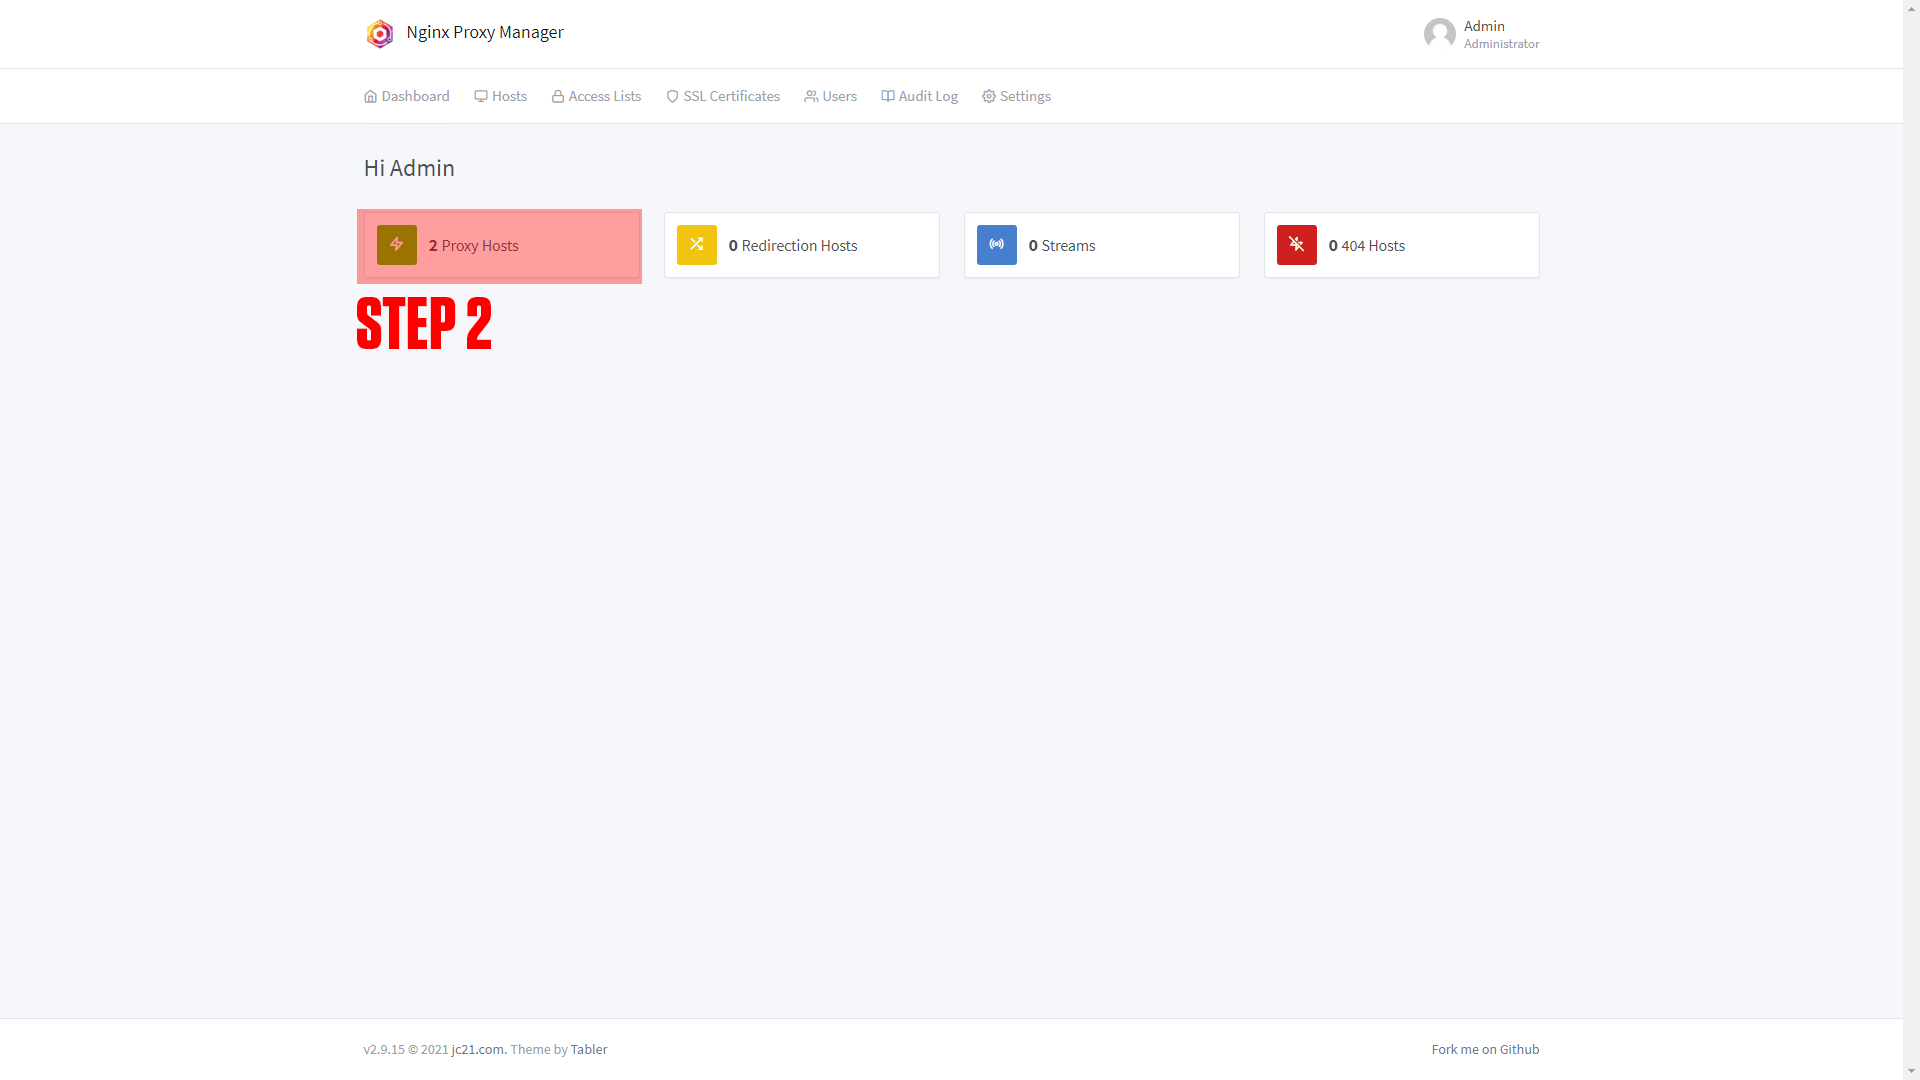
Step 2: Log in to Nginx-Proxy-Manager and create a new proxy host.
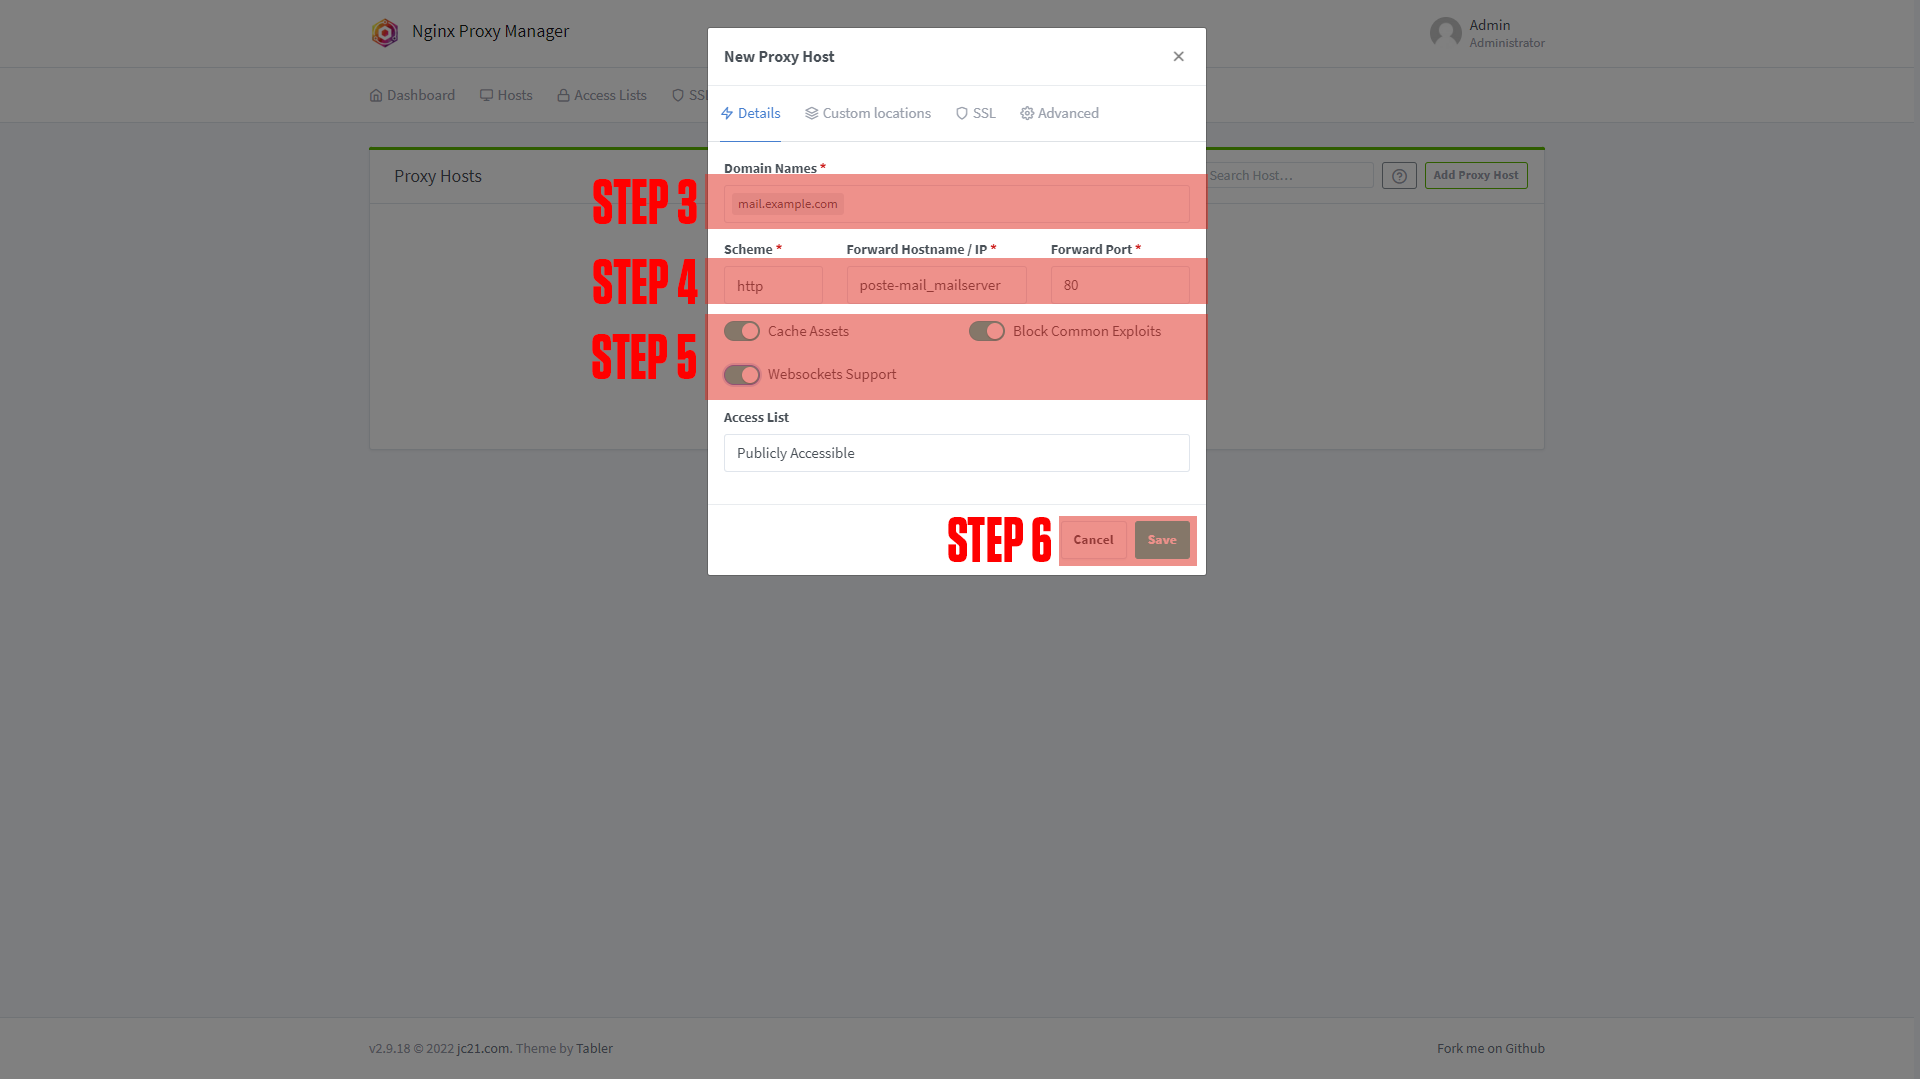
Step 3: Enter your Domain name (Ex. mail.example.com)
Step 4: Add the service name to the Forward Hostname / IP at port 80.
Step 5: Enable Cache Assets, Block Common Exploits, and Websockets Support.
Step 6: Click Save.
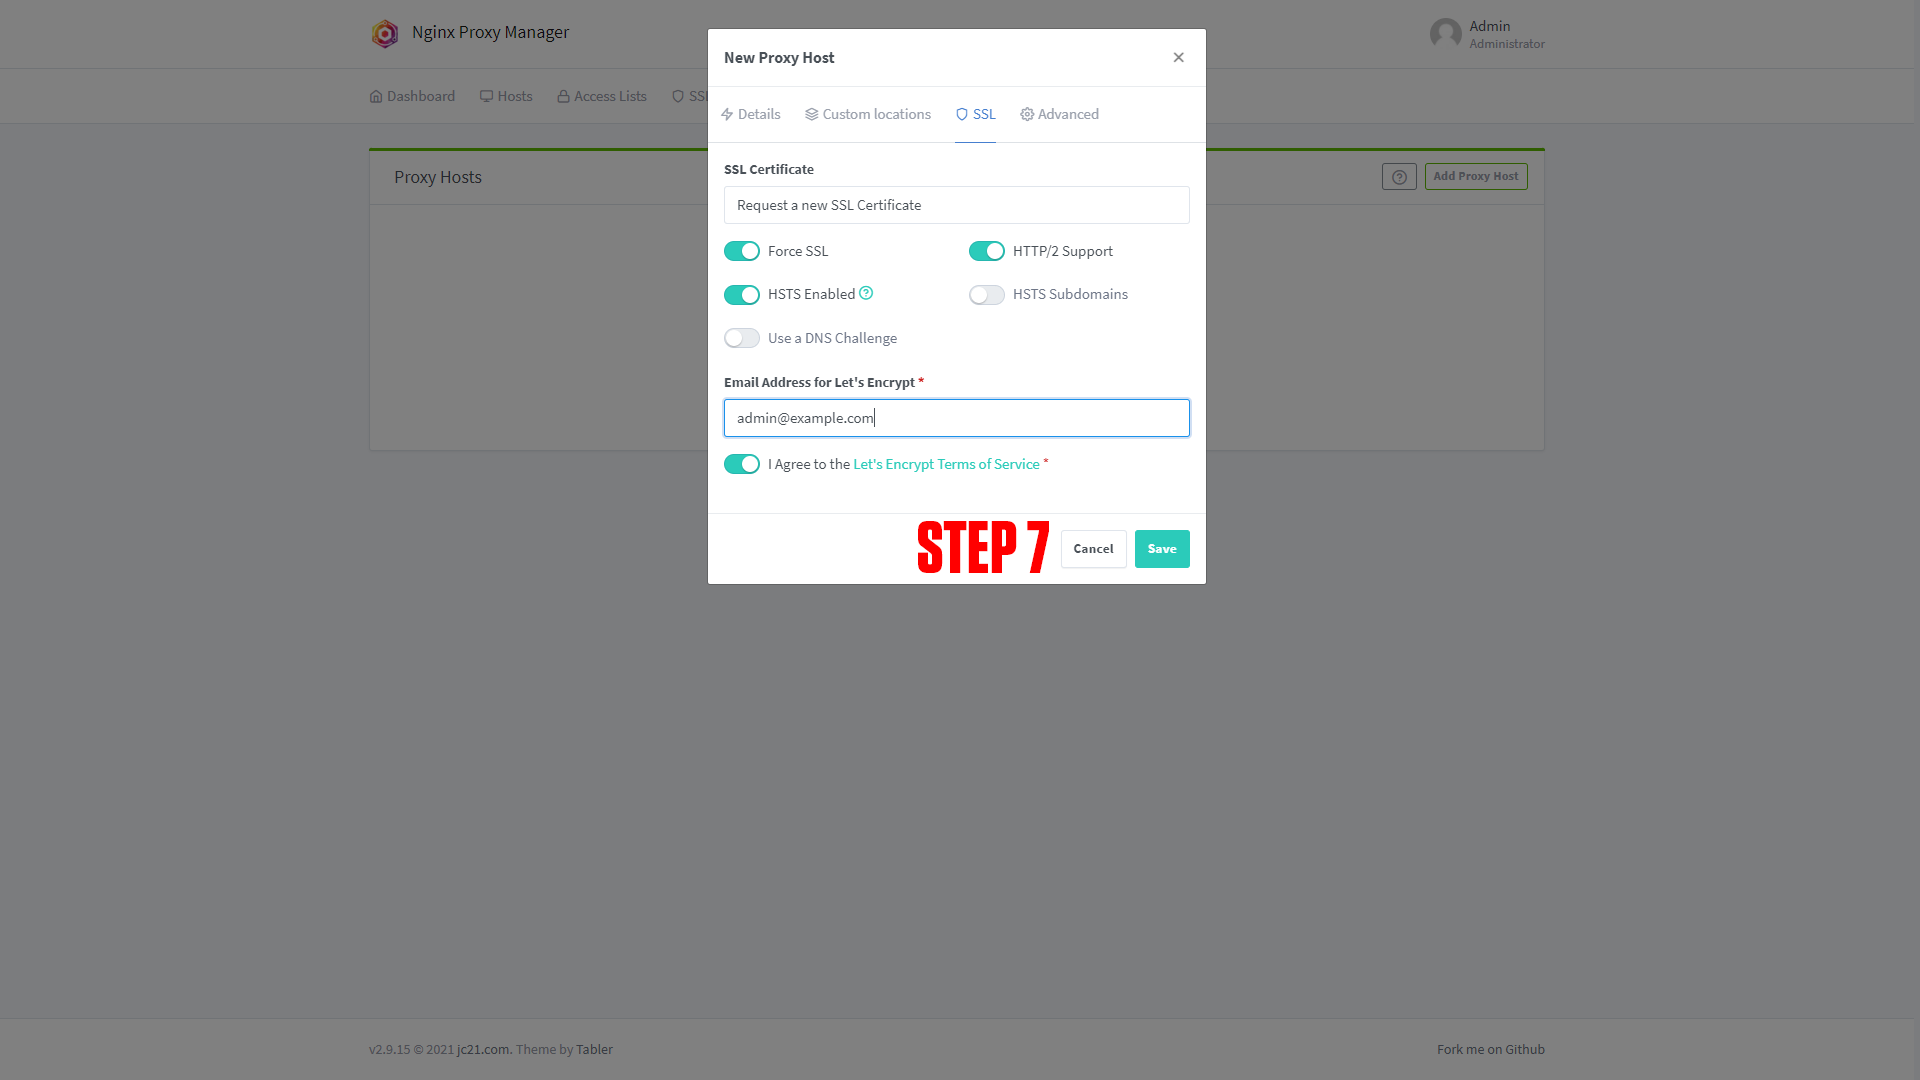
Step 7 (Optional): Enable SSL (we say this is optional, but you should always have an SSL cert if possible).
¶ Screenshots:
|
|
|
|
¶ Configuring Poste.io
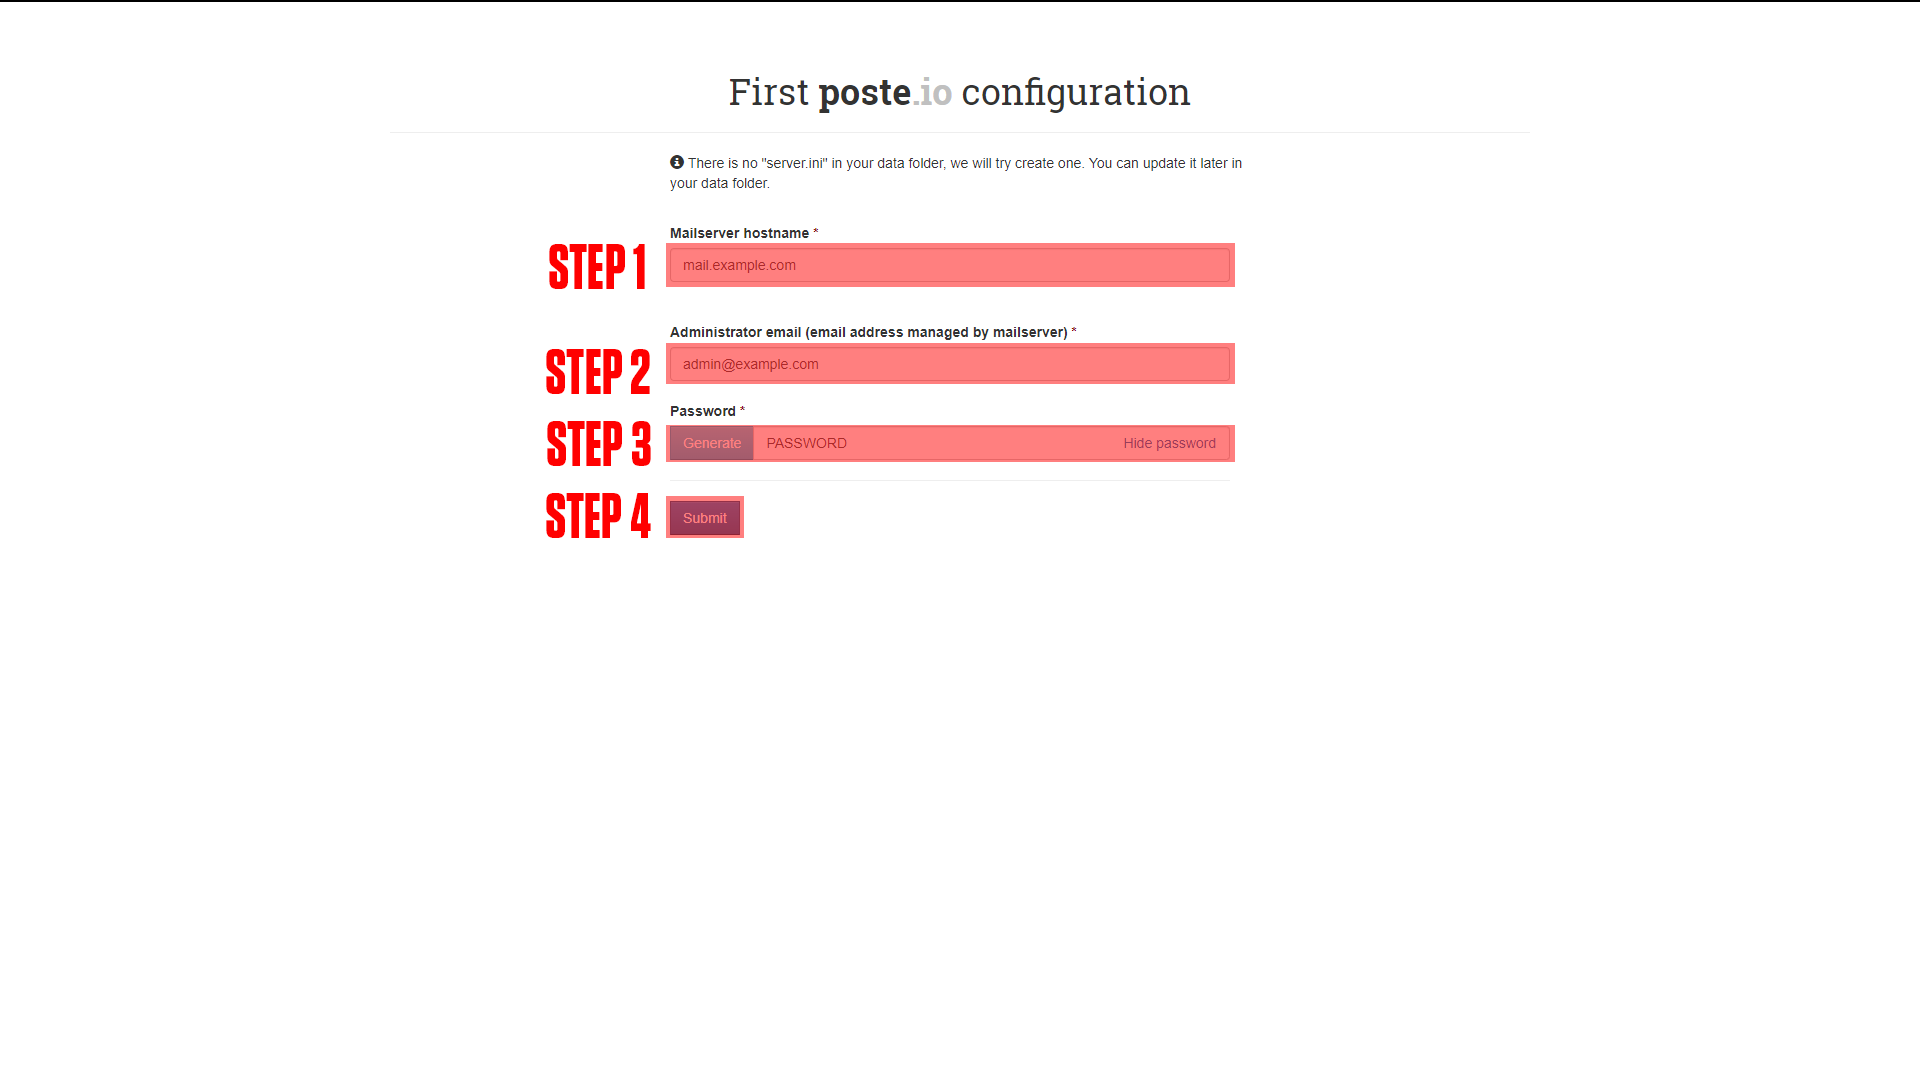
After setting up your domain name it's time to finish configuring the app. Go to the URL you chose for your application. You should arrive at a screen like this!
|
|
(If you do not arrive at a screen like this then something is wrong! Our premium members can open a support ticket Here!)
Step 1: Enter your mail domain (Ex. mail.example.com) *Note: This will be the same domain used in the Nginx-Reverse-Proxy host.
Step 2: Enter your email account address. (Ex. admin@example.com)
Step 3: Enter or Generate your password.
Step 4: Click Submit.
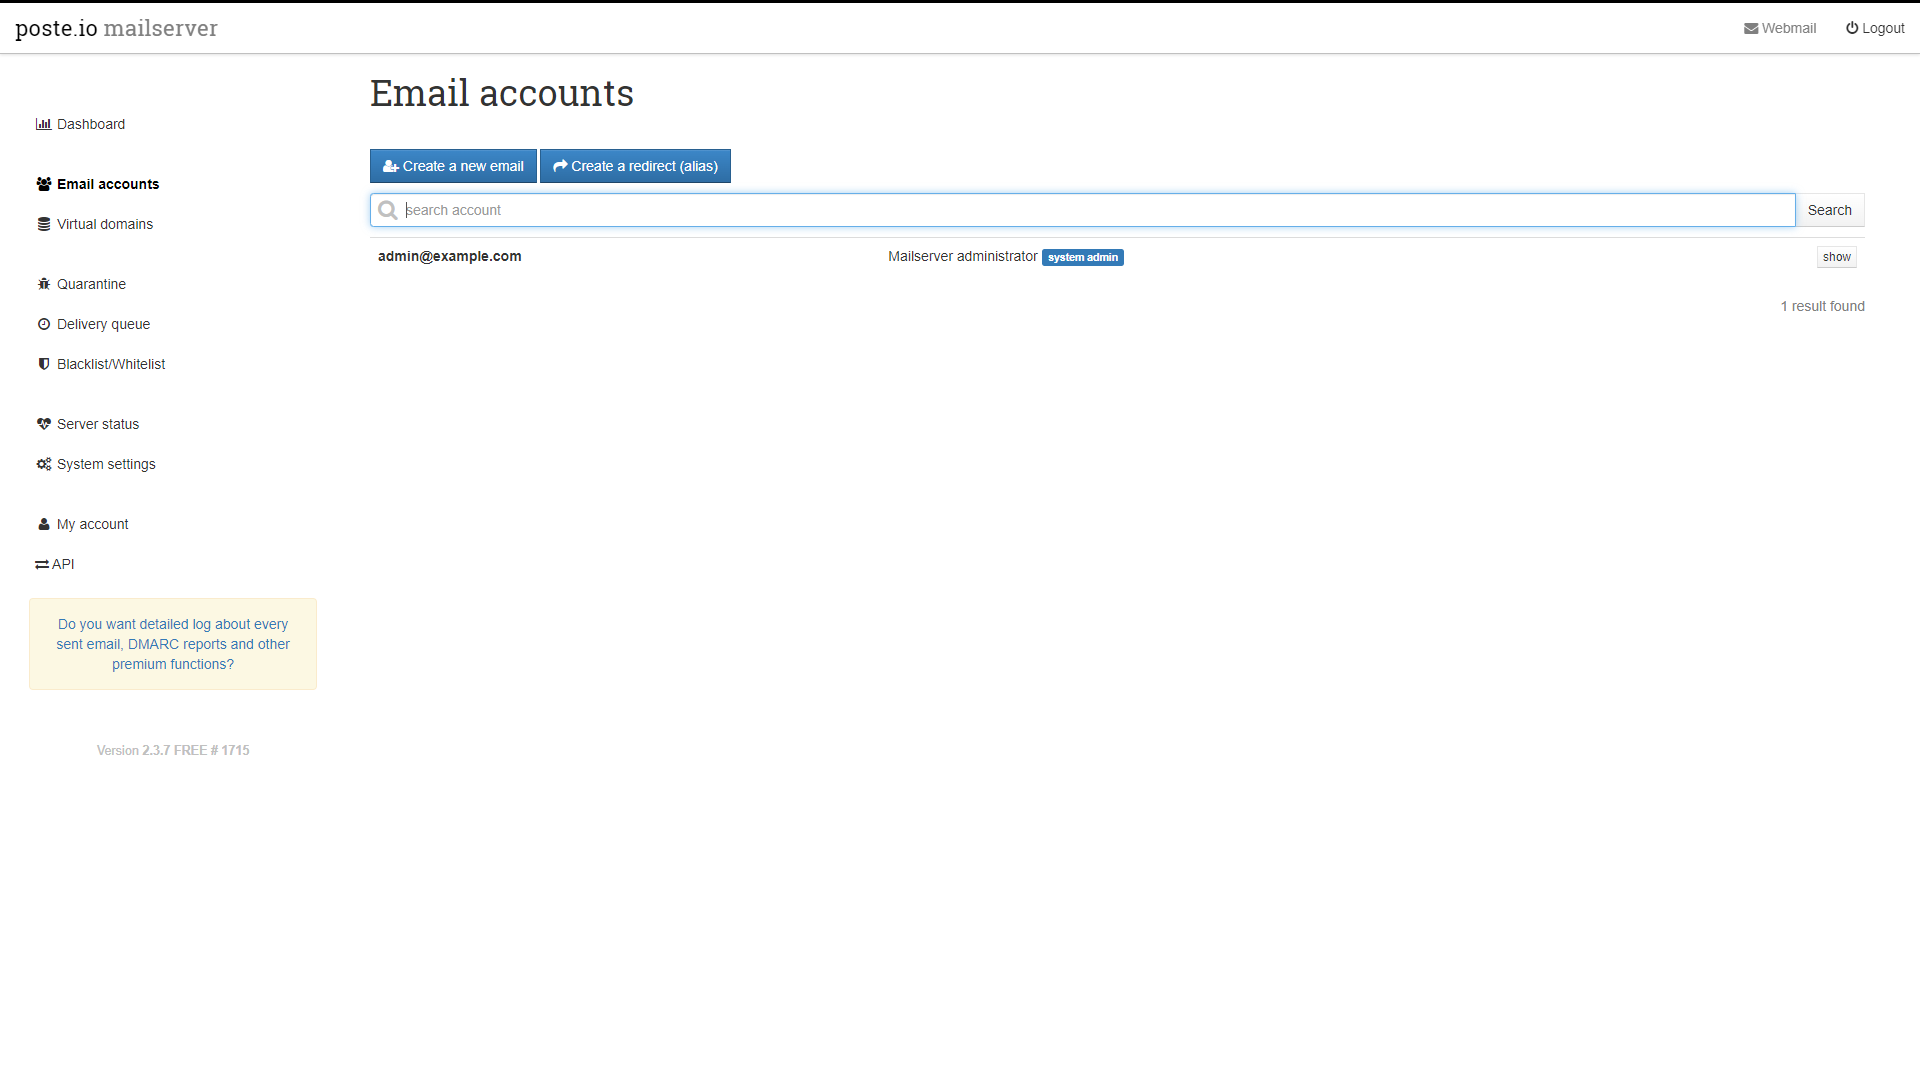
After completing the steps above you will be inside your webmail admin dashboard, to log in to your new email account click the webmail link in the top right corner.
¶ Conclusion
Congrats! This is the basic setup for Poste.io, as mentioned at the beginning we have a more in-depth course available at TrueFreedomTech.com.
¶ Troubleshooting
This section covers problems we have run into with poste.io. We only offer support to our premium members who can open a support ticket Here!
¶ Restart loop
This restarting loop is probably due to something not starting correctly on the server and the health check shutting it down.
If your Poste.io stack constantly restarts and fails here are some ways to troubleshoot the issue.
- disable ClamAV or Rspamd
- This can be done by adding:
- DISABLE_CLAMAV=TRUEor- DISABLE_RSPAMD=TRUEto the environmental variables section of our stack
*Note: This is not ideal as it weakens the overall security of your mail server and should only be a temporary fix if possible. One method for troubleshooting this issue is to move your mail server to a stronger host with more ram or add more ram to your current system.