¶ WordPress: Website Building Platform
¶ Introduction
WordPress is open-source software for building websites. It has an amazing community of developers that have created all kinds of plugins to expand what WordPress can do. WordPress by default is meant for running a blog, but thanks to the community and developers it has expanded to a store, forums, wikis, LMS learning sites, and tons more. You can learn more about WordPress from the links below:
¶ Introduction
At True Freedom Tech, we use WordPress for almost all of our websites. it's easy to spin up a container, buy a domain name, point it to the server, add it to the proxy, and start designing. WordPress simplifies everything and allows you to build very complex websites that would take 10x the amount of time to do from scratch. WordPress powered 37% of the websites online in 2021! Let me repeat that, ⅓ of the internet runs on WordPress.
There are some important things to note about WordPress, with such a large repository of plugins, and themes you might feel compelled to install 50 plugins on a website… Try not to. While it is amazing running your own online shop/blog/podcast/wiki website all in one from your dusty desktop you should remember that the more you add and the bigger it gets, the more it has to load each time someone visits your site. Having your website crash from a massive influx of clients is a good way to become aware of optimizing and speeding up your website, but better to know before and be prepared. So, we want to tell you before we begin that you should plan what your website is for and minimize the number of things you have to add!
If you are new to WordPress the best way to learn like anything else in our opinion is to just dive in. Start up a WordPress that you don't plan on using as a production website, install 50 plugins, add 5 themes and play around with them, and break your website a couple of times. You will walk out knowing more than you did when you entered (buy our course to do it even quicker).
¶ Overview
We are going to assume you already have a working server with Docker, Portainer, and Nginx Proxy Manager running. We will go over the custom configuration files, the compose for the stack, and configuring Nginx-Proxy-Manager. We are not using our own images for this stack so please consult the Docker hub and GitHub links for more information regarding the Docker image and source code.
This is strictly how to get the app running. Once again, we cover how to do this at TrueFreedomTech.com in much more detail! This will get beginners running, and experts should be able to adapt this to their own configuration with relative ease.
Ready?
¶ Docker-Configs
Open up Portainer and log in. If you are not familiar with Portainer here are the official docs:
We will be adding 1 custom configuration to our stack. The source code is linked below and can be found below the steps.
Add this file in Portainer:
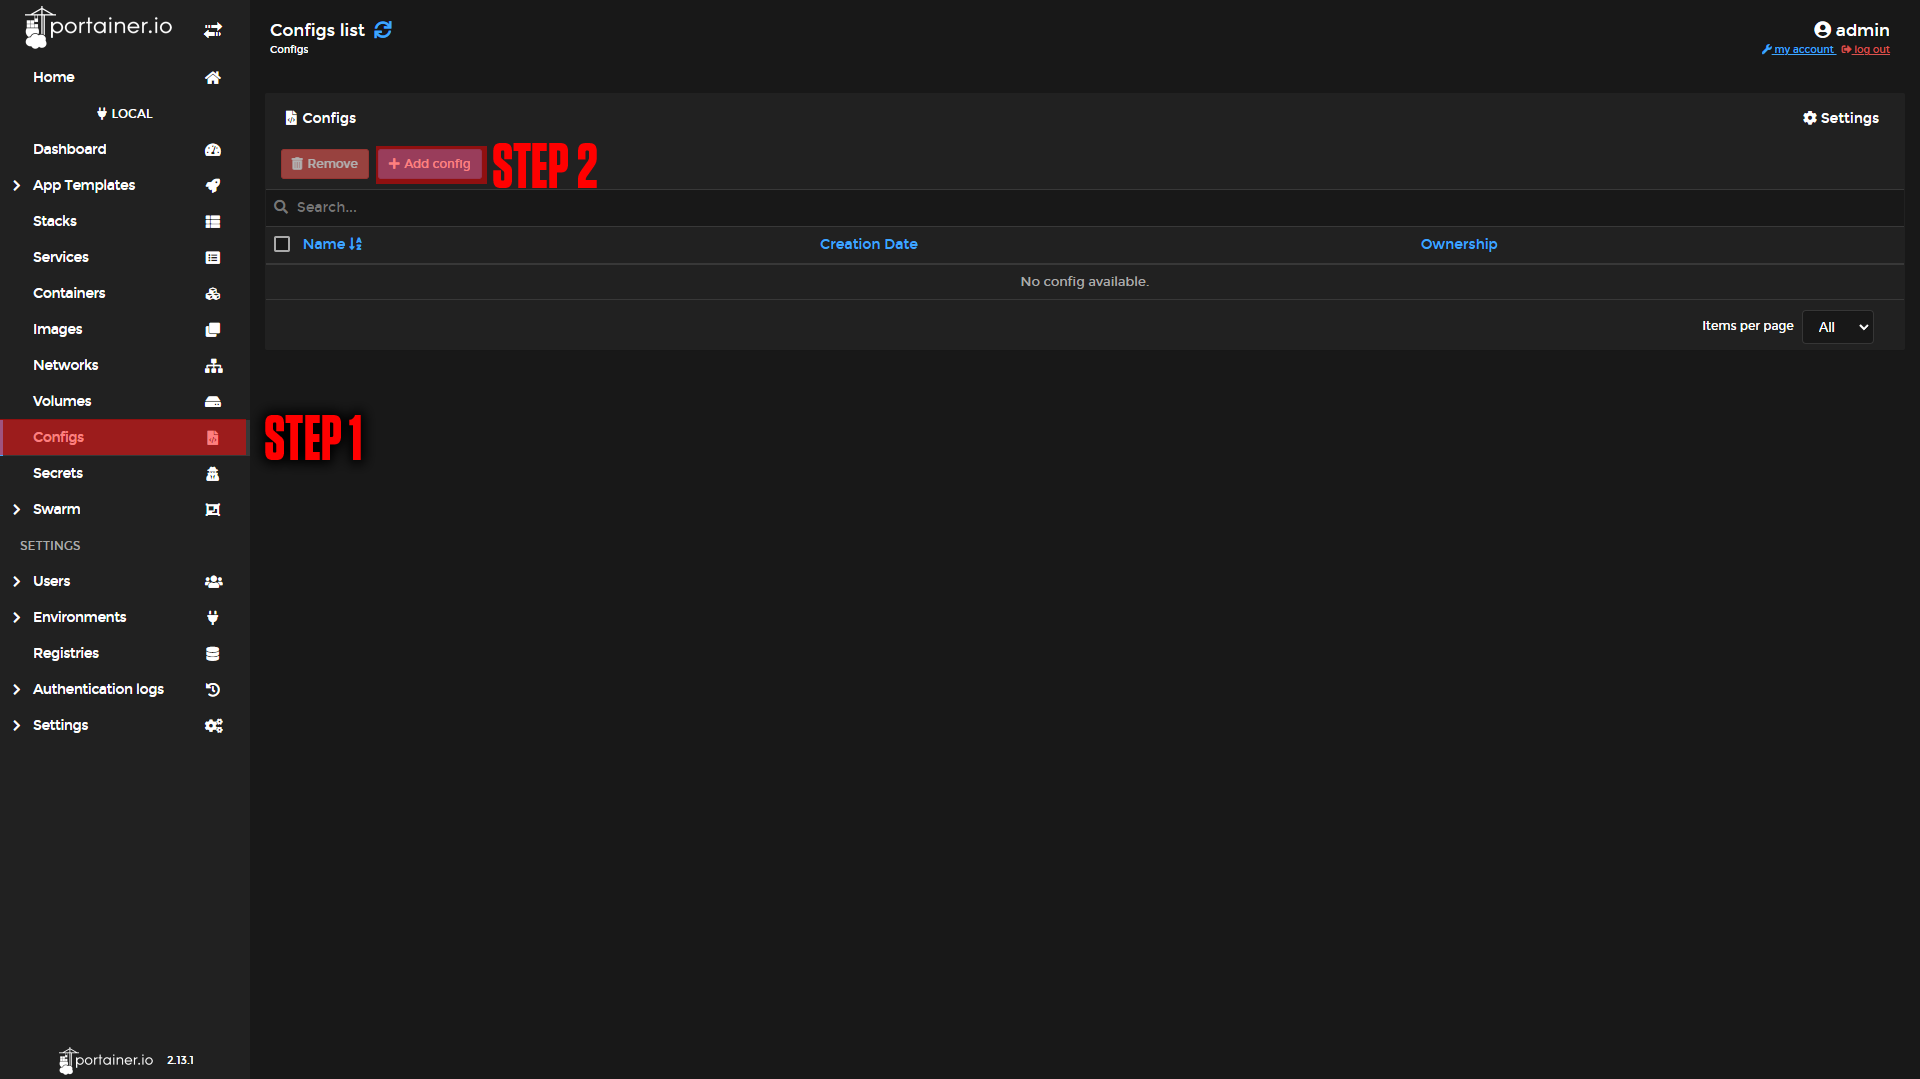
Step 1: Go to Configs.
Step 2: Click Add Config.
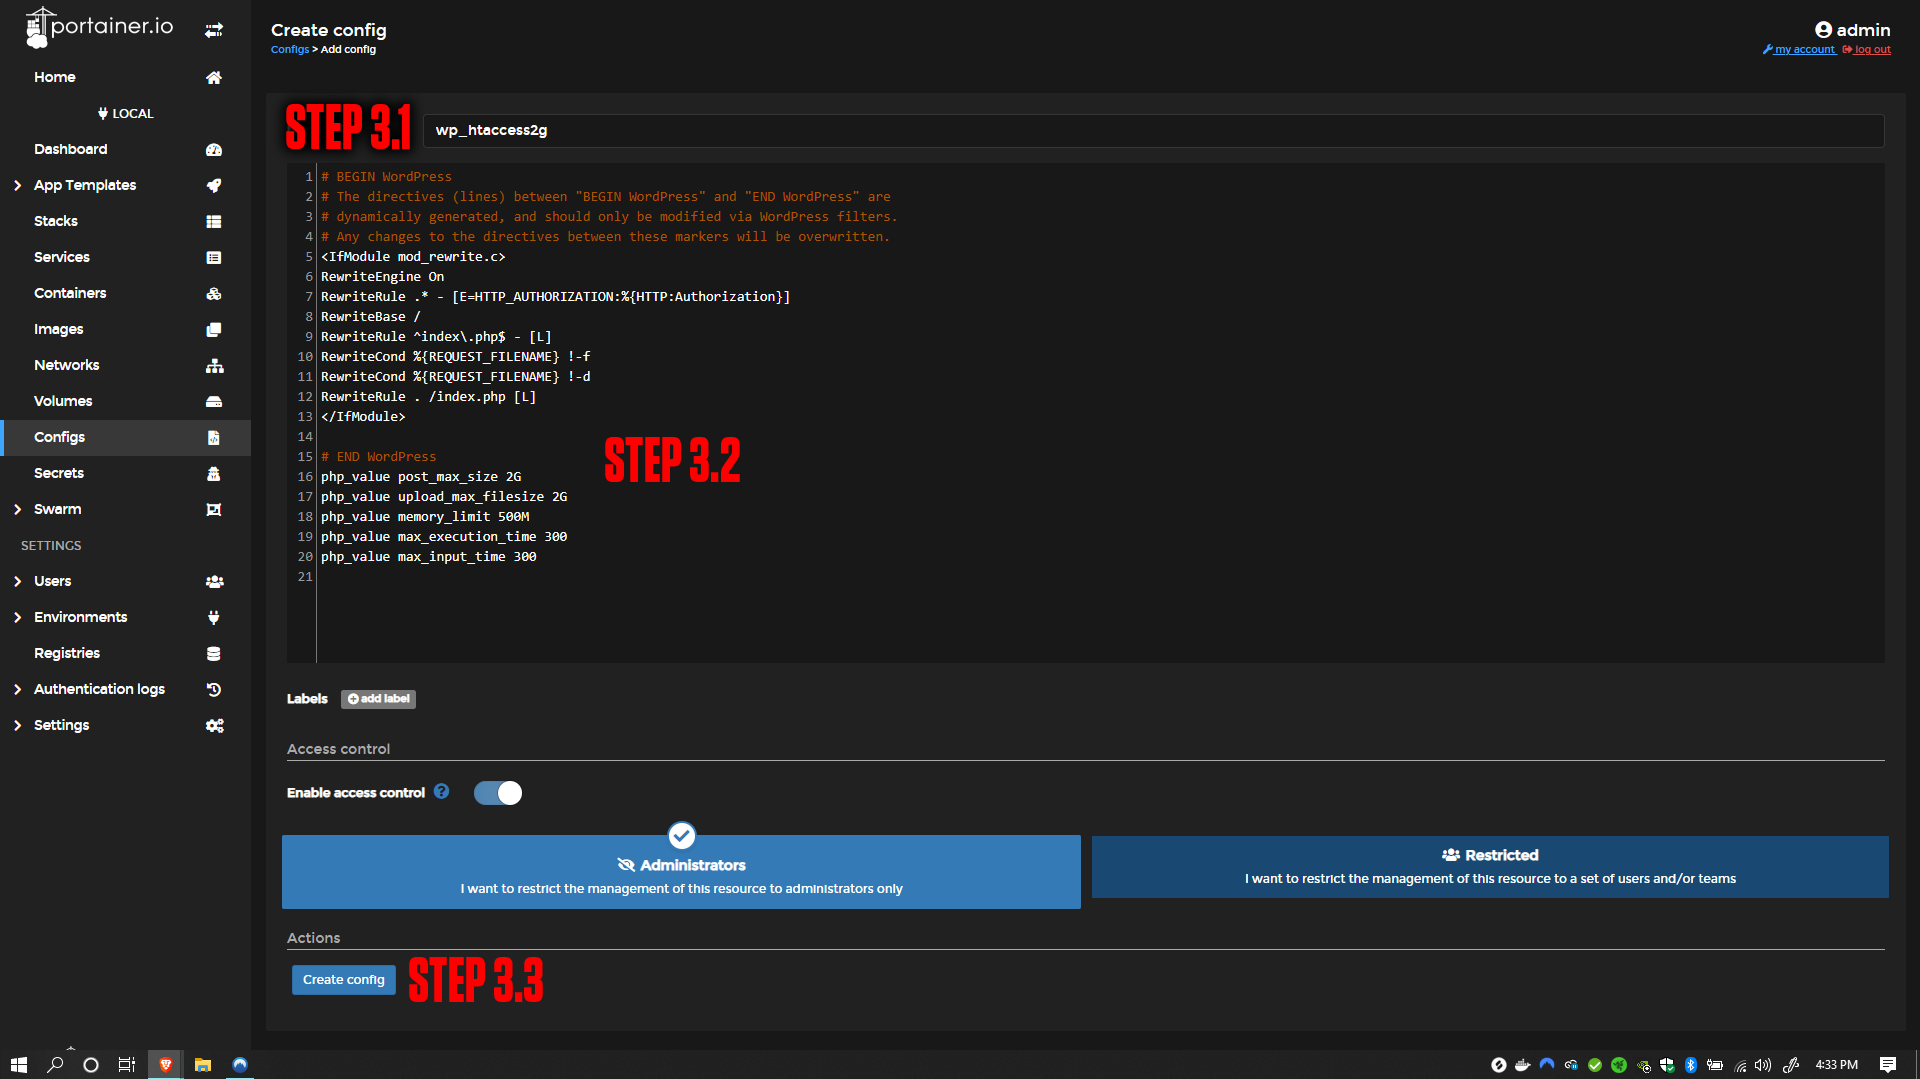
Step 3: Paste the name of the file and code.
There is no need to change anything in this config, the point of this is to allow larger file uploads to WordPress.
|
|
# BEGIN WordPress
# The directives (lines) between "BEGIN WordPress" and "END WordPress" are
# dynamically generated, and should only be modified via WordPress filters.
# Any changes to the directives between these markers will be overwritten.
<IfModule mod_rewrite.c>
RewriteEngine On
RewriteRule .* - [E=HTTP_AUTHORIZATION:%{HTTP:Authorization}]
RewriteBase /
RewriteRule ^index\.php$ - [L]
RewriteCond %{REQUEST_FILENAME} !-f
RewriteCond %{REQUEST_FILENAME} !-d
RewriteRule . /index.php [L]
</IfModule>

# END WordPress
php_value post_max_size 2G
php_value upload_max_filesize 2G
php_value memory_limit 500M
php_value max_execution_time 300
php_value max_input_time 300¶ Docker-Compose
If you are not familiar with Portainer or Docker-Compose here are the official docs:
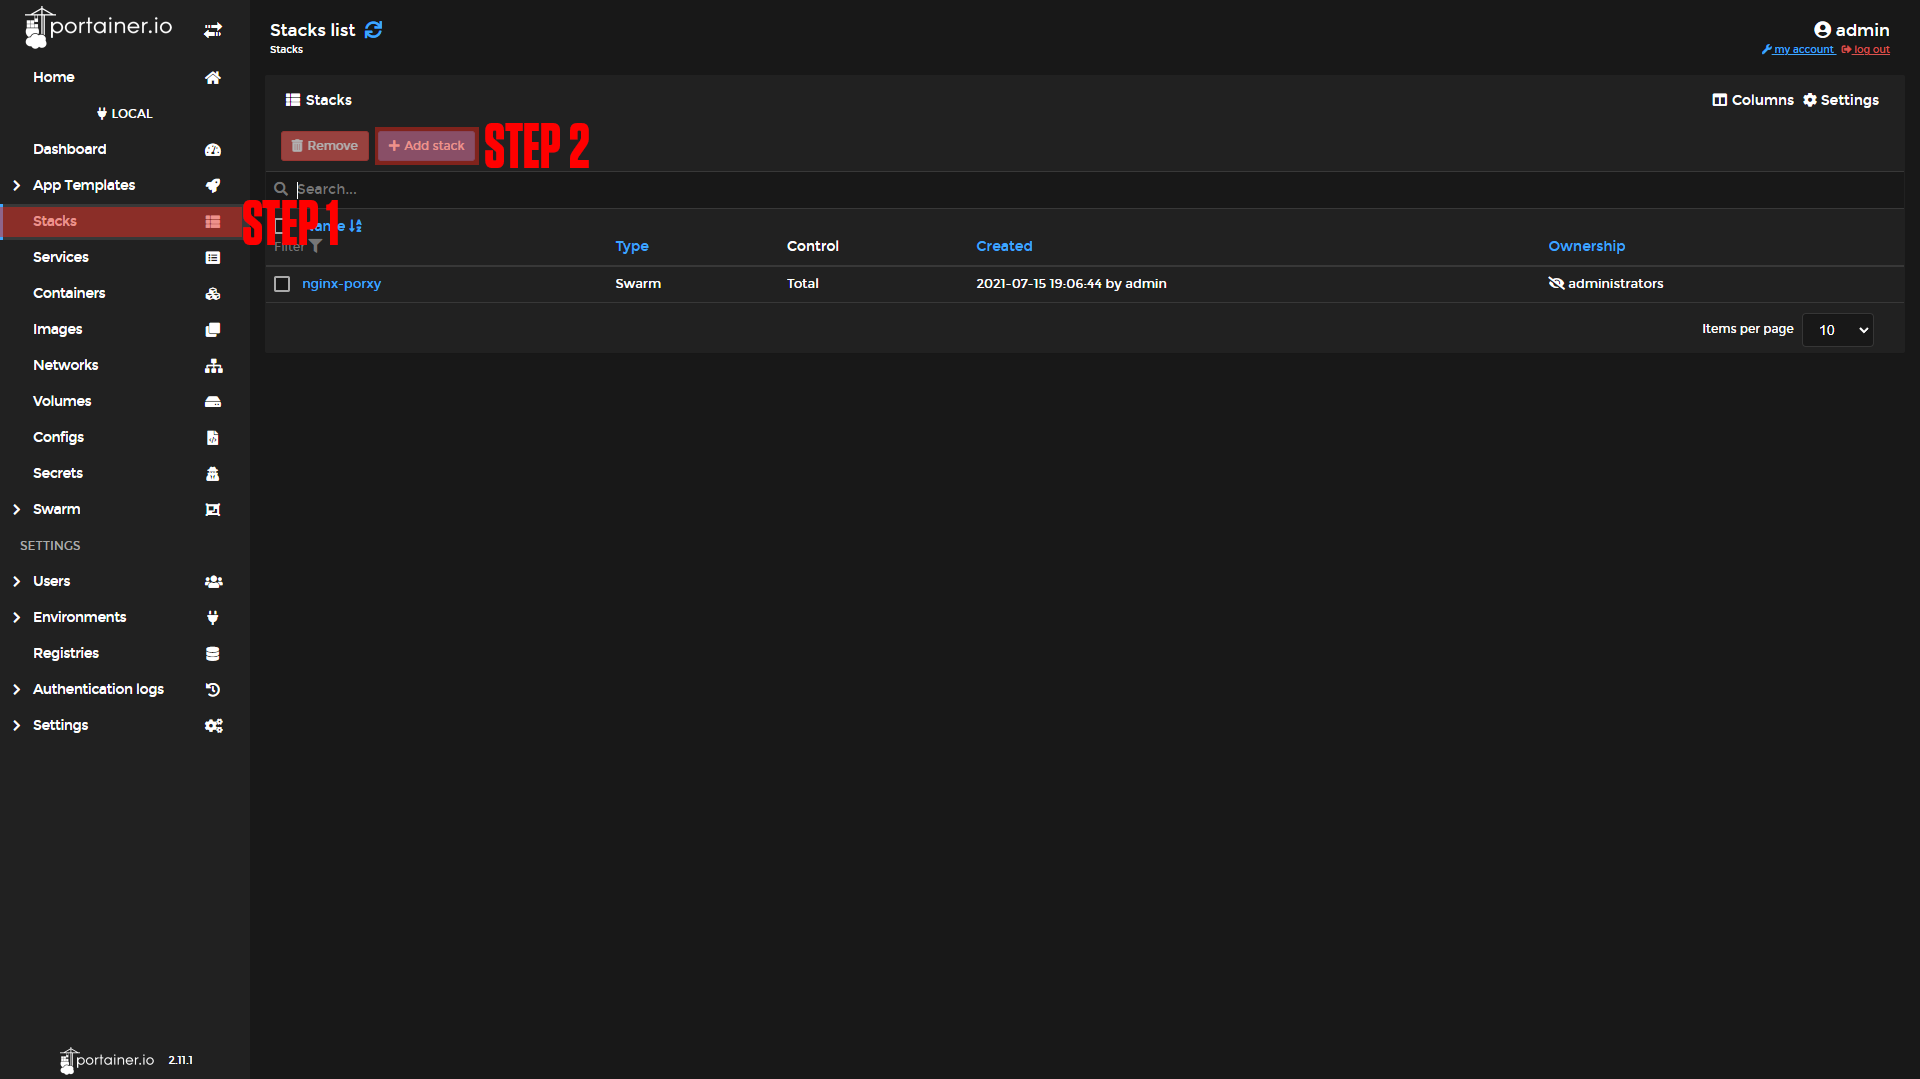
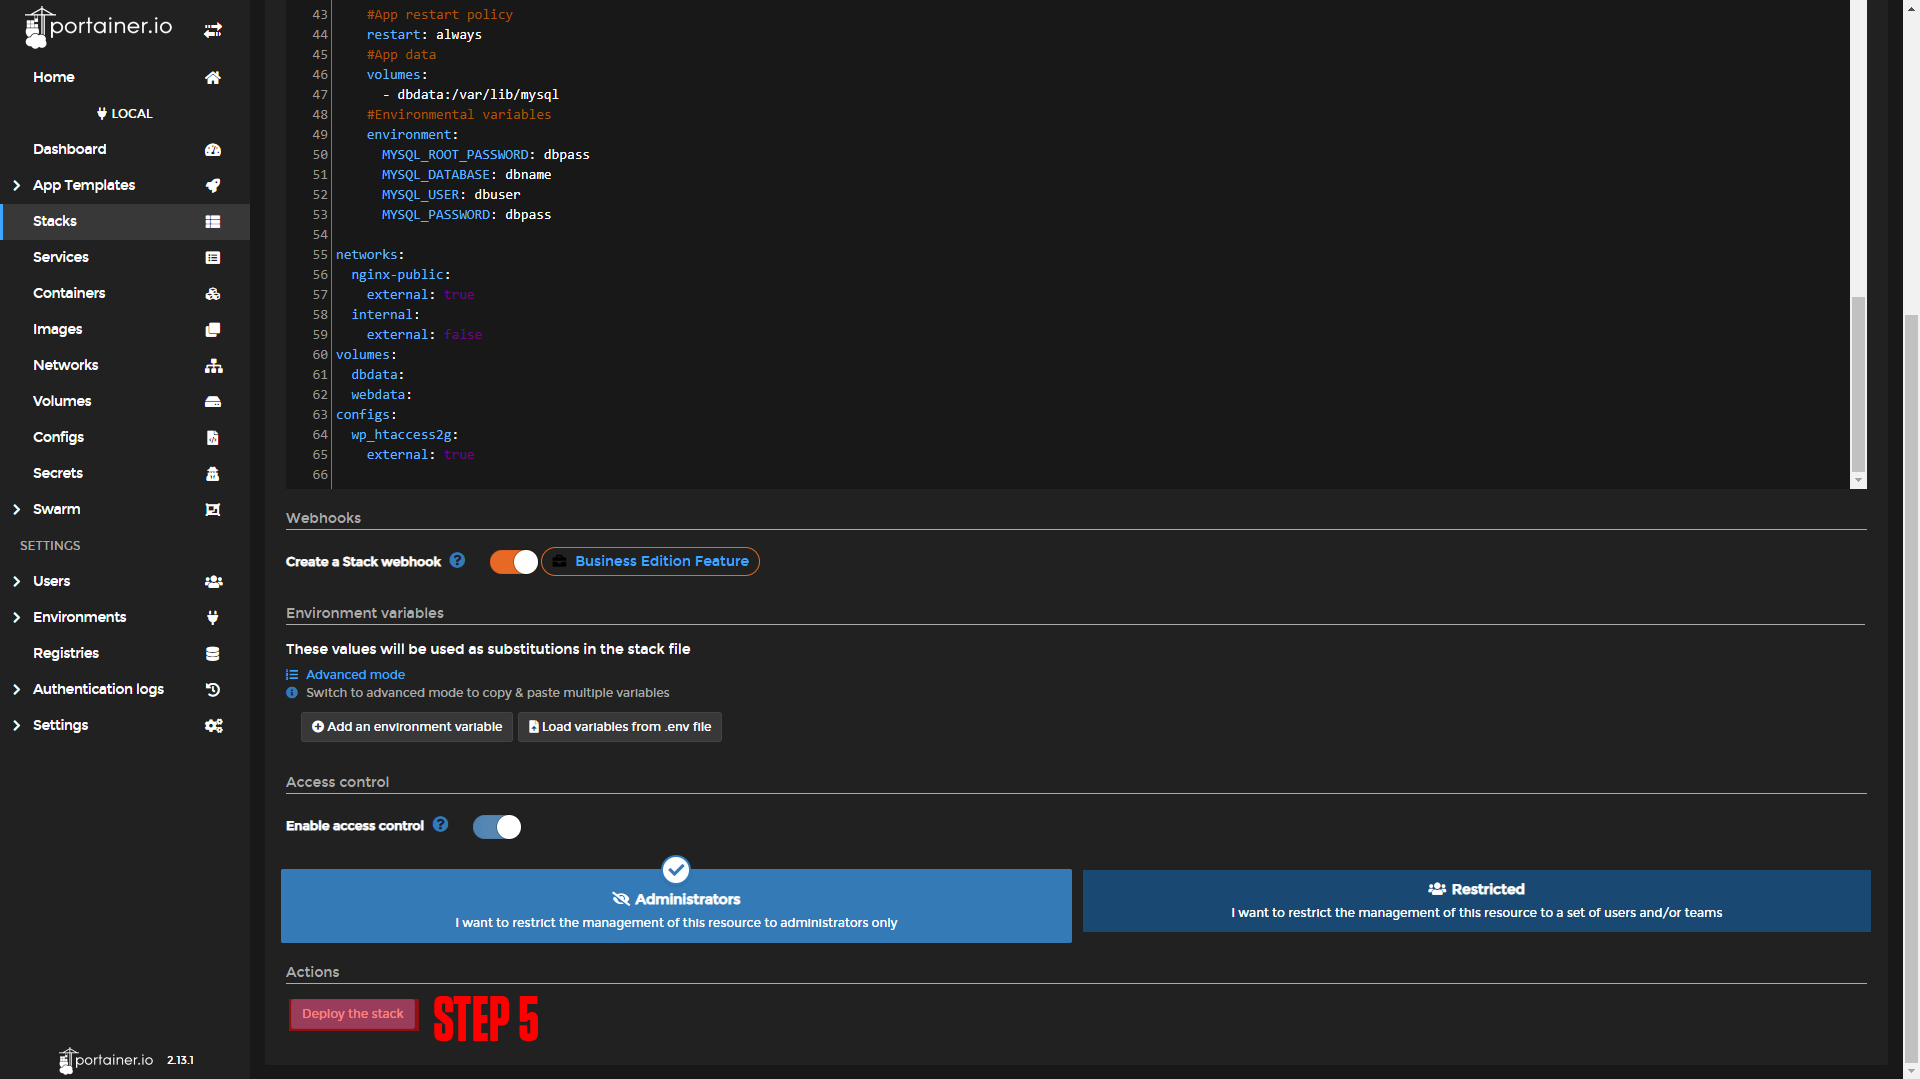
Step 1: Go to Stacks.
Step 2: Click Add Stack.
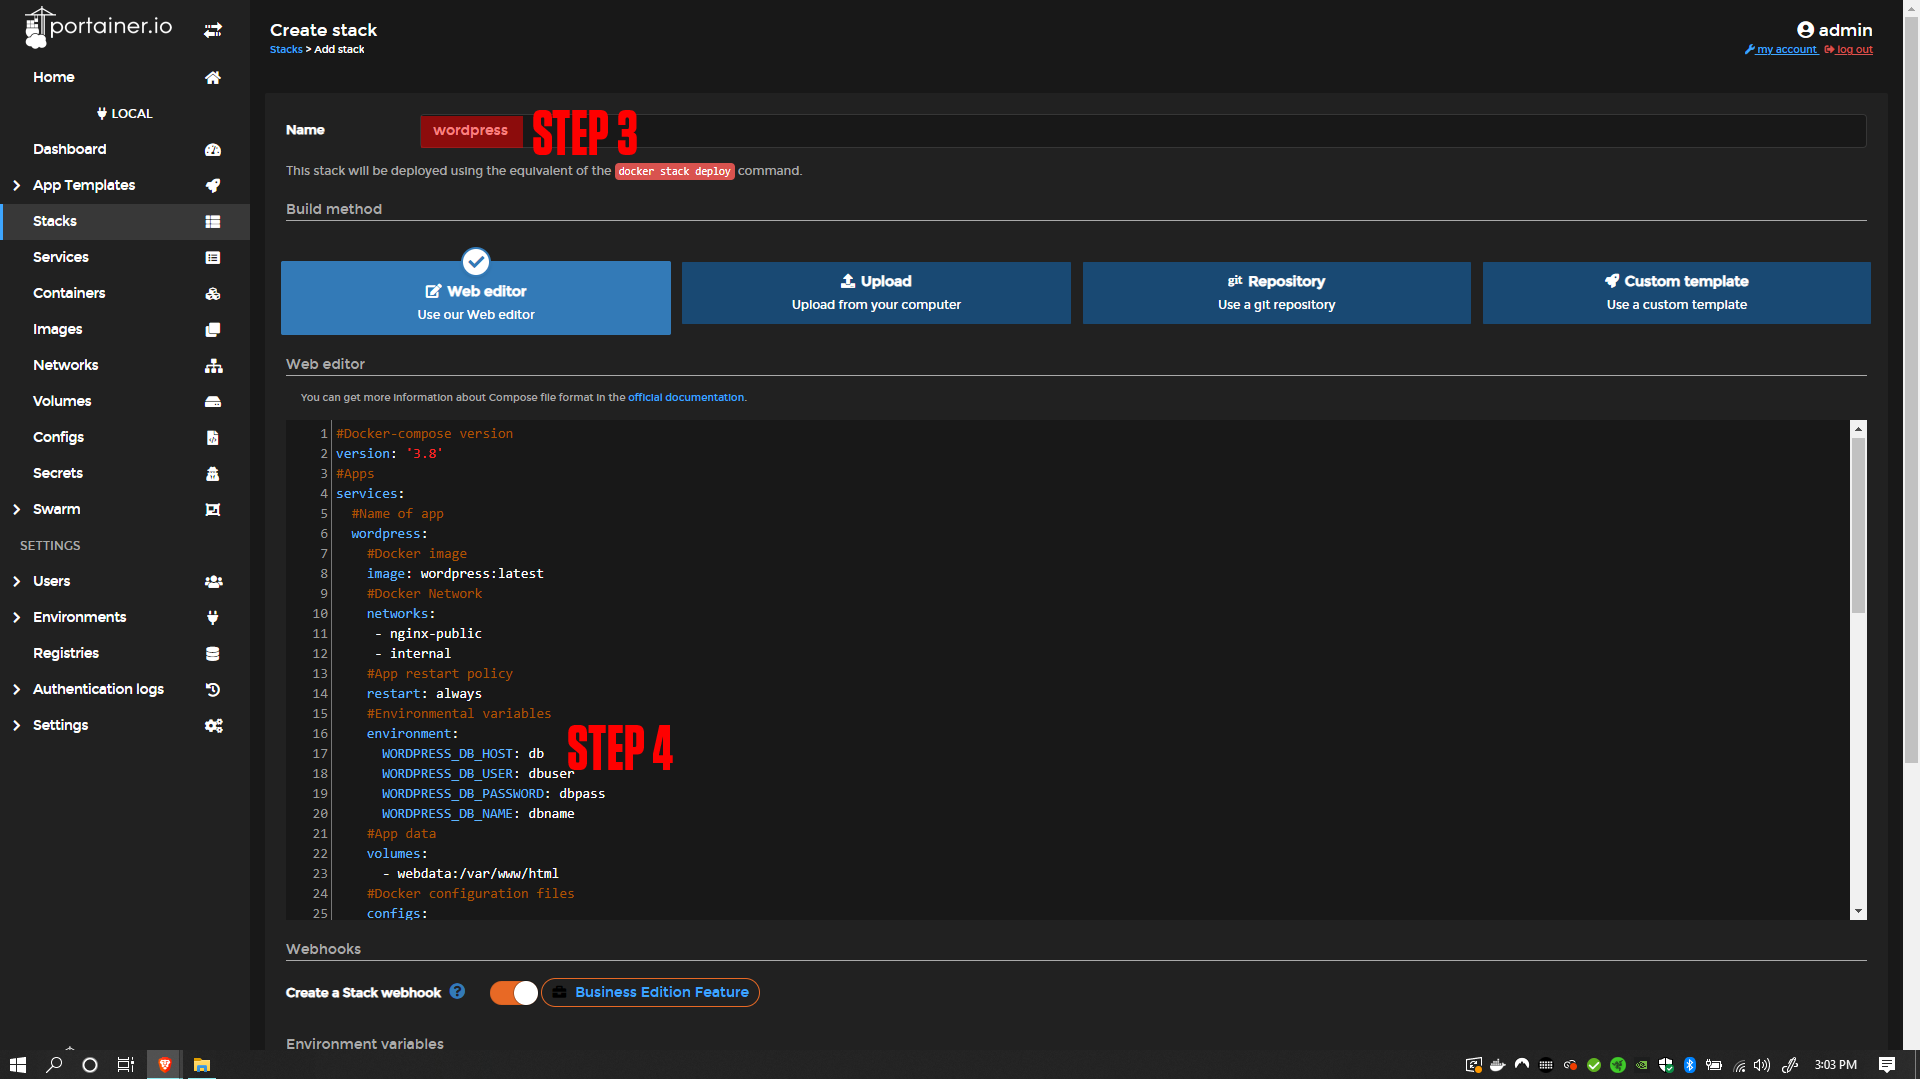
Step 3: Name your stack (Ex. wordpress).
Step 4: Paste in the contents below:
Step 5: Press Deploy the Stack.
|
|
|
#Docker-compose version
version: '3.8'
#Apps
services:
  #Name of app
  wordpress:
    #Docker image
    image: wordpress:latest
    #Docker Network
    networks:
     - nginx-public
     - internal
    #App restart policy
    restart: always
    #Environmental variables
    environment:
      WORDPRESS_DB_HOST: db
      WORDPRESS_DB_USER: dbuser
      WORDPRESS_DB_PASSWORD: dbpass
      WORDPRESS_DB_NAME: dbname
    #App data
    volumes:
      - webdata:/var/www/html
    #Docker configuration files
    configs:
      #Docker config to use (this config can be found in this repository)
      - source: wp_htaccess2g
        #location of file to replace or create
        target: /var/www/html/.htaccess
        #User ID
        uid: '33'
        #Group ID
        gid: '33'
        #permissions for file (Learn more here: http://permissions-calculator.org/)
        mode: 0440
  #Name of app
  db:
    #Docker image
    image: mariadb
    #Docker network
    networks:
      - internal
    #App restart policy
    restart: always
    #App data
    volumes:
      - dbdata:/var/lib/mysql
    #Environmental variables
    environment:
      MYSQL_ROOT_PASSWORD: dbpass
      MYSQL_DATABASE: dbname
      MYSQL_USER: dbuser
      MYSQL_PASSWORD: dbpass

networks:
  nginx-public:
    external: true
  internal:
    external: false
volumes:
  dbdata:
  webdata:
configs:
  wp_htaccess2g:
external: true¶ Nginx-Proxy-Manager
Before we configure our apps, we will set up our domains using Nginx-Proxy-Manager. If you followed our Nginx-Proxy-Manager stack setup you should be able to copy everything we do step by step.
¶ WordPress Domain Setup
Step 1: Copy the Heimdall service name.
This should be wordpress_wordpress if you did not change the names of apps.
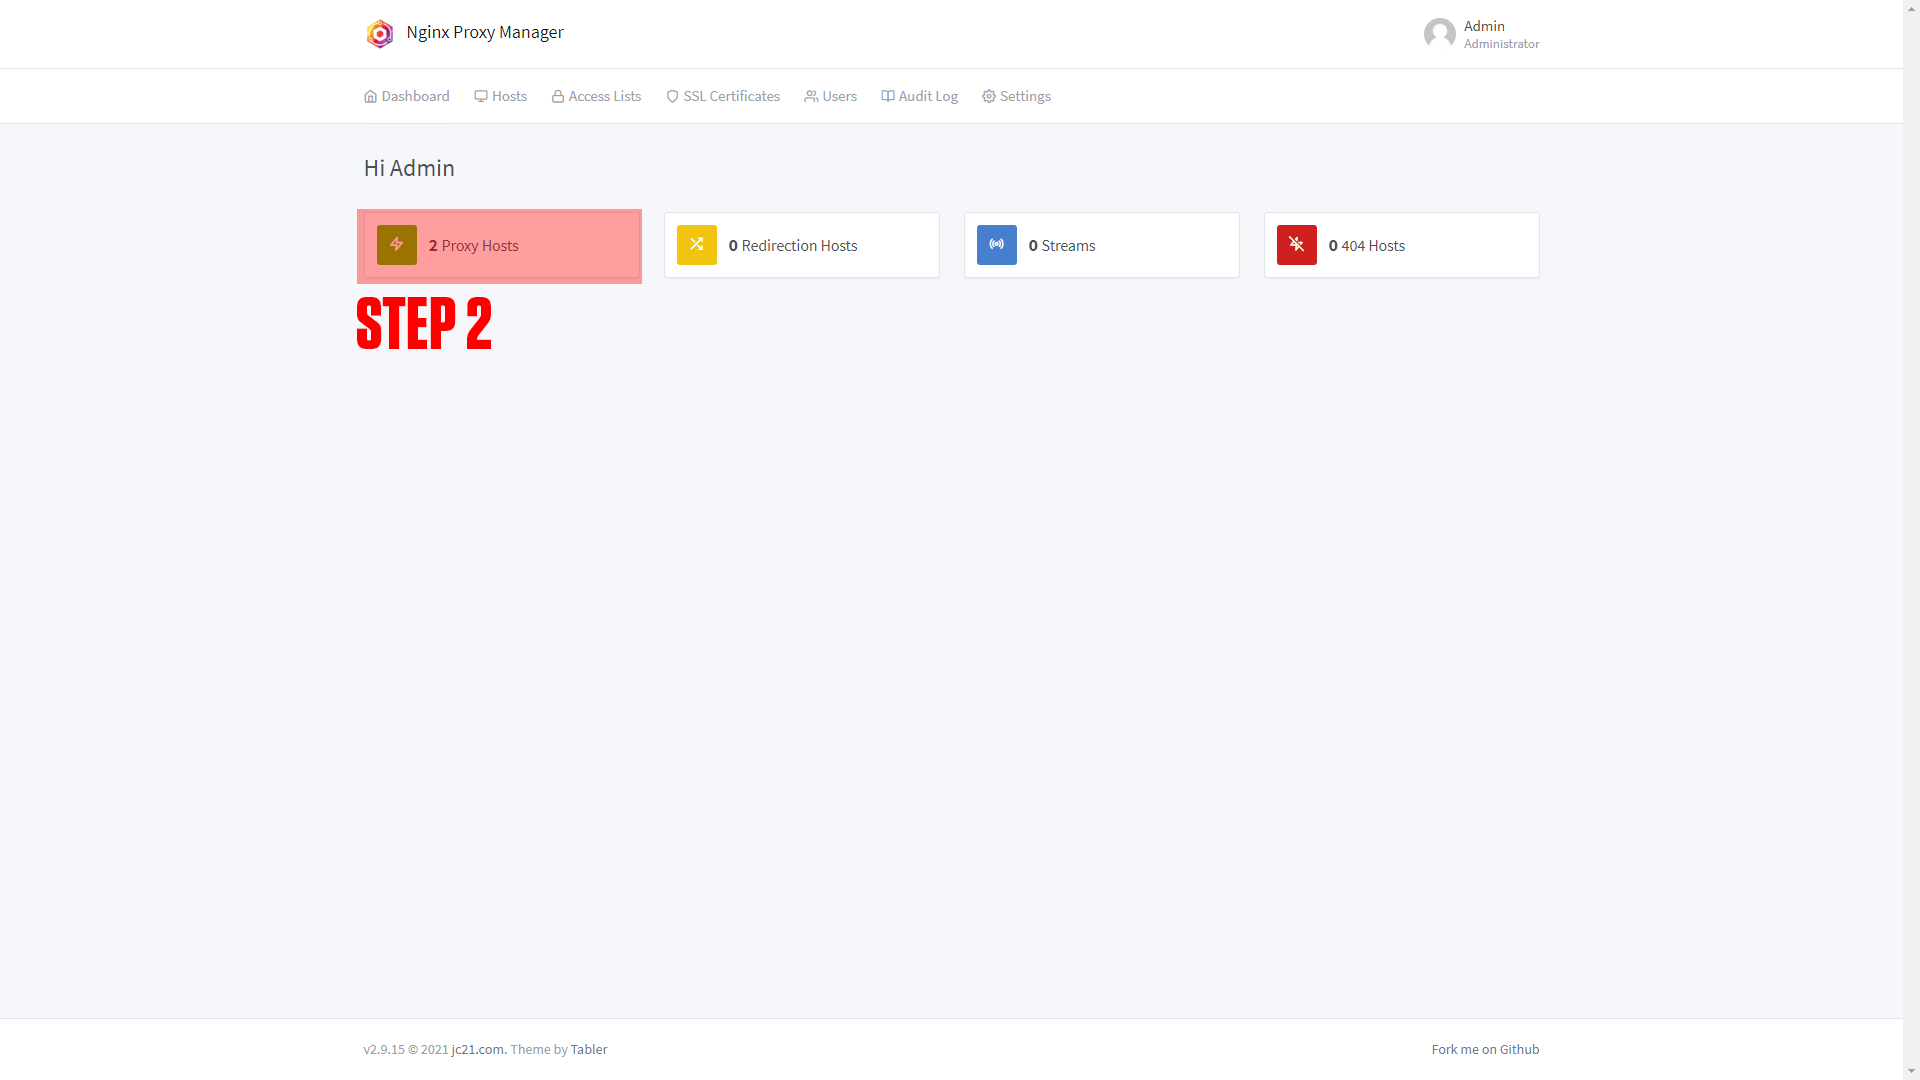
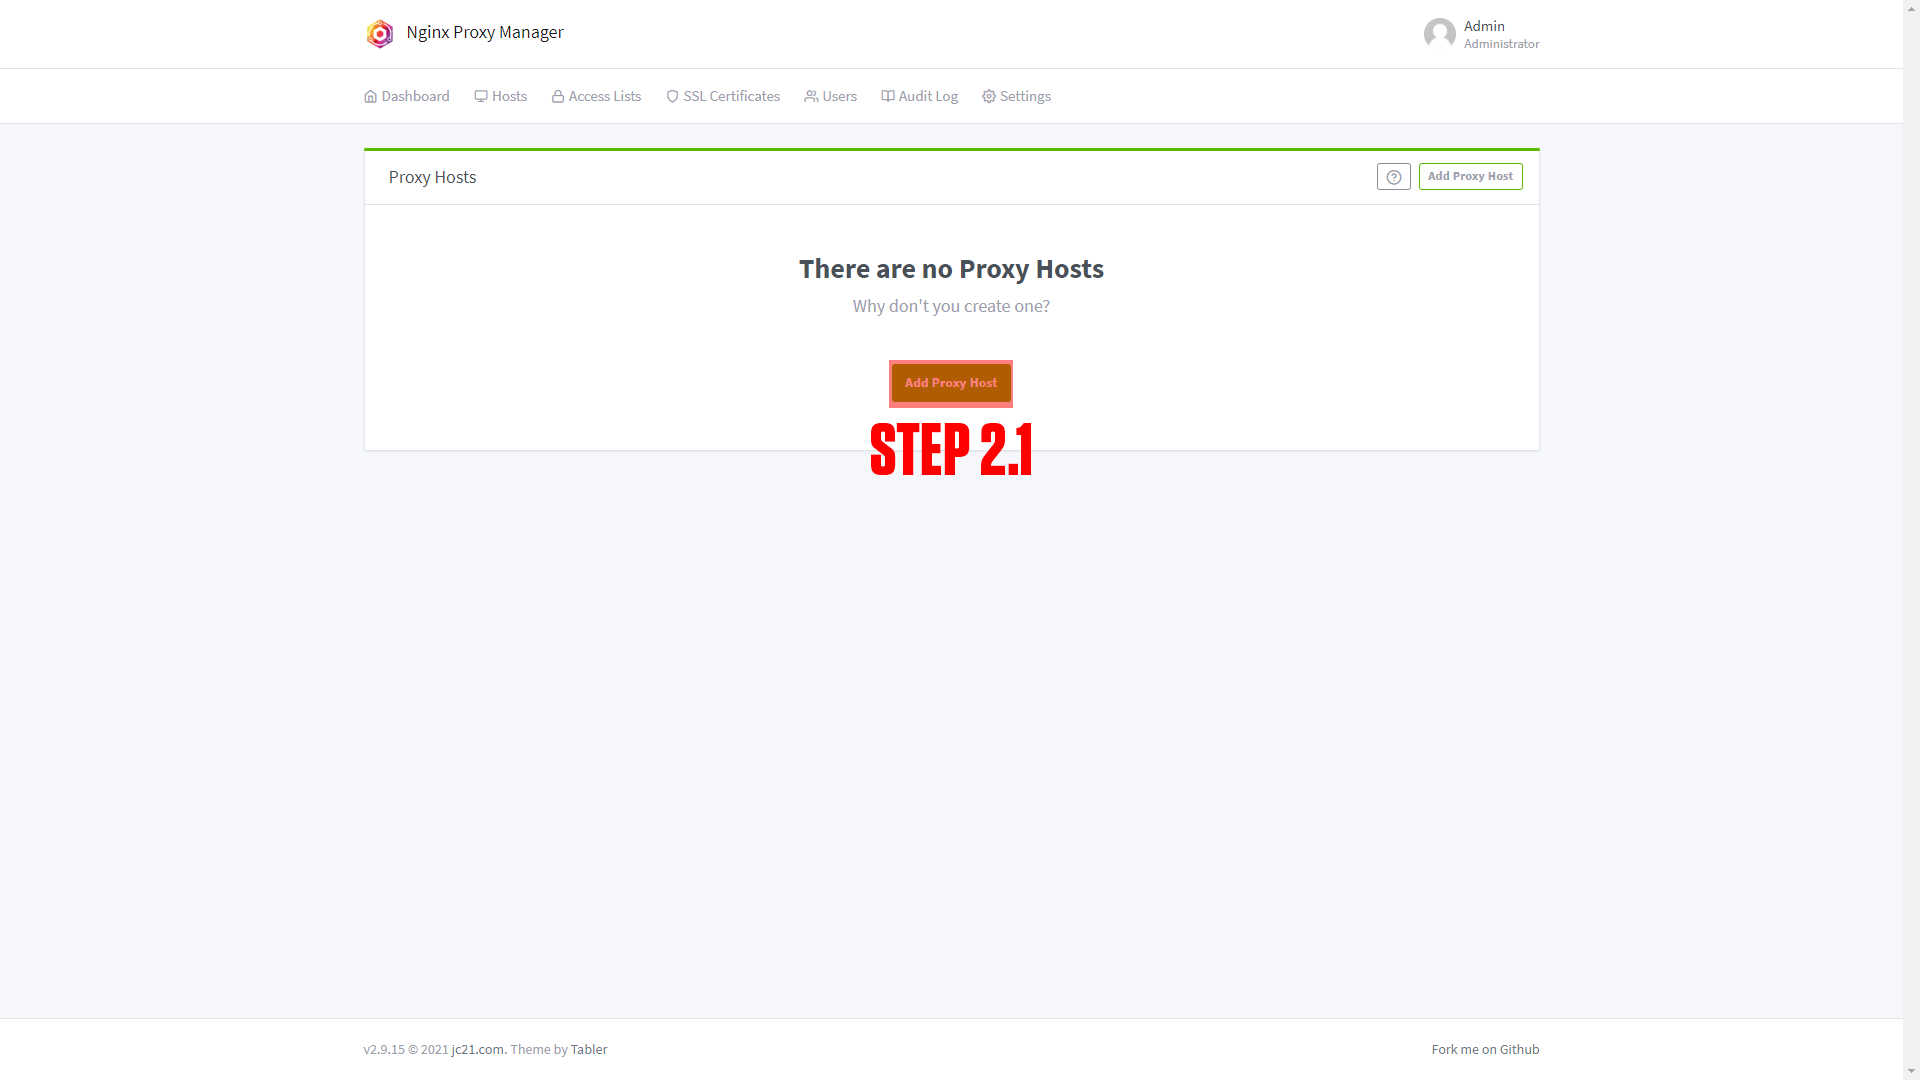
Step 2: Log in to Nginx-Proxy-Manager and create a new proxy host.
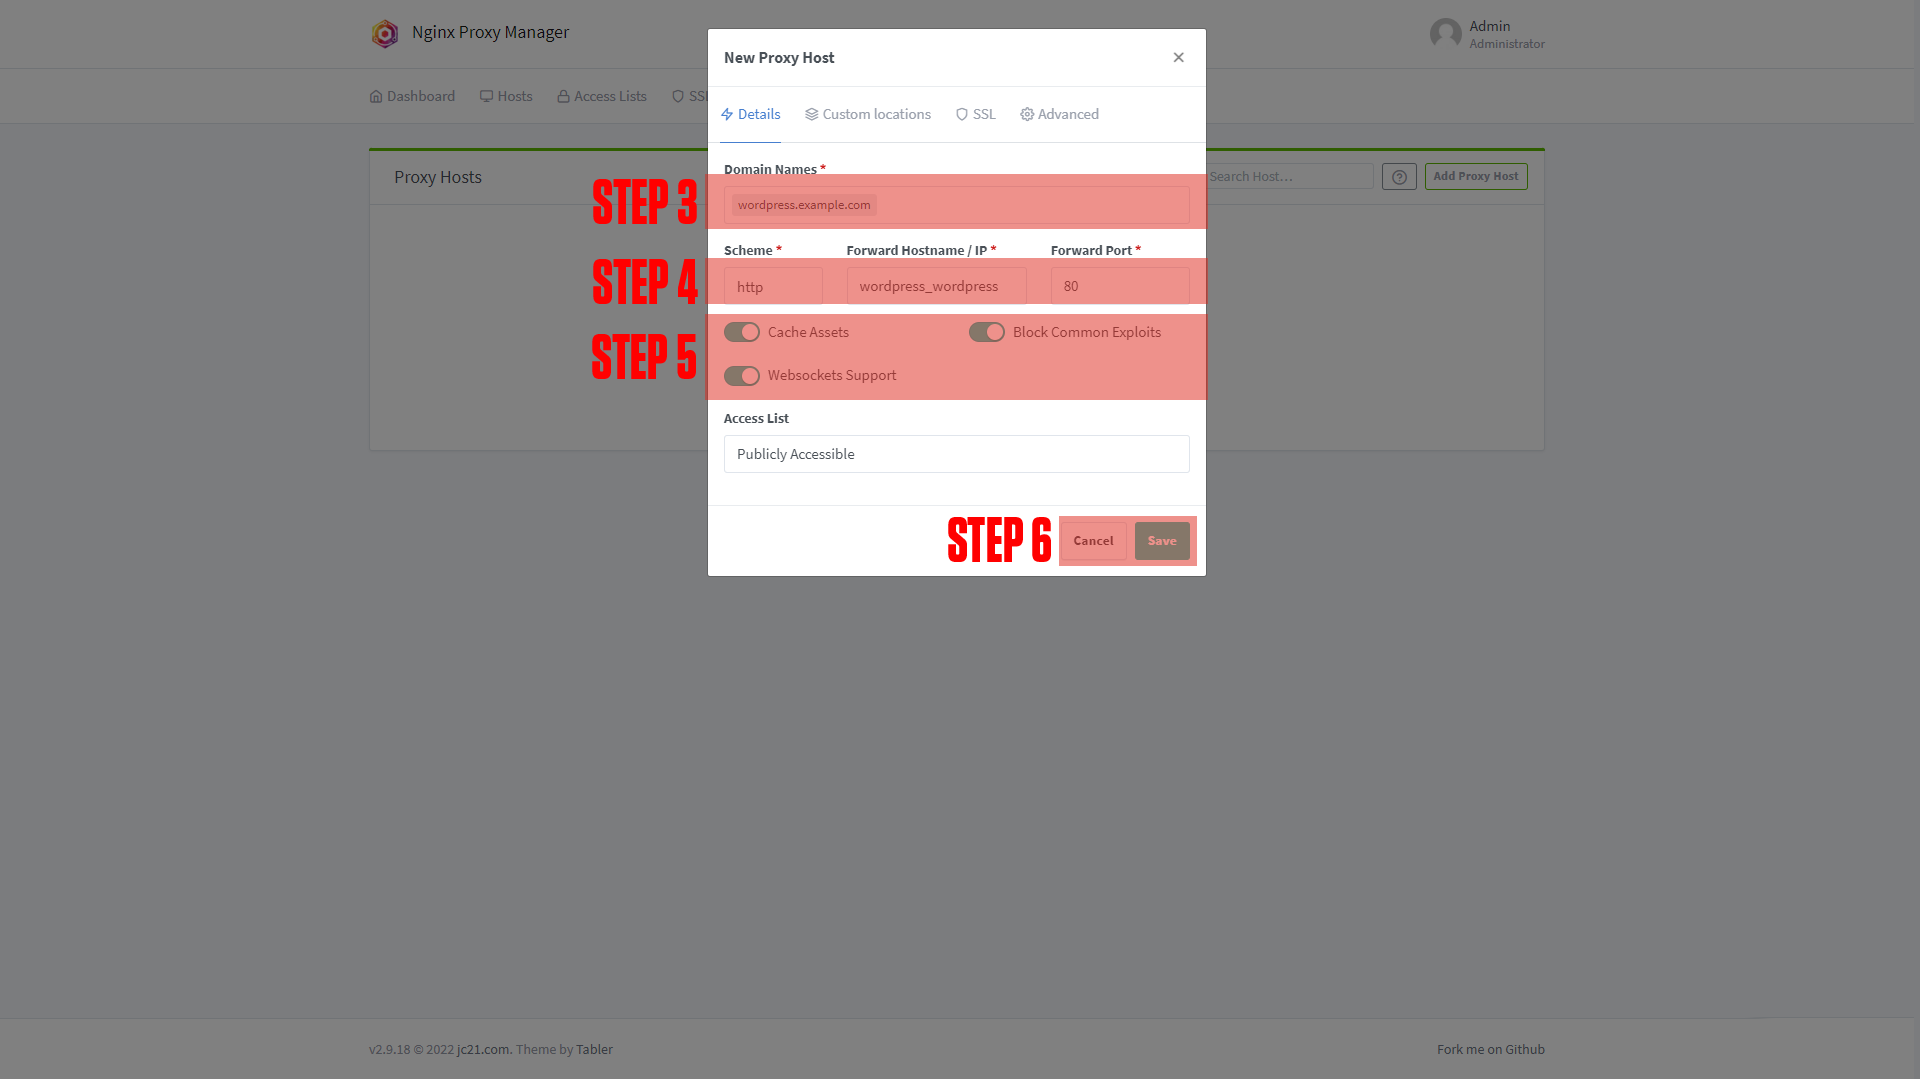
Step 3: Enter your Domain name (Ex. example.com)
Step 4: Add the service name to the Forward Hostname / IP at port 80.
Step 5: Enable Cache Assets, Block Common Exploits, and Websockets Support.
Step 6: Click Save.
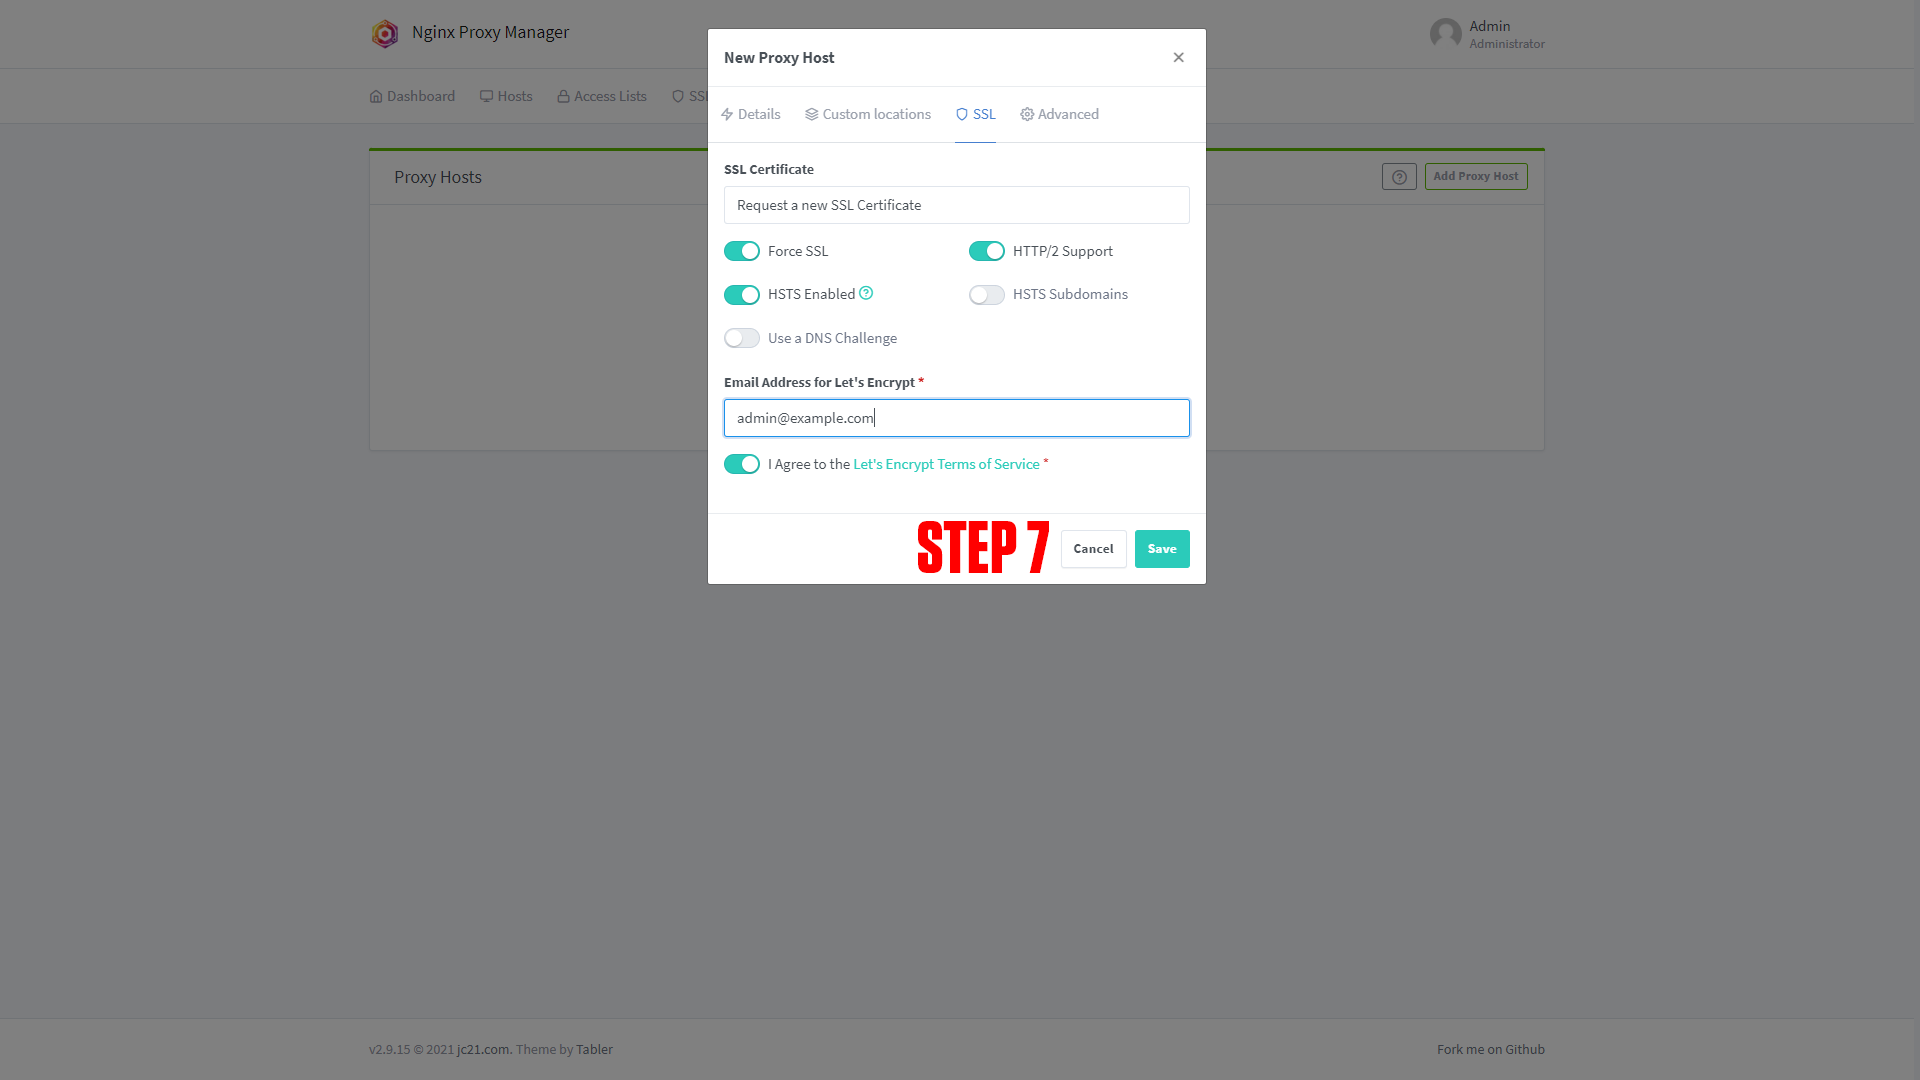
Step 7 (Optional): Enable SSL (we say this is optional, but you should always have an SSL cert if possible).
|
|
|
|
¶ Configuring WordPress
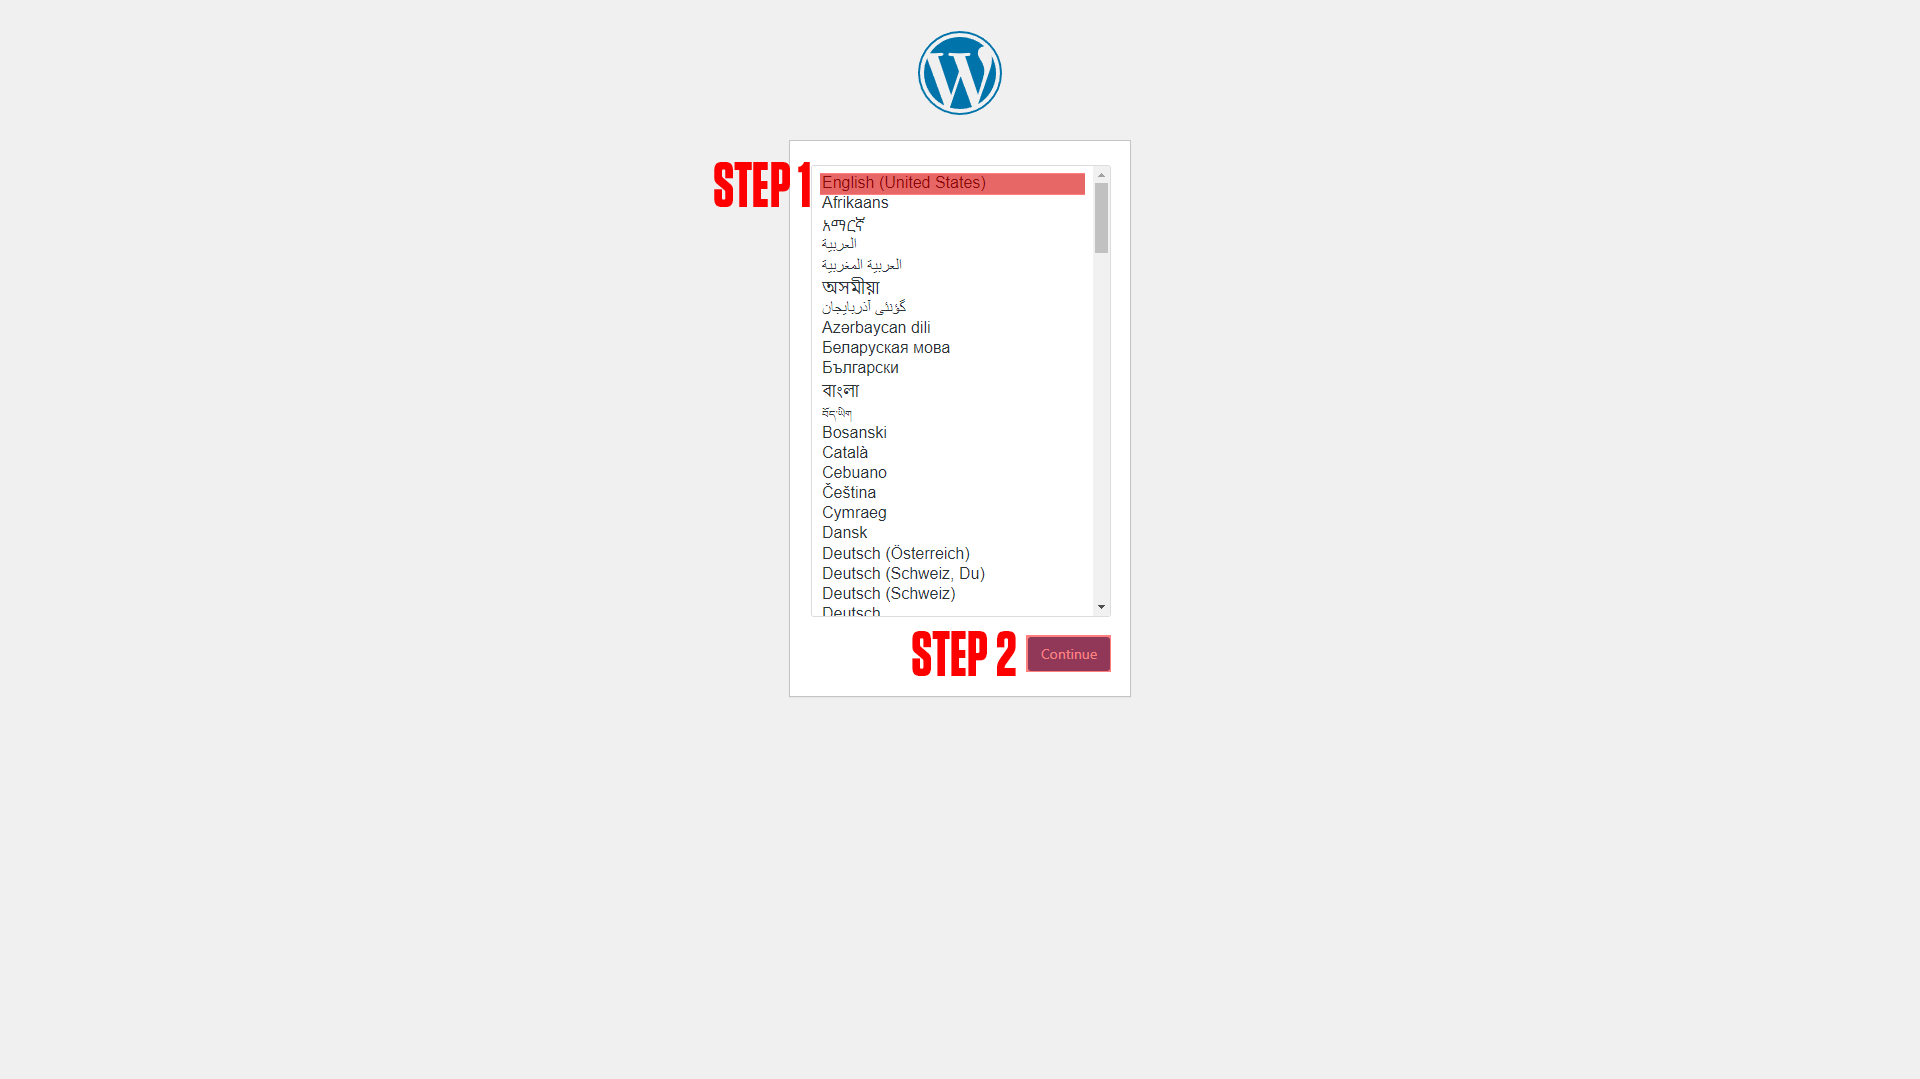
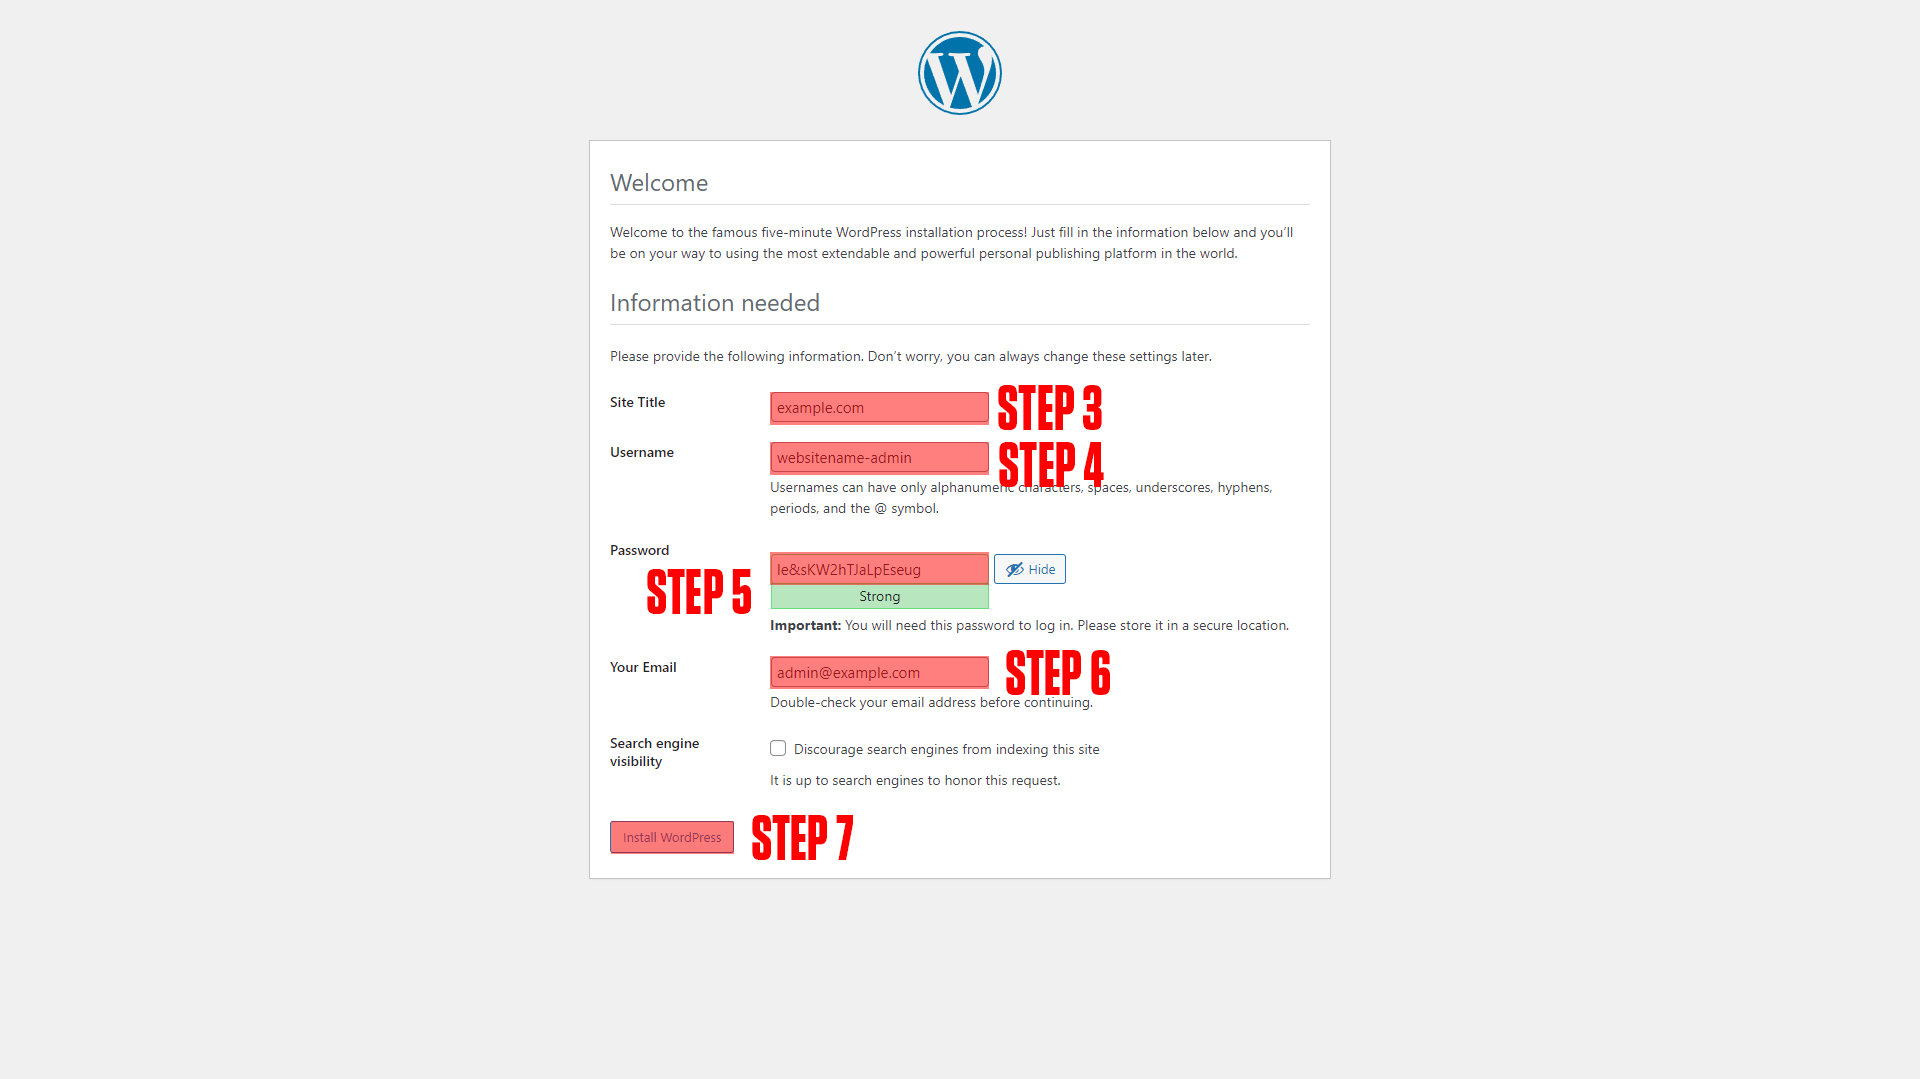
After setting up your domain name it's time to finish configuring the app. Go to the URL you chose for your application. You should arrive at a screen like this!
|
|
(If you do not arrive at a screen like this, something is wrong! Our premium members can open a support ticket Here!)
Step 1: Choose your language.
Step 2: Click continue.
Step 3: Enter the name of your site.
Step 4: Enter your admin username.
Step 5: Enter your password.
Step 6: Enter your admin email.
Step 7: Click install WordPress.
¶ Conclusion
Congrats! This is the basic setup for WordPress, as mentioned at the beginning we have a more in-depth course available at TrueFreedomTech.com.